Sending your products to Amazon is the first step in using its powerful Fulfillment by Amazon (FBA) service. In simple terms, you prepare, pack, and ship your inventory to an Amazon fulfillment center. Once it arrives, Amazon takes over storage, picking, packing, customer shipping, returns, and even customer service.
This one move gets your products the Prime badge, a huge driver for sales on the platform.
Your First Amazon FBA Shipment: What to Expect
Before taping up a box, it’s important to understand what you’re doing. Signing up for FBA isn't just a shipping choice; you're connecting your business to Amazon's massive logistics network. This lets you focus on sourcing and marketing products while Amazon handles the order fulfillment.
The numbers don't lie. As of 2025, the Amazon marketplace is home to 9.7 million registered sellers globally, with about 2.5 million actively selling. A significant 82% of these sellers use FBA to streamline operations and reach a wider customer base.
Why FBA is the Right Choice for Most Sellers
For new sellers, the benefits of FBA are clear and immediate. Here’s what you get when you send your inventory to an Amazon warehouse:
Prime Eligibility: Your products automatically qualify for Amazon Prime's free two-day shipping. Many shoppers filter for Prime-only products.
Built-In Customer Trust: Seeing "Fulfilled by Amazon" gives shoppers confidence. They trust the delivery speed and know the customer service will be reliable.
Hands-Off Operations: You don't have to worry about storing inventory, packing boxes late at night, or handling returns. Amazon's fulfillment network does it all.
Easy Scalability: FBA allows you to grow your sales without needing to hire more staff or lease warehouse space.
Getting the first shipment right is critical. It sets the stage for future success. Small mistakes in preparation or labeling can cause delays, extra fees, or even lead to your entire shipment being rejected.
To learn more about how the service works, our guide on what is Amazon FBA covers the fundamentals.
FBA vs. FBM: Key Differences
When you sell on Amazon, you can choose between FBA (Fulfillment by Amazon) and FBM (Fulfillment by Merchant). The right choice depends on your business model and resources. Here’s a quick comparison.
| Feature | Fulfillment by Amazon (FBA) | Fulfillment by Merchant (FBM) |
|---|---|---|
| Order Fulfillment | Amazon handles storage, packing, and shipping. | You are responsible for all fulfillment tasks. |
| Prime Eligibility | Automatic, giving you access to Prime members. | Possible through Seller Fulfilled Prime (SFP), but with strict requirements. |
| Customer Service | Amazon manages customer inquiries and returns. | You handle all customer communication and returns. |
| Storage Fees | You pay monthly fees based on inventory volume and duration. | You manage your own storage, incurring costs for space and staff. |
| Control | Less control over inventory and packaging presentation. | Full control over your inventory, packing, and branding. |
| Scalability | Easy to scale as Amazon's network handles increased volume. | Scaling requires more space, staff, and resources on your end. |
For most new sellers, FBA is the best option because it handles the most complex parts of an eCommerce business. However, FBM might be a better fit if you sell large, heavy, or slow-moving items, or if you already have a fulfillment operation.
A Step-by-Step Guide to Creating a Shipping Plan
Once your products are prepped, it's time to inform Amazon about your incoming shipment. This is done through a "shipping plan" in your Seller Central account. The Send to Amazon workflow guides you through this process. Getting it right is essential to avoid delays and extra fees.
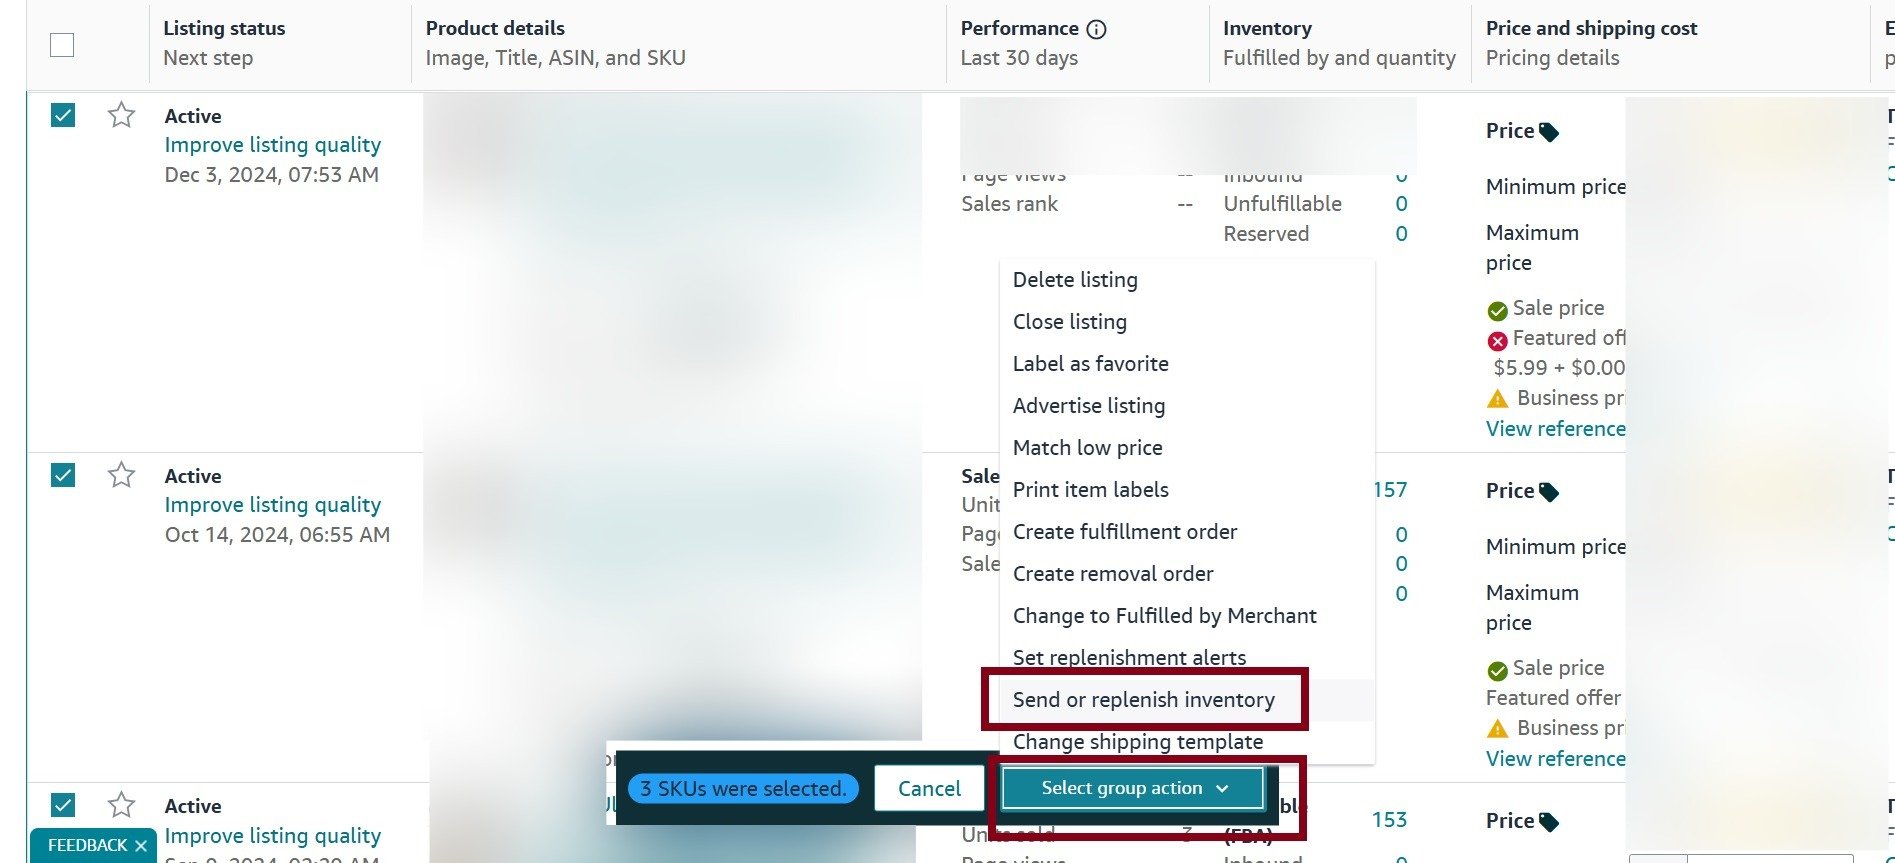
Step 1: Select Inventory to Send
To start, go to the Manage Inventory page in Seller Central. Select the checkboxes next to the SKUs you want to ship, and from the dropdown menu, choose Send/replenish inventory. This will launch the workflow.
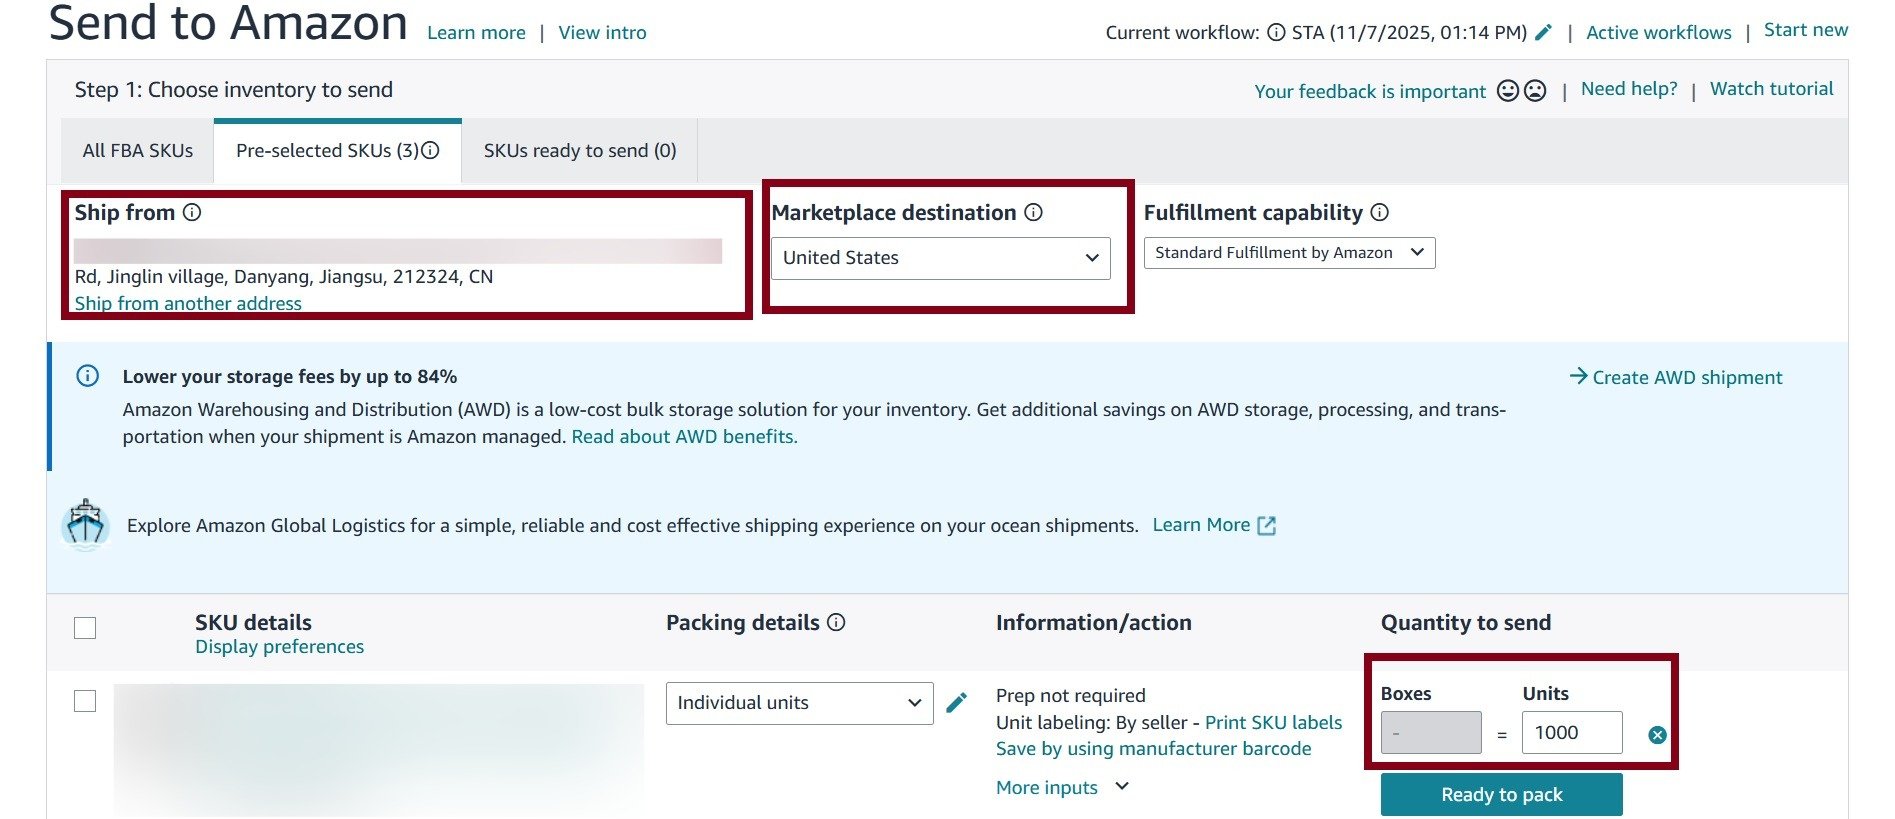
On this first screen, you'll confirm your ship-from address, select the marketplace destination, and enter the number of units for each SKU you are sending and click on 'Ready to Pack'. Make sure the ship-from address is accurate, as Amazon uses it to calculate your shipping costs.
For a broader look at getting your business started, our guide on how to start an ecommerce business on Amazon provides a comprehensive overview.
Step 2: Pack Your Units
Next, Amazon needs to know how everything is packed. You'll provide box content information by choosing one of two options:
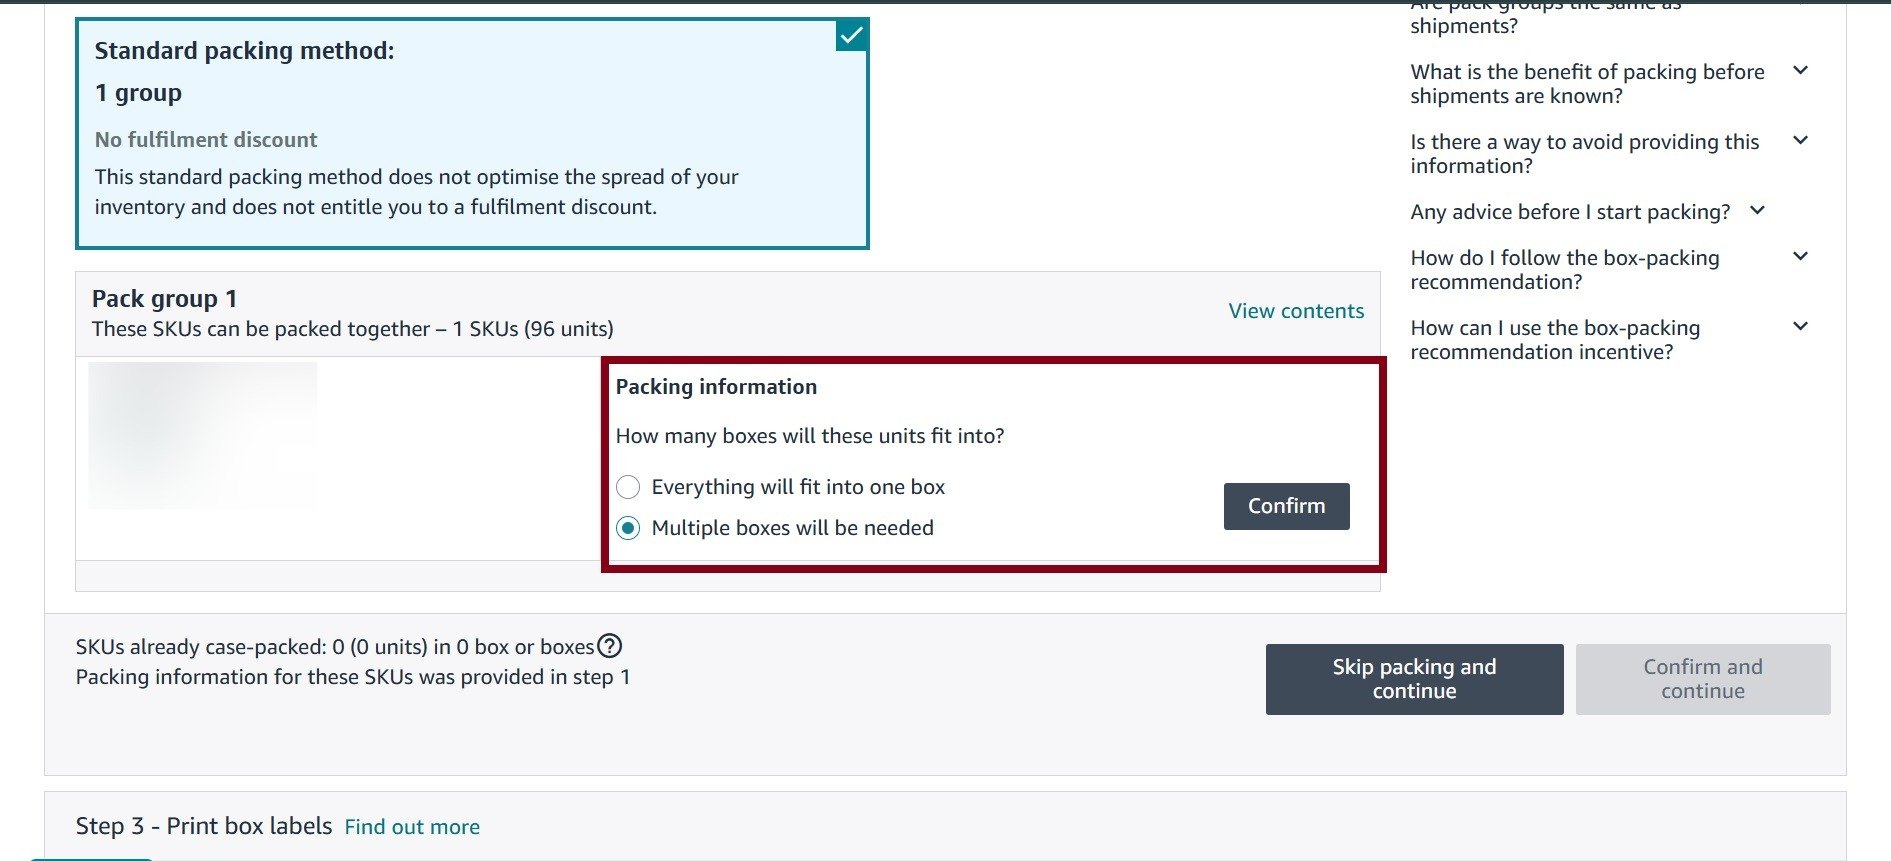
Everything will fit into one box: For small shipments consolidated into a single master carton.
Multiple boxes will be needed: For larger shipments or mixed SKUs across several boxes.
If you’re sending multiple boxes, specify if they are single-SKU boxes (case packs) or if they contain mixed products. To save time on future shipments, you can create case pack templates that pre-fill box dimensions, weight, and prep details.
Always use a scale and tape measure for accurate box dimensions and weight. Amazon’s systems rely on this data. A common mistake is ignoring the strict box limits: no box can weigh more than 50 lbs (unless it contains a single oversized item) or have any side longer than 25 inches.
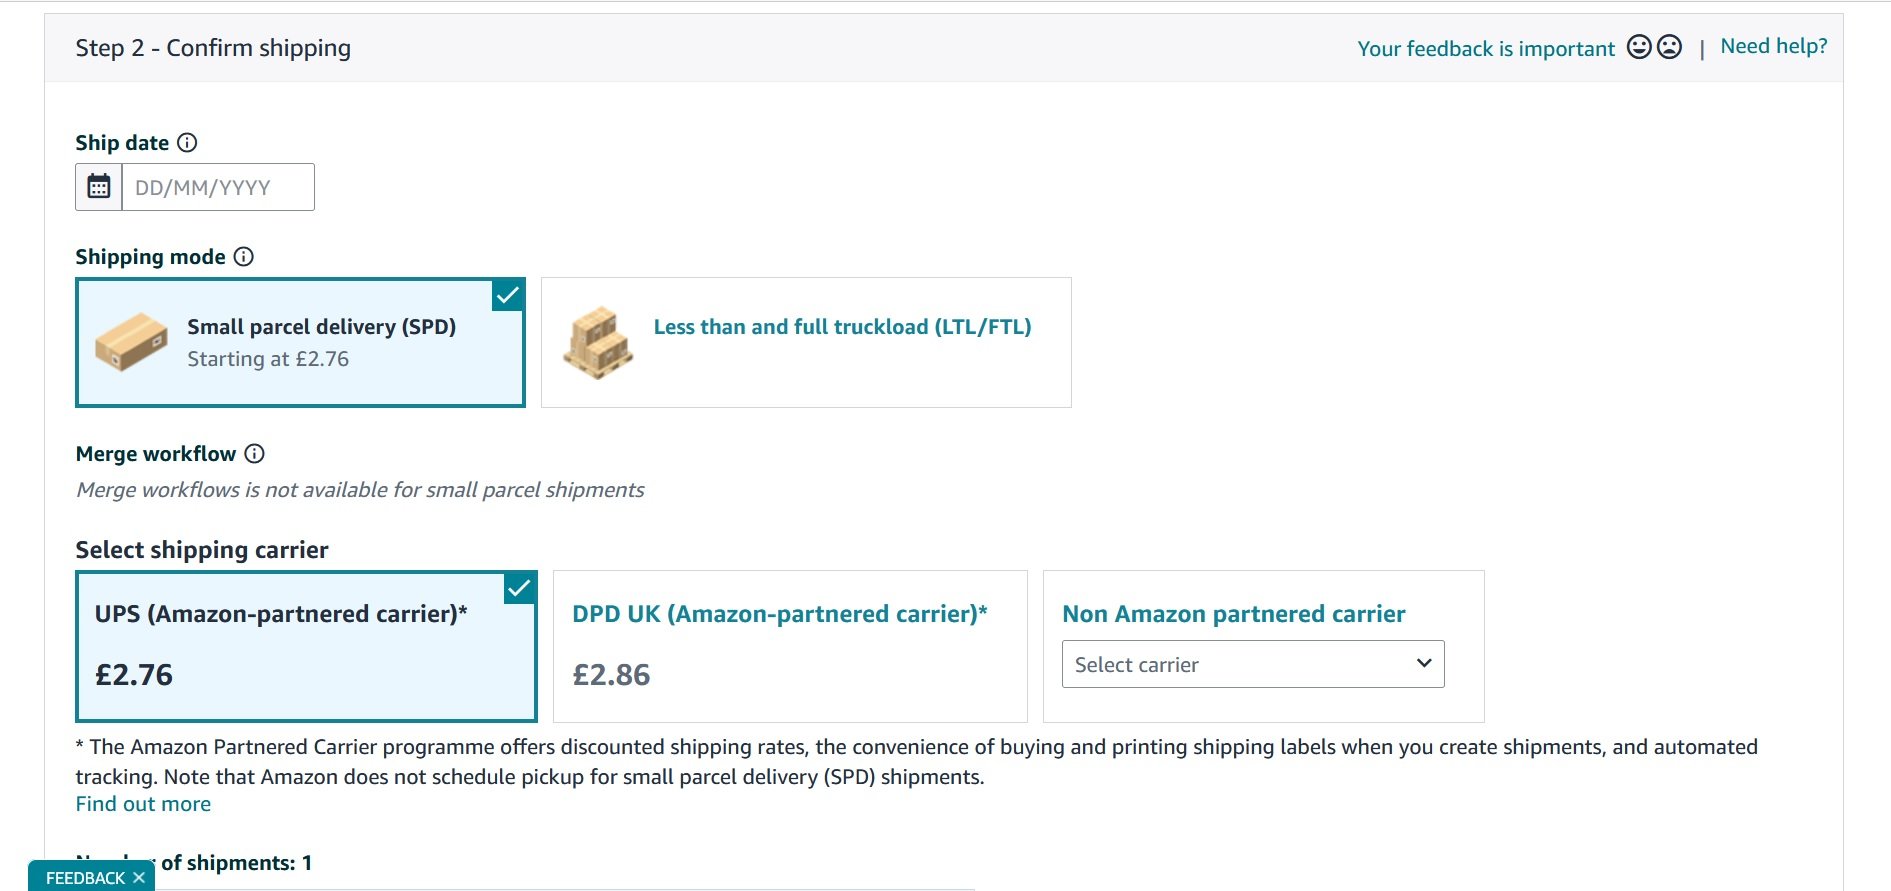
Step 3: Confirm Shipping
After entering packing details, set a ship date and choose your shipping mode: Small Parcel Delivery (SPD) for individual boxes or Less Than Truckload (LTL) for pallets. You'll also select a carrier. The Amazon Partnered Carrier program (usually UPS) offers significant discounts and is highly recommended.
The system will then calculate shipping charges. Amazon may split your shipment into multiple shipments going to different fulfillment centers to position inventory closer to customers.
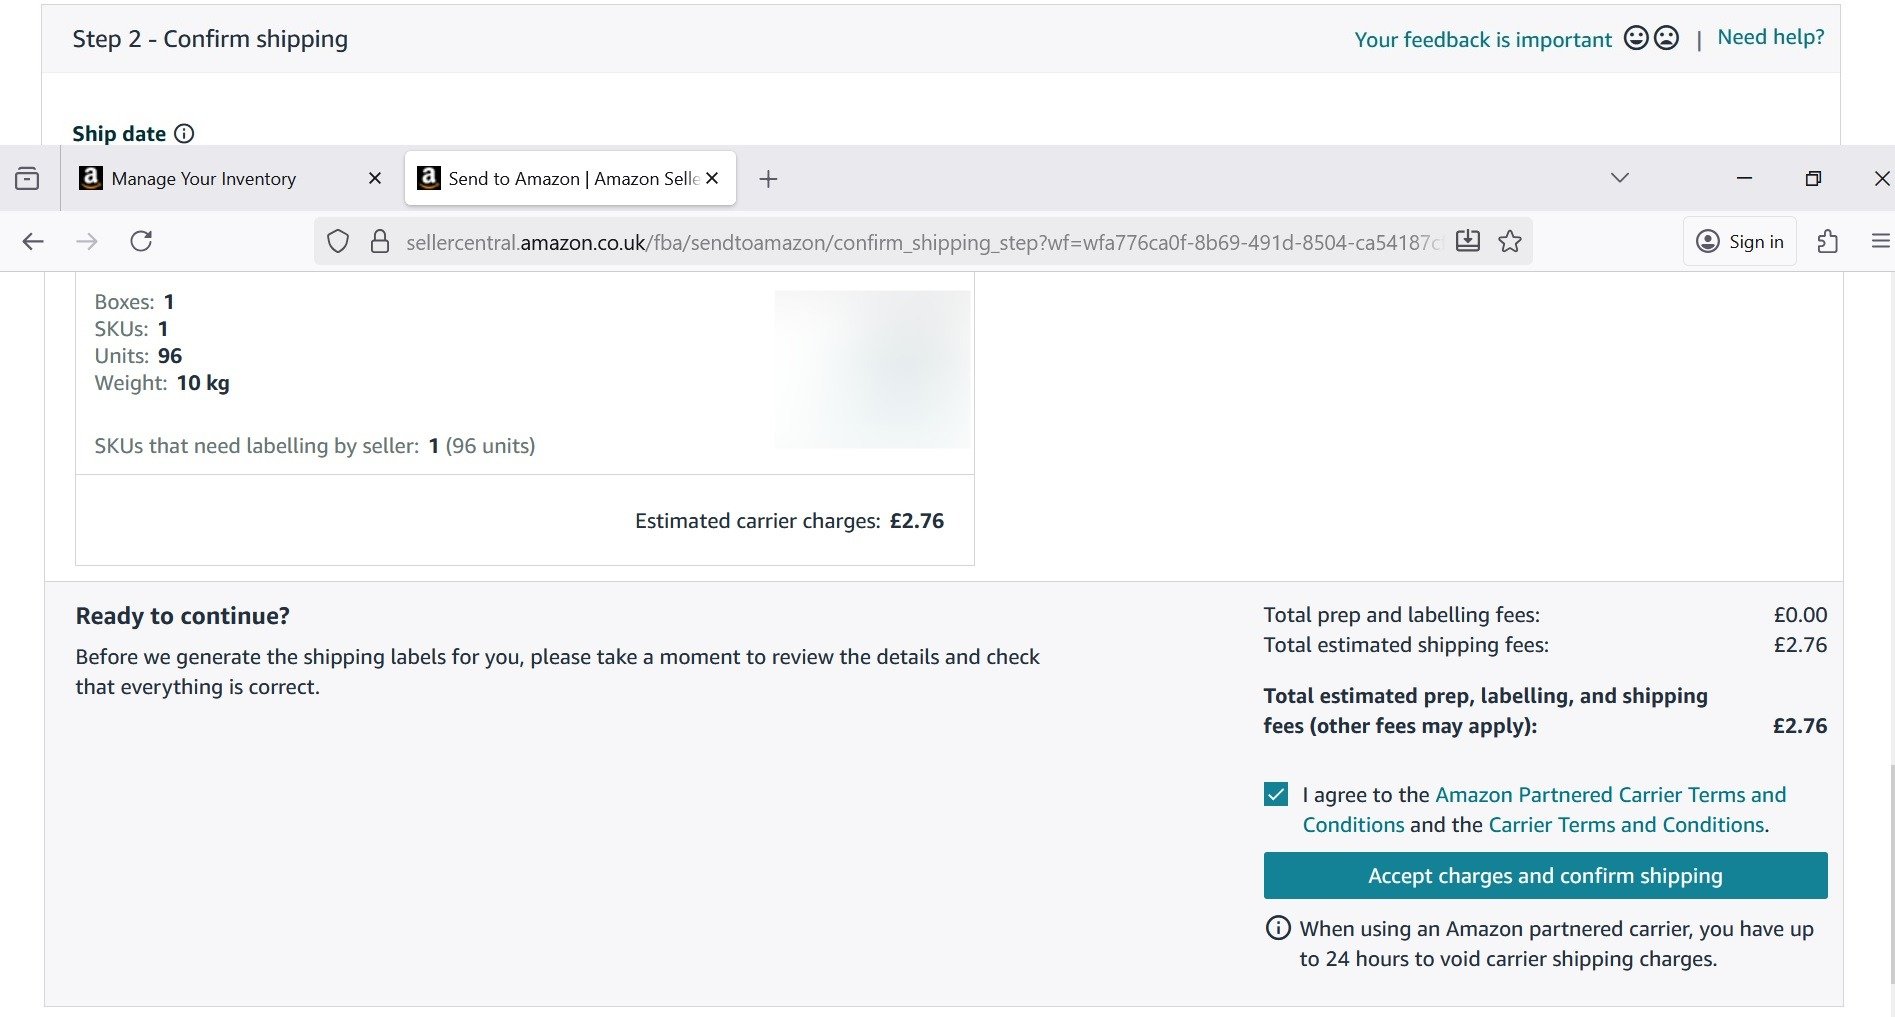
After this, select the shipping date and click on "Accept charges and confirm shipping".
Step 4: Print Box Labels
Once you accept the charges, your shipping plan is confirmed. You can now print two labels for each box:
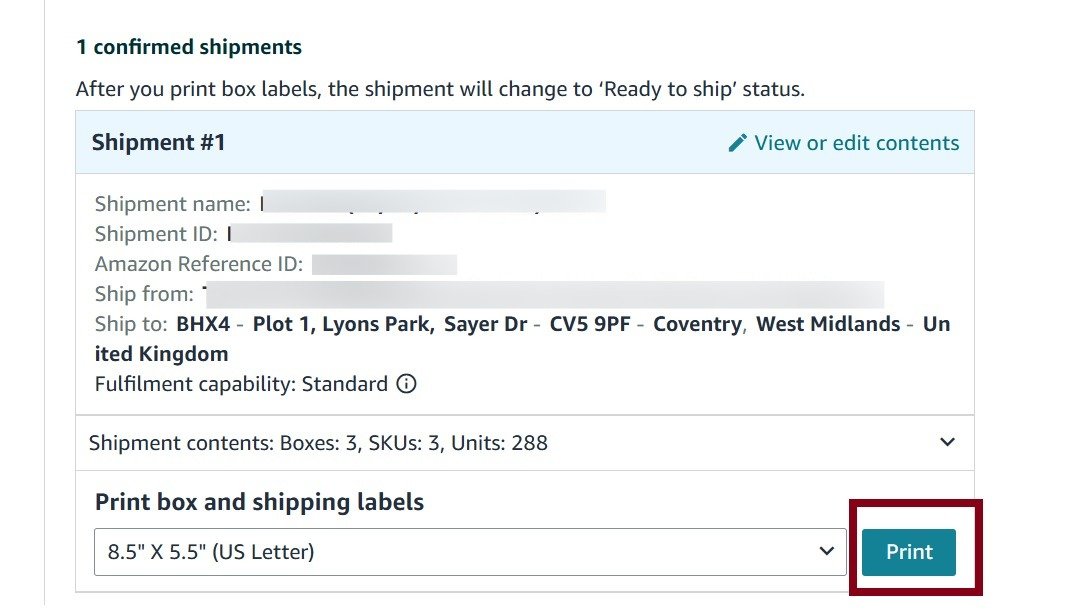
FBA Box ID Label: Amazon’s internal tracking label.
Carrier Shipping Label: The standard label from your chosen carrier (e.g., UPS).
With these labels, your shipment status in the Shipping Queue will change to Ready to send.
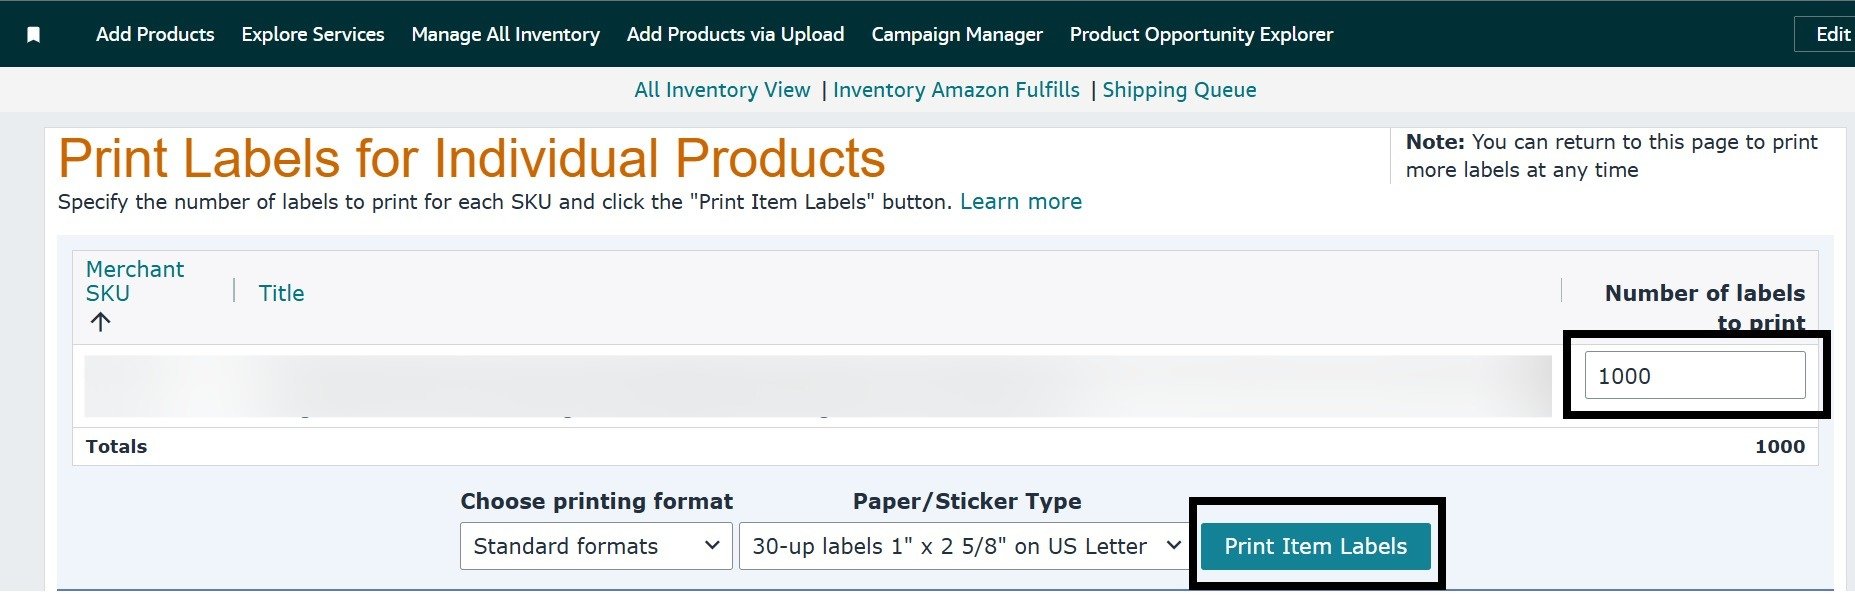
Step 5: Print Item Labels
To print item labels on Amazon products, Go to your Amazon Seller Central account. Select the inventory option and locate the specific item you want to ship.
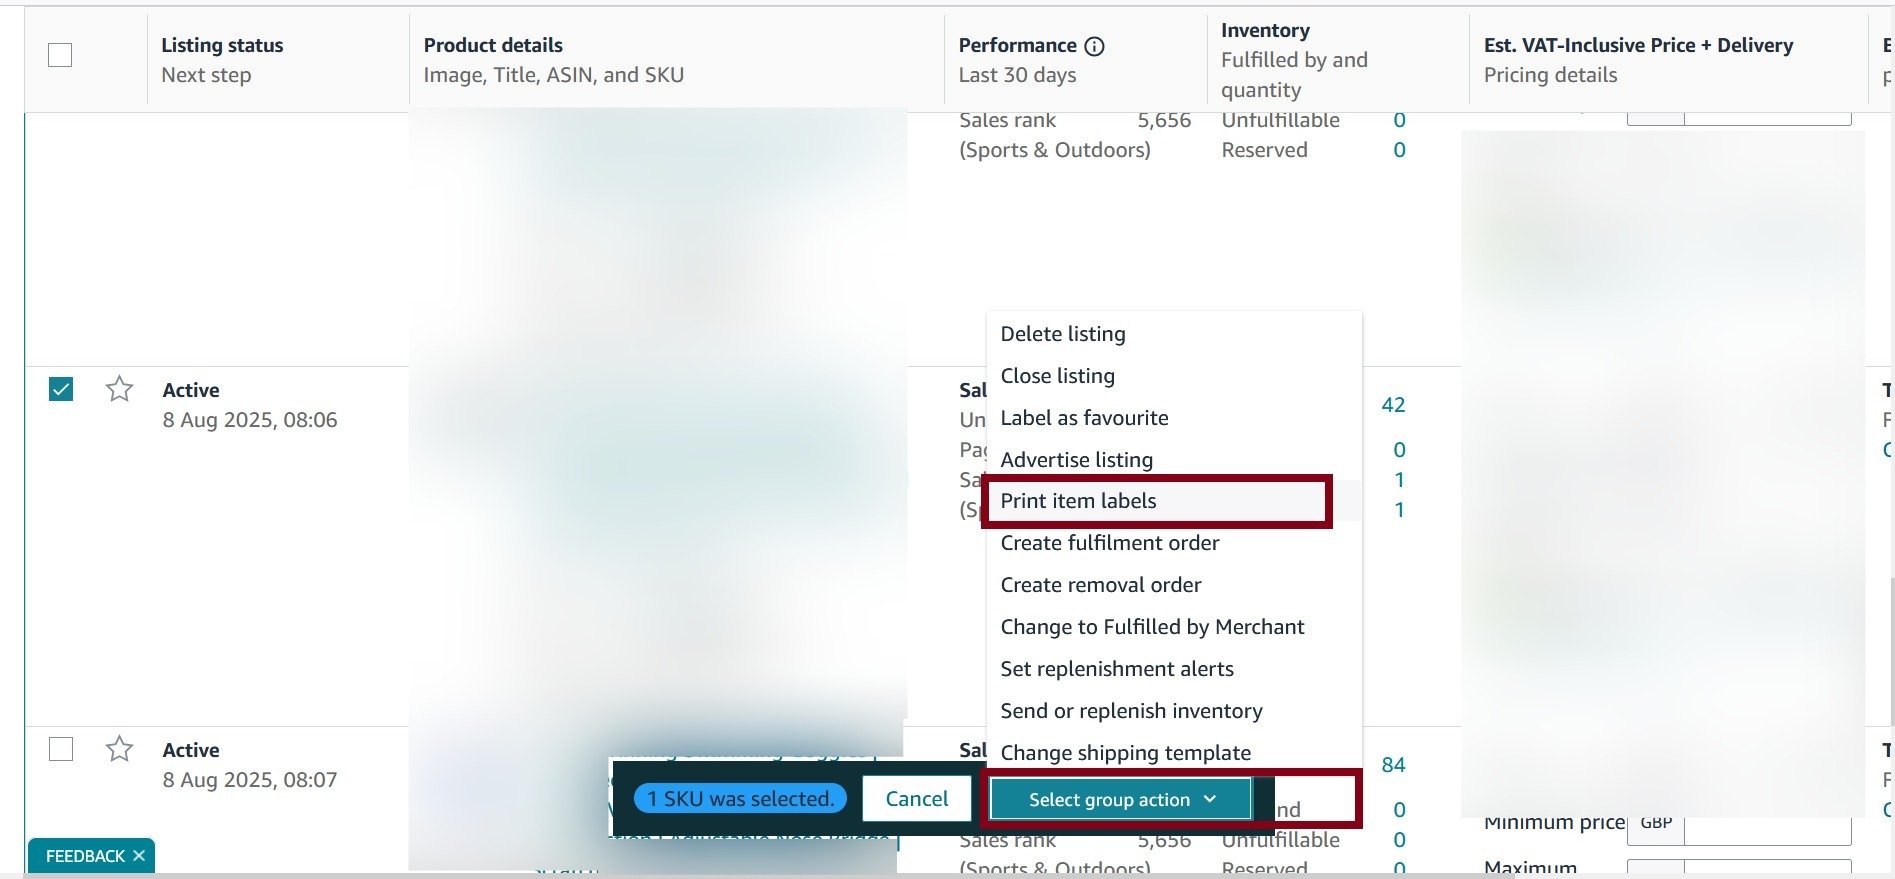
Now select the item and click on "Print Item Labels" and entre number of units you are sending and click on "Print Item Labels"
FBA Prep and Labeling Requirements

Amazon's fulfillment centers are highly automated, and this system depends on every product arriving properly prepped and labeled. Mistakes here can cause delays or result in FBA prep service fees.
Essential FBA Packaging Requirements
While different product categories have specific rules, some universal FBA prep requirements apply to most items.
Polybags: Any polybag with an opening of 5 inches or wider must have a suffocation warning. This can be printed on the bag or applied as a sticker. The bag must also be transparent and have a scannable barcode.
Bubble Wrap: Fragile items like glass or ceramics must be bubble-wrapped or placed in a protective box. The item should be able to withstand a three-foot drop test without breaking.
Liquids and Gels: Bottles need a double seal to prevent leaks. This typically means a tight lid plus a secondary safety seal or placement in a secure, transparent bag.
"Sold as a Set" Labels: If you're bundling items, you must apply a "Sold as a Set" or "This is a Set, Do Not Separate" label to the outside of the bundle.
Barcodes: FNSKU vs. UPC
Many new sellers find barcodes confusing. Most products have a standard manufacturer barcode, like a UPC (Universal Product Code) or EAN. However, Amazon uses its own internal system, the Fulfillment Network Stock Keeping Unit (FNSKU), to track FBA inventory.
You must use an FNSKU if other sellers are listing the same product. The FNSKU links your specific units to your seller account. If you rely only on the UPC, your products could be "commingled" with inventory from other sellers, which might be lower quality.
Applying professional product labels is a key part of this process. For a detailed guide, see our article on Amazon label requirements.
Packing and Shipping Your Boxes Correctly
With your shipping plan confirmed and labels printed, it’s time to pack. Proper packing and labeling are the final steps to ensure your inventory is checked in smoothly.
Every shipment must be packed in a rigid, six-sided box with all flaps intact. Amazon recommends using double-wall cardboard for better protection. The goal is for your inventory to arrive in perfect condition.
Applying Labels Correctly
Each box requires two labels: the FBA Box ID label and the carrier shipping label. Both should be placed on a single flat surface of the box, next to each other. Avoid placing them on seams, corners, or edges where they might get torn or become unreadable.
Never place labels over the box seam. If a warehouse worker opens the box, they will slice through the labels, making them unscannable and potentially delaying your shipment.
Using Approved Packing Materials
Use approved dunnage to cushion your items inside the shipping box.
What to use: Air pillows, full sheets of Kraft paper, or bubble wrap are effective and won’t interfere with Amazon's receiving equipment.
What to avoid: Do not use packing peanuts, foam strips, or shredded paper. These materials can cause problems with automated systems.
Before sealing the box, give it a gentle shake. If items are moving, you need more dunnage.
Common Mistakes to Avoid
A few common errors can cause major issues for your shipment.
Weak Boxes: Using old or flimsy boxes increases the risk of damage during transit.
Incorrect Taping: Use strong, pressure-sensitive shipping tape. The "H-taping method" (one strip down the middle seam and one across each edge) provides a secure seal.
Exceeding Limits: Remember the limits: no box over 50 lbs and no side longer than 25 inches. Violating these rules can lead to penalties or rejected shipments.
Old Labels: If you reuse boxes, completely cover or remove any old shipping labels, barcodes, or addresses to avoid confusion.
Carrier Selection and Shipping Costs
Inbound shipping costs directly affect your profit margin, so making smart choices is essential. According to a recent report, 38% of Amazon brands cited higher shipping costs as a major concern in 2025. You can find more insights in Jungle Scout’s 2025 seller report.
Amazon Partnered Carrier vs. Non-Partnered Carrier
When creating your shipping plan, you can use an Amazon Partnered Carrier (like UPS in the U.S.) or a non-partnered carrier. For most sellers, the partnered carrier program is the best option due to deeply discounted shipping rates. You pay through Seller Central, and the labels are generated for you.
SPD vs. LTL Shipping Mode
You'll also need to choose a shipping mode:
Small Parcel Delivery (SPD): For sending individual boxes. This is the standard choice for smaller shipments.
Less than Truckload (LTL): For sending boxes stacked on pallets. LTL is usually more cost-effective for shipments over 150-200 lbs.
Inbound Placement and Shipment Splitting
Amazon often splits a single shipping plan into multiple shipments headed to different fulfillment centers. This is called shipment splitting and helps position your inventory closer to customers for faster delivery.
While this can increase shipping costs, Amazon offers an Inbound Placement Service. For a per-item fee, you can send your entire shipment to a single warehouse, and Amazon will handle the distribution. When calculating how much it costs to sell on Amazon, be sure to factor in these potential inbound fees.
For international shipping, understanding trade terms like understanding DDU and DDP Incoterms is important for managing duties and other cross-border costs.
Tracking Your Shipment in the Shipping Queue
Once your carrier picks up your boxes, you can monitor their progress in the Shipping Queue in Seller Central. Understanding the different shipment statuses will help you know what's happening.
Understanding Shipment Statuses
Here’s what each status means:
In Transit: The carrier has your shipment, and it's on its way to the Amazon fulfillment center.
Delivered: The shipment has been dropped off at the warehouse's loading dock.
Checked-In: Amazon's team has moved your shipment into the receiving area.
Receiving: Warehouse staff are scanning your individual units and adding them to your available inventory.
The "Receiving" process can take time, from a few days to several weeks, especially during peak seasons. A "Delivered" status does not mean your items are available for sale.
This process is part of what makes Amazon's marketplace so efficient. Third-party sellers now account for over 60% of all sales in Amazon’s store, generating more than $2.5 trillion in sales over the last 25 years, as noted in a report on Amazon’s marketplace on amzprep.com.
If there are issues with your shipment, wait until the status is "Closed" and a "Reconcile" tab appears. Then, you can open a case to request an FBA reimbursement for lost or damaged units. For more on this, check out our guide on inventory management best practices.
Frequently Asked Questions
Here are answers to some common questions new sellers have when sending products to Amazon.
What if I Make a Mistake on My Shipping Plan?
You have a very limited window to make changes after confirming a shipment. For Amazon Partnered Carrier shipments, you can usually void the shipping charges within 24 hours.
You can't directly edit a confirmed plan. The best approach is to duplicate the plan, correct the error (like box weight or unit counts), and then create a new shipment. It's always best to double-check everything before confirming.
Can I Ship Directly from My Supplier to Amazon?
Yes, this is a common strategy, but it requires careful coordination. Your supplier must follow all of Amazon's FBA prep and labeling rules.
You will likely need to work with a freight forwarder to manage logistics and customs. Shipping under Delivered Duty Paid (DDP) terms is recommended, as it ensures all import duties and taxes are paid before the inventory reaches an Amazon warehouse. Consider hiring a third-party inspection service to check the goods before they leave the factory.
How Do I Handle Amazon Splitting My Shipment?
Shipment splitting is a normal part of the FBA process. Amazon's system automatically distributes your inventory across its fulfillment network to enable faster Prime delivery.
You can opt into the FBA Inventory Placement Service for a per-item fee to send all units of a single SKU to one warehouse. However, for many sellers, it's more cost-effective to send the smaller shipments to the multiple locations Amazon assigns.
What Is the Difference Between an FNSKU and a UPC?
A UPC is a universal product code used by retailers worldwide. An FNSKU (Fulfillment Network Stock Keeping Unit) is an internal Amazon barcode unique to your seller account.
The FNSKU links your units directly to your account, preventing your inventory from being "commingled" with another seller's stock. This protects your brand and reputation.