

High-quality product photos are important for Amazon success. 75% of online shoppers analyze product images when making purchase decisions. On Amazon, every product detail page must have at least one image. Product images act as silent salespeople as they help customers evaluate your product before buying.
In fact, Amazon warns that listings can be suppressed or blocked if they violate image policies. To avoid this, sellers must follow Amazon’s strict image guidelines. The sections below explain Amazon’s requirements and best practices in detail.
Amazon’s Official Image Guidelines
Amazon enforces uniform image rules to ensure all listings look professional.
1. Main Image
The main image (the first image shown in search results) has the strictest rules.
- It must show only the product for sale, on a pure white background (RGB 255,255,255).
- The product should fill about 85% of the image frame
- No text, logos, color blocks, watermarks or graphics may appear on a main image.
- Main image cannot include accessories or props not included with the product.
- Absolutely no watermarks, logos, slogans or even the seller’s name on a main
image. - The entire product must be visible (not cut off) . Jewelry necklaces may slightly extend beyond the frame (as noted by Amazon), but generally nothing should be cropped out.
- Use at least 1000×1000 pixels (Amazon’s current minimum for zoom). Ideally use 2000×2000 pixels (1:1 ratio) for best zoom clarity.
- The image must be an actual photograph (or appropriate illustration like a book cover). No logos, drawings, or “dummy” images.
- The photo’s product must match the title and description.
In short, the main shot should be a “clean mugshot” of the item, nothing extra.
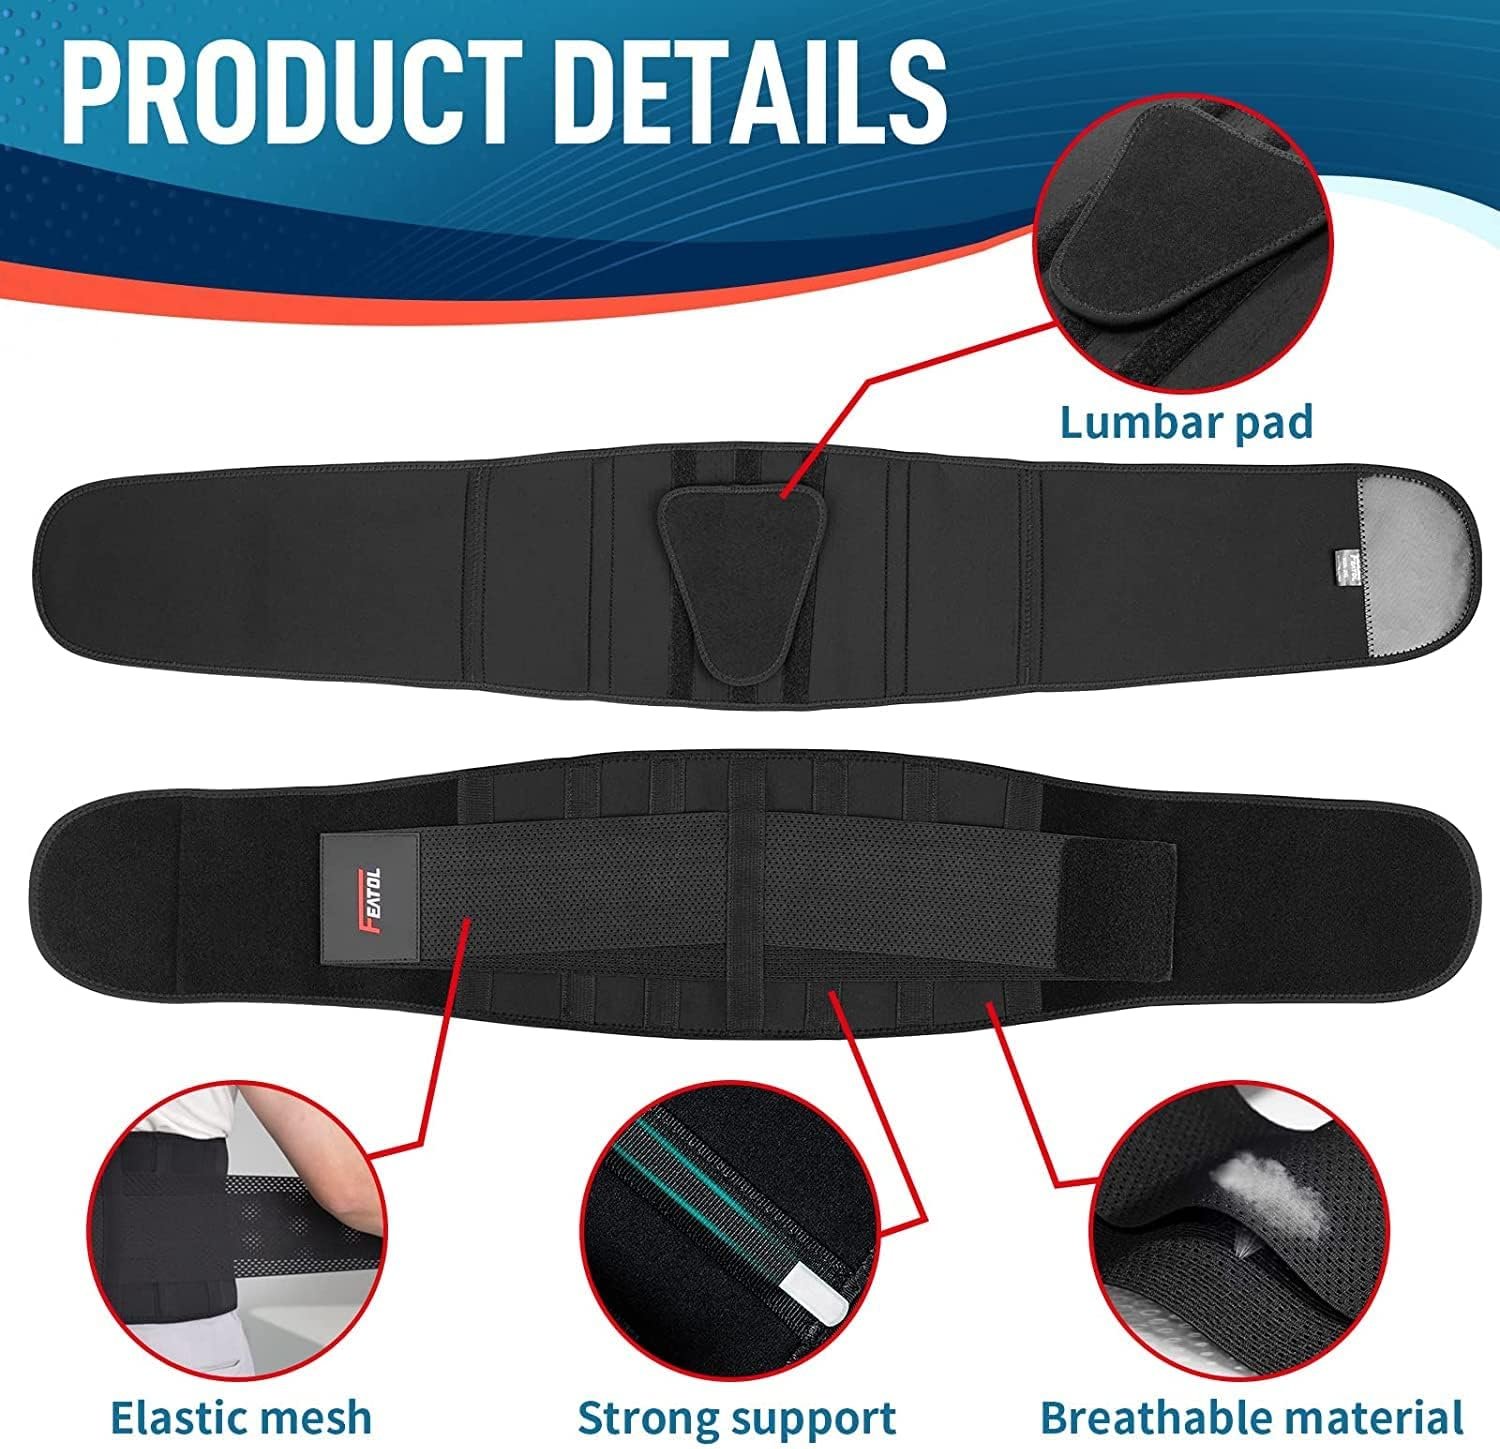
2. Secondary Images
In addition to the main image, you can (and should) add supplemental images. Amazon allows up to 8 additional images per listing (or 7 if you include one product video). Use these slots fully. The more high-quality images you have, the more information customers get. Amazon itself suggests including lifestyle shots, infographics, and various angles to “build buyer confidence”.
Lifestyle images: Show the product in use or in context (e.g. a backpack being worn, a kitchen gadget in a real kitchen). These help buyers visualize using the product.
Different angles & features: Provide front, back, side, bottom, top views. Include close-ups of important details (e.g. stitching, buttons, texture, display).
Size/Scale references: Images with a model, hand, ruler or common object for scale help customers understand dimensions.
Infographics/text callouts: You can safely add text or graphics to secondary images only. For instance, you can overlay lines/dimensions or highlight special features with callouts. (Keep text minimal and legible.)
Color/style swatches: If the product comes in multiple colors or patterns, show each variant separately, or include a single image with a color swatch chart.
Packaging: It’s often helpful to show the retail packaging or multi-pack layout in a secondary image, especially if the box design is distinctive.
Instructions/use cases: If the product requires assembly or has multiple steps, a photo of the manual or a step in use can be useful.
3. All Images Guidelines
Amazon’s official guidelines cover all images (main and secondary) as well. Here are key Amazon image requirements below:
Image content: Photos must accurately represent the product . No suggestive or offensive content is allowed . Avoid nudity or sexual content, as well as any misleading content.
File type: Accepted formats are JPEG (.jpg/.jpeg), TIFF (.tif), PNG (.png), or non-animated GIF (.gif) . JPEG is strongly recommended for its quality and small file size. (Amazon’s servers do not support animated GIFs.)
File size and dimensions: Image files must be at least 500 pixels on the longest side (this is the bare minimum to display) and no larger than 10,000 pixels on the longest side. However,
Amazon recommends ≥1,600 pixels on the longest side so that the zoom feature works properly. Also, keep each file under 10 MB to ensure upload compatibility.
Image quality: Photos must be sharp, in focus, and properly lit . Blurry, pixelated or “jagged” images are not allowed. Ensure correct exposure and color accuracy, misleading or overly edited images can lead to returns.
Background: Besides the main image’s strict white background rule, all other images should
also avoid distracting backgrounds. Keep additional shots simple or contextually relevant, but
the focus must remain on the product.
No logos or text: Except for the product itself, images cannot display any logos, trademarks,
special badges, or text overlays (like “Best Seller” or coupons). This rule applies especially to the main image. Secondary images may include small textual info (e.g. dimensional
callouts), but it must not cover the product.
Product packaging: The main image must show the product outside of its packaging.
(Boxes or cases can only appear if they are a key part of the product.) In additional images, you
can show packaging or product in box if it helps understanding.
Single unit: Each image should contain only one unit of the product. Do not show multiple copiesof the same item in one shot. (If selling multipacks, use separate images or appropriate
labeling.)
Technically, the minimum resolution in Amazon images is 1000 pixels on the longest side to enable the zoom feature, but always go bigger. Aim for 2000 x 2000 pixels for much better clarity, which is critical when you consider that over 70% of Amazon shoppers browse on mobile devices. You can dig into more of these updated standards and why they matter for mobile shoppers on flapen.com.
4. Main Image Category Rules
Some Amazon categories have extra rules for main images. For instance:
Clothing: Adult apparel (men’s/women’s) main images must be worn by a human model. Children’s clothing must be shown flat (off-model). Do not use mannequins (except clear mannequins for non-human objects, or as specified).
Shoes & Accessories: Show only a single shoe at a 45° angle (facing left). Bags and wallets should be on plain backgrounds (models are optional for accessories if wearing them helps sell).
Jewelry: Necklaces can be partially cut off due to framing (permitted by Amazon), but otherwise follow the same rules (white background, no extra props).
Electronics: Always remove items from packaging for the main shot. E.g., a video game disk
should be out of its box, a phone out of its case, etc. (You may show the closed box in a secondary image, but not as the main).
Using a variety of images not only educates customers but can boost conversion rate. Amazon allows you to get creative here. for example, split infographics, step-by-step photos, or even a photo series illustrating “before vs after” can all live in the additional images. Just remember: any text or branding belongs only on secondary images, not the main one.
Technical Specifications
Amazon has clear technical specs to ensure images display and zoom properly. Below are the technical specifications by Amazon.
1. Resolution & Zoom
The main image and others should be at least 1000 pixels on the longest side. Amazon recommends 1,600–2,000 pixels to activate the zoom feature (which enhances sales). The common aspect ratio is 1:1 (square), and many top listings use 2000×2000 px. Don’t exceed 10,000 px on the longest side, as Amazon will reject oversize files.
2. File Size
Keep each image file under 10 MB. Large images may not upload properly.
3. Formats
Save images in one of the accepted formats – JPEG (.jpg/.jpeg) is preferred for its balance of quality and size. Amazon also accepts TIFF (.tif), GIF (.gif) (non-animated), or PNG (.png). Make sure the file extension matches the format (e.g. a JPEG file ends in “.jpg”).
4. Color Mode
Use sRGB color profile when editing and saving images. This is the standard for web images. (Amazon also accepts CMYK, but sRGB is safest.) A true pure white background should have RGB values (255,255,255).
5. Compression
Don’t over-compress your images. Use minimal compression to avoid artifacts. If using high-quality formats (TIFF/PNG), Amazon allows lossless images.
6. DPI
While Amazon doesn’t enforce a DPI (dots per inch) standard, saving your images at 72 DPI or higher is recommended to ensure clarity on most screens.
7. Alt Text
On Amazon, the standard listing images don’t have visible alt text. However, if you use A+ Content (Enhanced Brand Content), Amazon allows alt text on those images. Alt text isn’t visible to shoppers, but it helps SEO and accessibility. As a best practice, use clear, concise descriptions with one or two keywords (e.g. “silver stainless steel travel mug, 16 oz”) when alt text is available.
Slot-by-Slot Image Strategy for Secondary Images
A common mistakes sellers make is uploading six slightly different angles of the same product. It’s better than nothing, but it doesn’t do any real selling. A
much smarter approach is to treat each slot like a slide in a pitch deck, with each one tackling a specific job. Here’s a proven flow that works for just about any product out there:
Slot 1: Main Image
Your main image plays the biggest role in driving CTR on Amazon. A well-designed main image can grab attention within seconds. Our detailed guide on Amazon main image covers 16 ways to style your main image to boost CTR.
Slot 2: Key Features & Benefits (Infographic)
Use your second image to spotlight the top 3-5 features. But don’t just list them; show them. Use crisp text callouts and simple icons to explain why they matter to the customer. If your coffee maker has a “quick brew” feature, a photo with a clock icon and the text “Hot Coffee in 60 Seconds” is way more compelling than another plain shot of the machine.
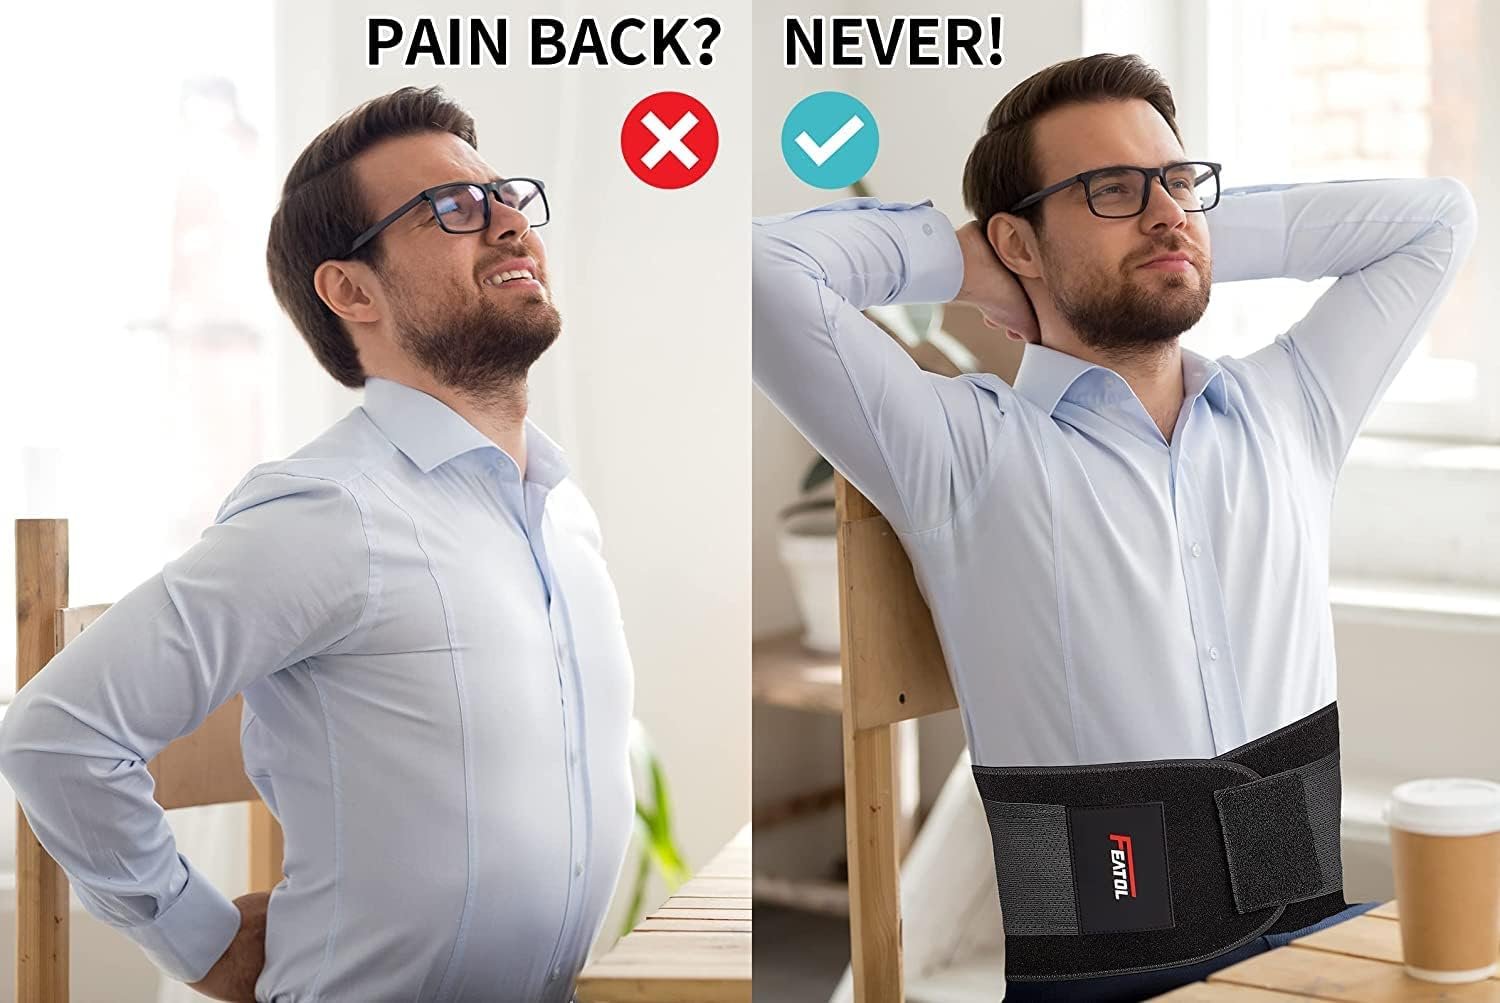
2. Slot 3: Product in Use (Lifestyle)
This is where you bring your product to life. Show it in a real-world setting. A shot of your yoga mat being used in a bright, sunlit studio helps the customer picture themselves using it. This isn’t just about showing the product; it’s about building an emotional connection and demonstrating its value in a tangible way.
3. Slot 4: Scale and Dimensions (Infographic)
One of the biggest drivers for returns is when a product is “smaller or larger than expected.” Head this problem off at the pass with a simple graphic showing the product’s exact dimensions. Even better, show it next to a common, everyday object for a crystal-clear sense of scale, like placing a new wallet next to a smartphone.
4. Slot 5: Different Angles or Detail Shots
Now you can bring in those other product angles. This slot is perfect for highlighting the little things that signal quality, like the texture of a fabric, the stitching on a seam, or the ports on an electronic device. Use close-up, zoomed-in shots to convey craftsmanship.

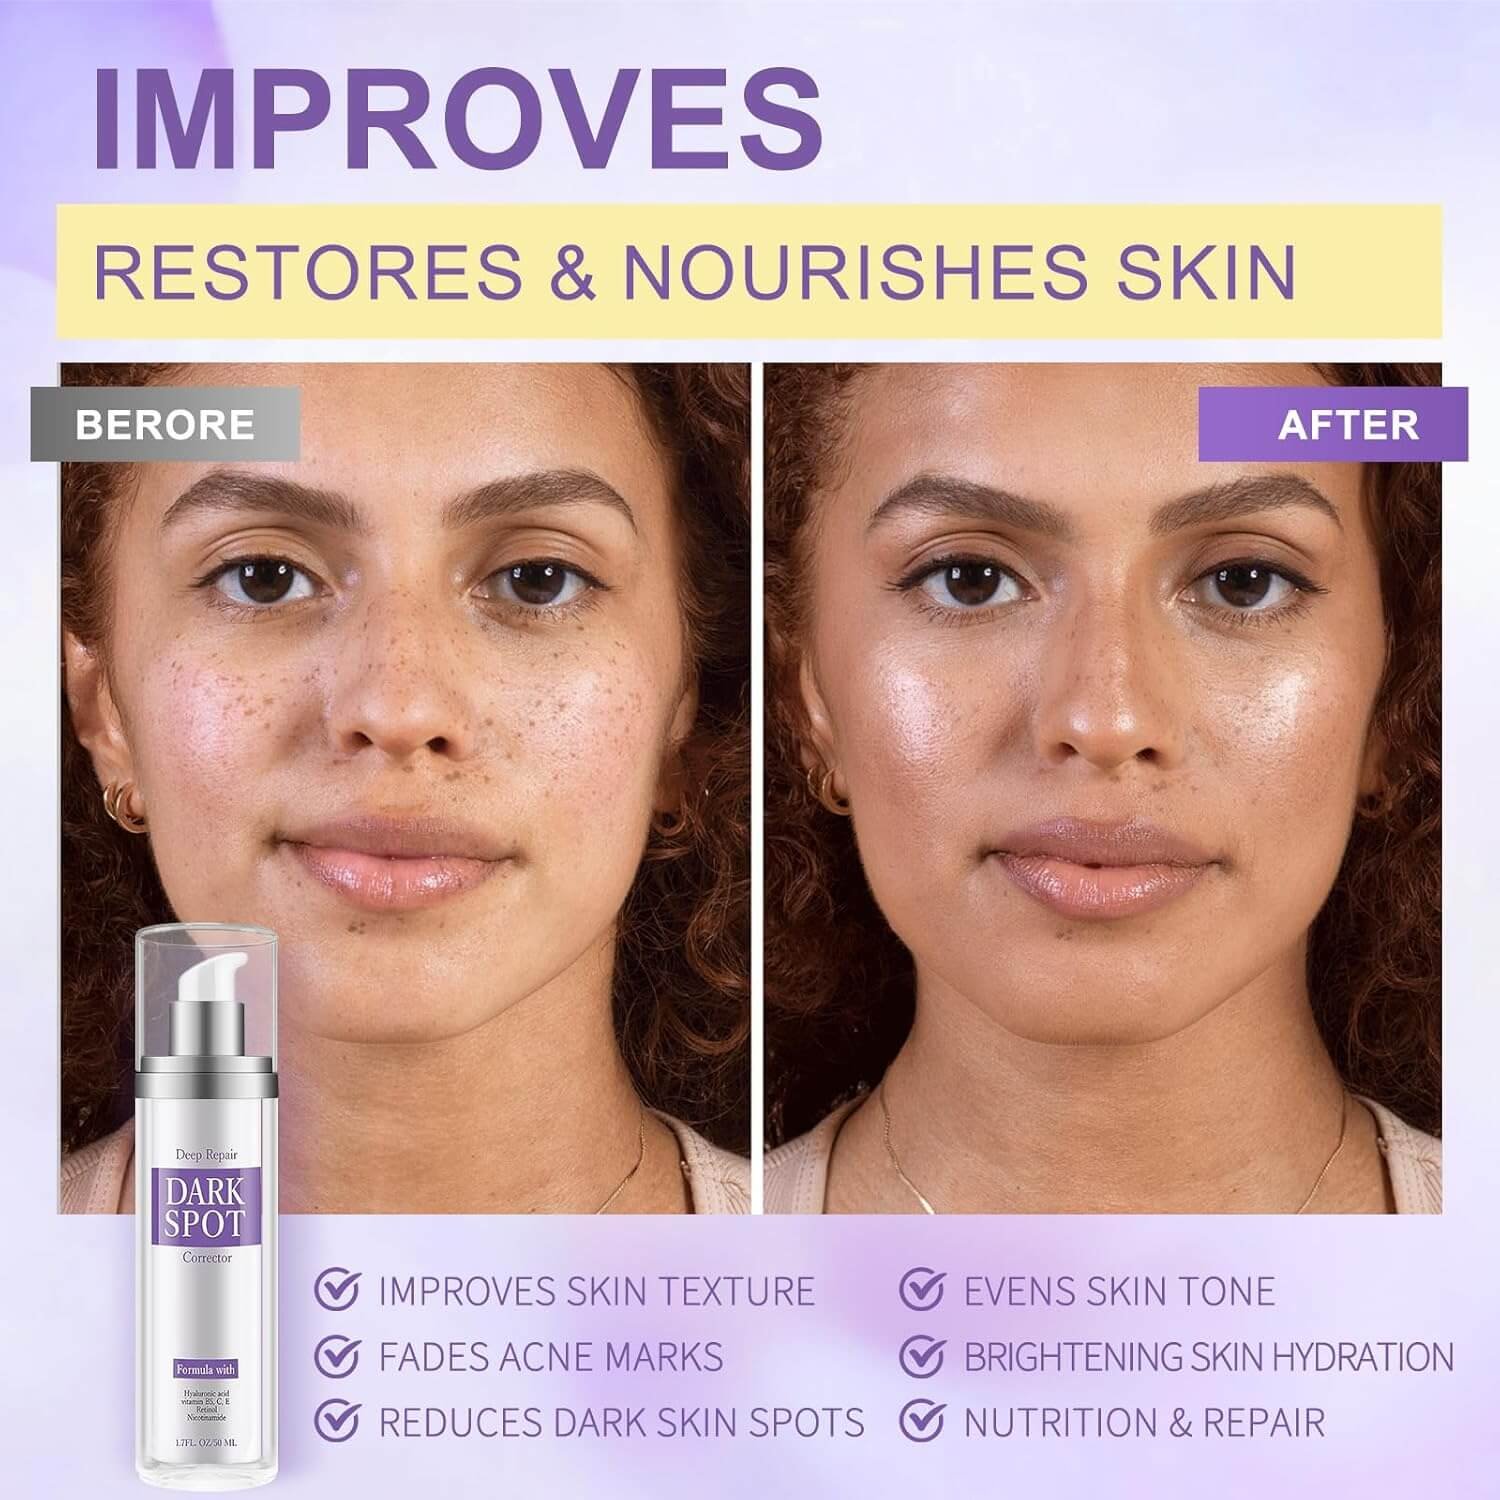
5. Slot 6: Before & After or Social Proof
Show the transformation. For a skincare product, this is the classic before-and-after shot. For a kitchen gadget, it might be a messy counter versus a perfectly organized one. You can also use this space for a graphic featuring a powerful quote from a 5-star review. It’s the visual equivalent of a glowing testimonial.
This kind of structured approach helps you build a compelling visual argument for your product. It’s an essential part of learning how to list products on Amazon the right way. A killer set of secondary images anticipates customer questions and answers them visually, smoothing out the path to purchase and increasing your conversion rate.
Best Practices for Amazon Images
Beyond compliance, optimizing images can lift your listing’s performance. Here are some additional tips:
1. Use All Image Slots
Upload the maximum number of images Amazon allows. This provides more information and reduces purchase uncertainty. Consider uploading at least 6–7 images plus a video if you can.
2. Consistency
Keep a uniform style across images. Similar lighting, background, and framing give your listing a cohesive, professional look. This also helps brand recognition if you sell multiple products.
3. Highlight Key Features
Use secondary images to emphasize unique selling points – for example, show the inside of a bag, the sole of a shoe, or a close-up of fabric texture. Infographics and annotation images (with labels or pointers) can clarify size, capacity, or special features.
4. Size and Scale
If size is a concern, include a comparison shot (product next to a common object or with measurements). Customers appreciate seeing scale, it can reduce returns due to misunderstanding.
5. Professional Quality
If possible, use a good camera and tripod. Mobile phones can work, but ensure the images are high-resolution and well-composed. Blurry handheld shots should be avoided. Investing in a proper photoshoot (or hiring a pro) often pays off in conversion rate.
6. Mobile-Friendly
Many shoppers use Amazon on phones. Ensure that your images (especially infographics) remain legible on small screens. Keep overlaid text to large, readable fonts.
7. A/B Testing
Use Amazon’s Manage Your Experiments tool (for Brand Registered sellers) to test which images drive more sales. Even swapping out the main image or trying different infographics can yield insights.
Questions and Answers
Can I Use PNG Files for My Product Images?
You sure can. Amazon’s system officially takes JPEG, PNG, TIFF, and GIF files, so you have options. Most sellers stick with JPEG because it hits that sweet spot between great quality and a small file size, which is exactly what you want.
But PNGs definitely have their place. They’re perfect when you need a transparent background, say for an infographic or a specific lifestyle shot. Just remember, that’s a no-go for your main image. For that all-important hero shot, a high-quality JPEG is almost always your safest and best bet.
What Happens if My Images Are a Few Pixels Off?
Honestly, just don’t do it. While the system might, and that’s a big might, accept an image that’s 998px instead of the required 1000px, you’re playing with fire. The biggest risk is that Amazon will disable the zoom function on your listing.
That zoom feature is absolutely critical for shoppers who want a closer look, and without it, you can bet your conversion rate will take a nosedive. My advice? Always aim to meet or, better yet, exceed the minimums. A square 2000 x 2000 pixel image is a rock-solid standard that keeps everything looking sharp and guarantees that zoom works flawlessly.
Why Is My Listing Suppressed if My Main Image Has a White Background?
This one is maddeningly common, and I feel your pain. If your listing gets slapped with a suppression and you’re staring at a background that looks perfectly white, the problem is almost certainly that it isn’t pure white. Amazon’s bots are incredibly picky and are programmed to look for one exact color value: RGB (255, 255, 255).
Even a hint of off-white or a very light gray can trigger the bots and get your listing pulled. The easiest way to check is to pop the image into an editing tool and use the eyedropper to check the color value. If it’s anything other than pure white, you’ll need to fix it and re-upload to clear the suppression.