Creating an Amazon Storefront gives your brand a custom, multi-page destination on Amazon that can imporove sales and brand awareness. According to Amazon’s internal data, shoppers who visit a storefront buy 53.9% more frequently and have a 71.3% higher average order value compared to those who don’t.
When customers land on your product detail page, they can access your store directly through the store name displayed below the product title. This allows shoppers to easily explore your full range of products, view curated collections, and discover your best-selling items, boosting sales and increasing the average order value (AOV).

In other words, a well-built Storefront can turn casual browsers into loyal customers. In this article we’ll cover everything you need create and optimize your Store.
Why Amazon Storefronts Matter
Amazon Storefront gives your brand a dedicated space on Amazon, making it easy for customers to discover and browse your products. Here are some of the benefits of having Amazon store.
1. Higher Conversions & Sales
Storefront visitors are much more likely to buy. Amazon reports a 53.9% higher purchase frequency, 52.1% higher add-to-cart rate, and 71.3% higher average order value for customers who visit a Storefront.
In practice, this means a dedicated Storefront can directly boost your revenue per visitor. When buyers stay on your branded page, they see more of your products and messaging in a distraction-free environment instead of getting pulled into other products or competitors.
2. Full Brand Control
Your Storefront is your corner of Amazon. Shoppers who click your brand name (below the product title) or a Sponsored Brands ad can land here, seeing only your products. No competitor ads or unrelated listings will appear on these pages.
You can use images, infographics, and video to tell your brand story and showcase products exactly as you want. This creative freedom lets you build recognition and trust: for example, you might use lifestyle images to illustrate your values or infographics to highlight features.
3. Custom Shopping Experience
If you have different product lines (say, kitchen appliances vs cookware), you can create separate subpages or categories within your Store. Up to three levels of pages are allowed.
For example, a home page could link to subpages like “Coffee Makers” or “Air Fryers,” each with its own products and banner. This helps shoppers find what they want without jumping between search results. In a large or niche catalog, giving customers a curated journey through your best items or new arrivals can boost engagement and sales.

4. Marketing Campaigns
Your Store has a unique Amazon URL (like amazon.com/stores/ YourBrand ). You can drive external traffic there via ads or social media. For instance, link your Instagram bio or TikTok ads directly to your Store instead of a single product. You can also use Amazon’s Sponsored Brands ad format to send traffic to your Store.
If you optimize store for SEO, it can even appear in Google search results. In fact, entering a smart meta description and page title helps: the Store’s home page has a meta description field that Google can index.
5. Built-In Store Insights
Amazon provides a Store Insights dashboard showing where your visitors come from, how they navigate pages, and how many sales each page drives. You can use this data to see which pages or products resonate.
For example, if your “Best Sellers” page gets lots of views and sales, you might double down on it in ads. If a page lags, try rearranging its content or swapping images. In short, you get concrete metrics to optimize your Store continuously.

Prerequisites for Creating Your Storefront
Before you can build a Storefront, make sure you meet these requirements and have key assets ready:
1. Professional Selling Plan
You must have Amazon professional account. (The Individual plan does not qualify.) The Professional plan costs a monthly fee, but gives you full selling tools including the Store builder. If you only have an Individual account, upgrade in Seller Central.
2. Amazon Brand Registry Enrollment
You need an active brand enrolled in Amazon Brand Registry. This requires a registered trademark for your brand’s name or logo. Brand Registry is free to join once you have a trademark.
3. Quality Brand Assets
Have your brand logo file ready (Amazon recommends at least 400×400 pixels). Also prepare any hero/banner images, product photos, or videos you want to use.
Use high-resolution, product-focused images (e.g. at least 1280px width for banners) and no promotional text or external URLs in images.
Remember, the Store gives you more visual space than a single listing image, so custom creative can make a big impact .
4. Product Listings
Although the Store builder can create a blank page, typically you’ll link to actual products. That means your brand’s products should already exist in Amazon’s catalog.
You can add products to your Store by ASIN via the builder. If a product isn’t listed yet, create a listing in Seller Central first. You don’t need a minimum number of products to start, but having a handful of key items ready will let you build a more compelling Store.
How to Create Amazon Store: Step-by-Step Process
Amazon’s Store Builder is a drag-and-drop, self-service tool in Seller Central. Below are the main steps to set up your Storefront.
1. Access the Amazon Store Builder
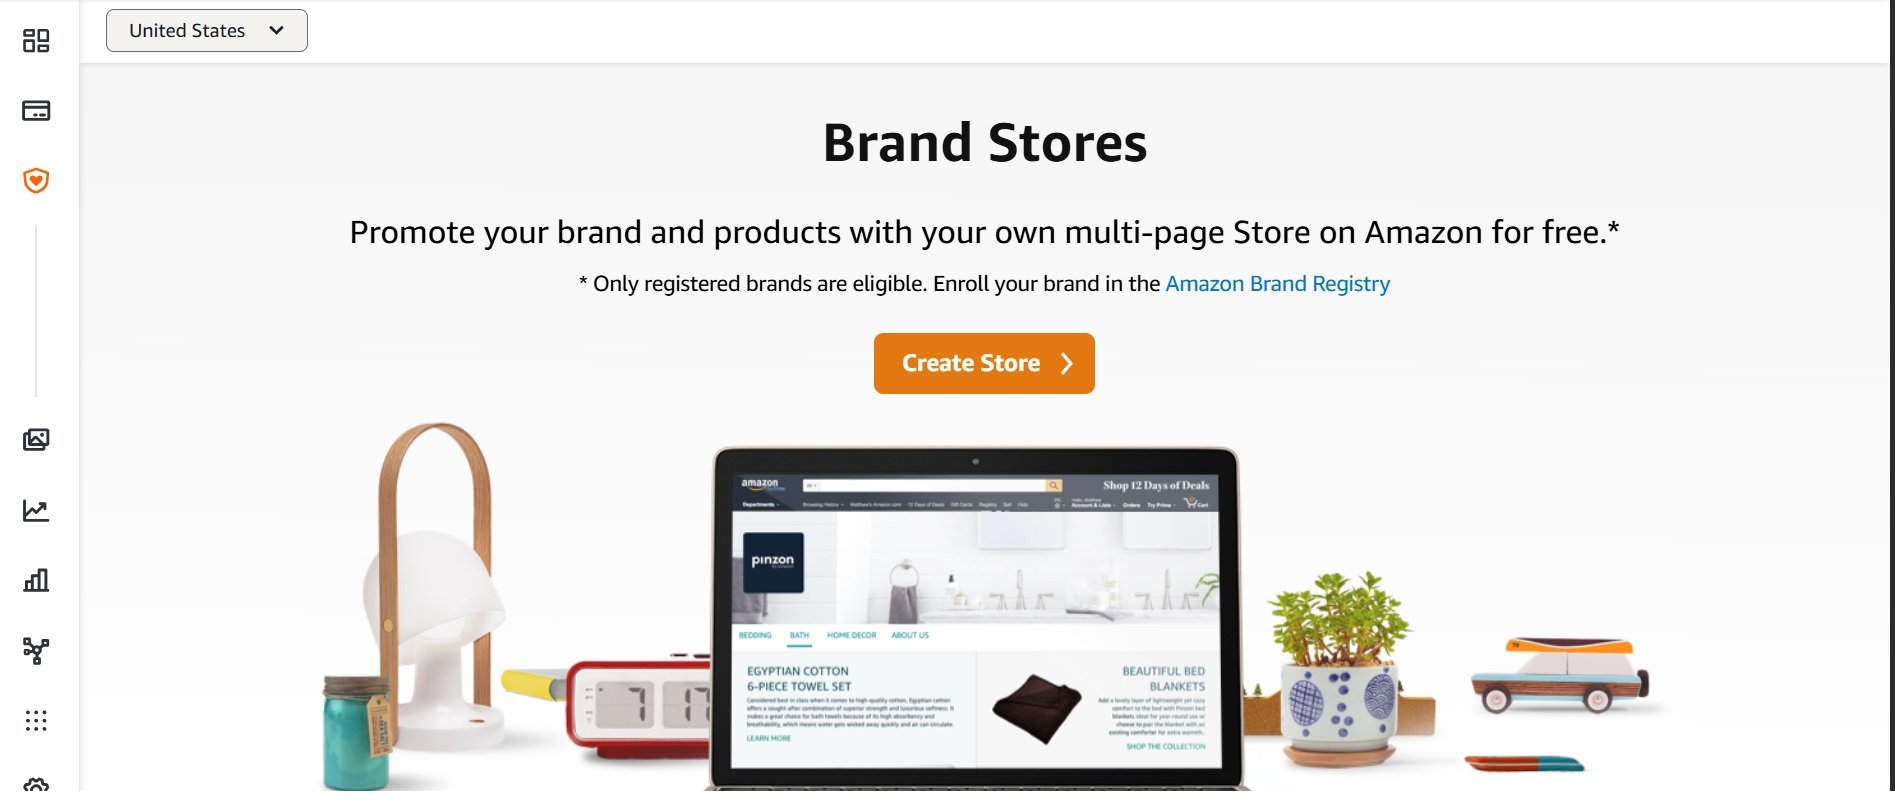
Log in to Seller Central. In the top menu, hover over Stores and click Manage Stores.

Then click Create Store and choose your brand name. (Only brands enrolled in Brand Registry will appear here .) This opens the Store Builder canvas. If you’ve created a store before, you’ll see a list of existing Stores; otherwise it’ll be blank.
2. Set Up Your Store’s Home Page
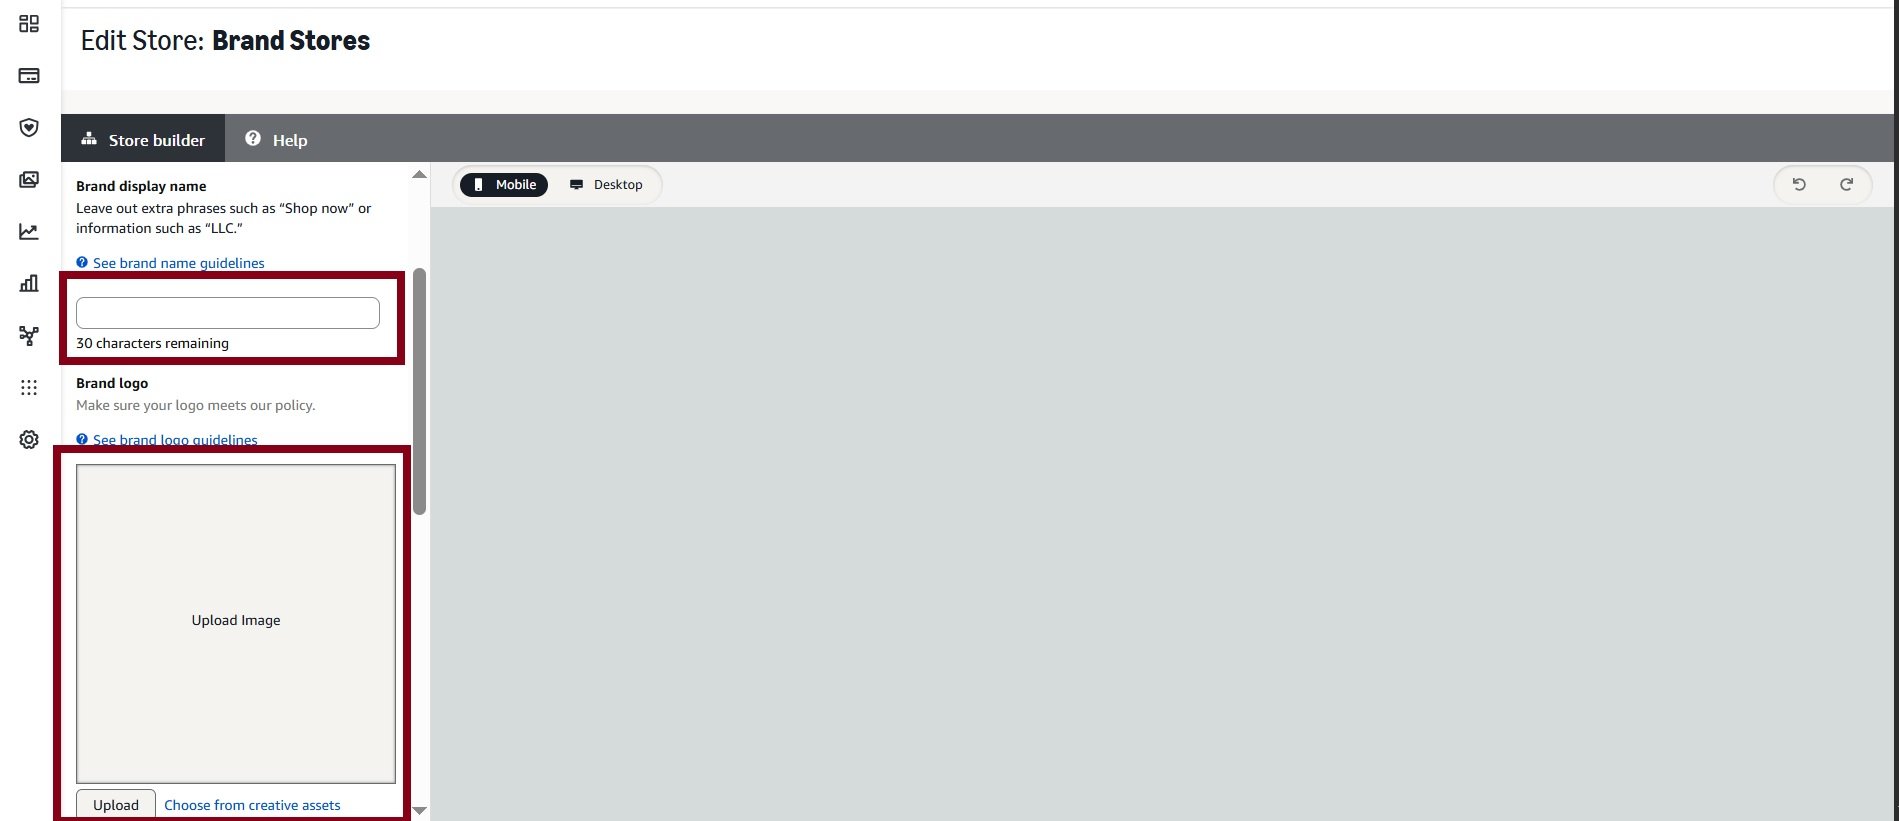
The Store’s home page is the first page shoppers see. Begin by entering your Brand Display Name and this should match exactly your brand as registered. Then upload your brand logo (a common recommendation is 400×400 pixels or larger).
You have the option to make the logo visible on the banner or not; showing it reinforces your brand identity, but if you already include it in a banner image you could hide the standalone logo.

Next, add a Page Description and this is a short text (1–2 sentences) that serves as the meta description for SEO . It won’t display on the Store itself, but it helps your Store rank in Google searches. Write this snippet as if you’re pitching your brand to new customers: highlight your unique value (e.g. “Organic skincare designed for sensitive skin”) and include a keyword or two if it fits naturally.

Once your name, logo, and description are entered, you’ve set up the basic Store identity. Click Next (or the equivalent in the builder) to move on to choosing your template.
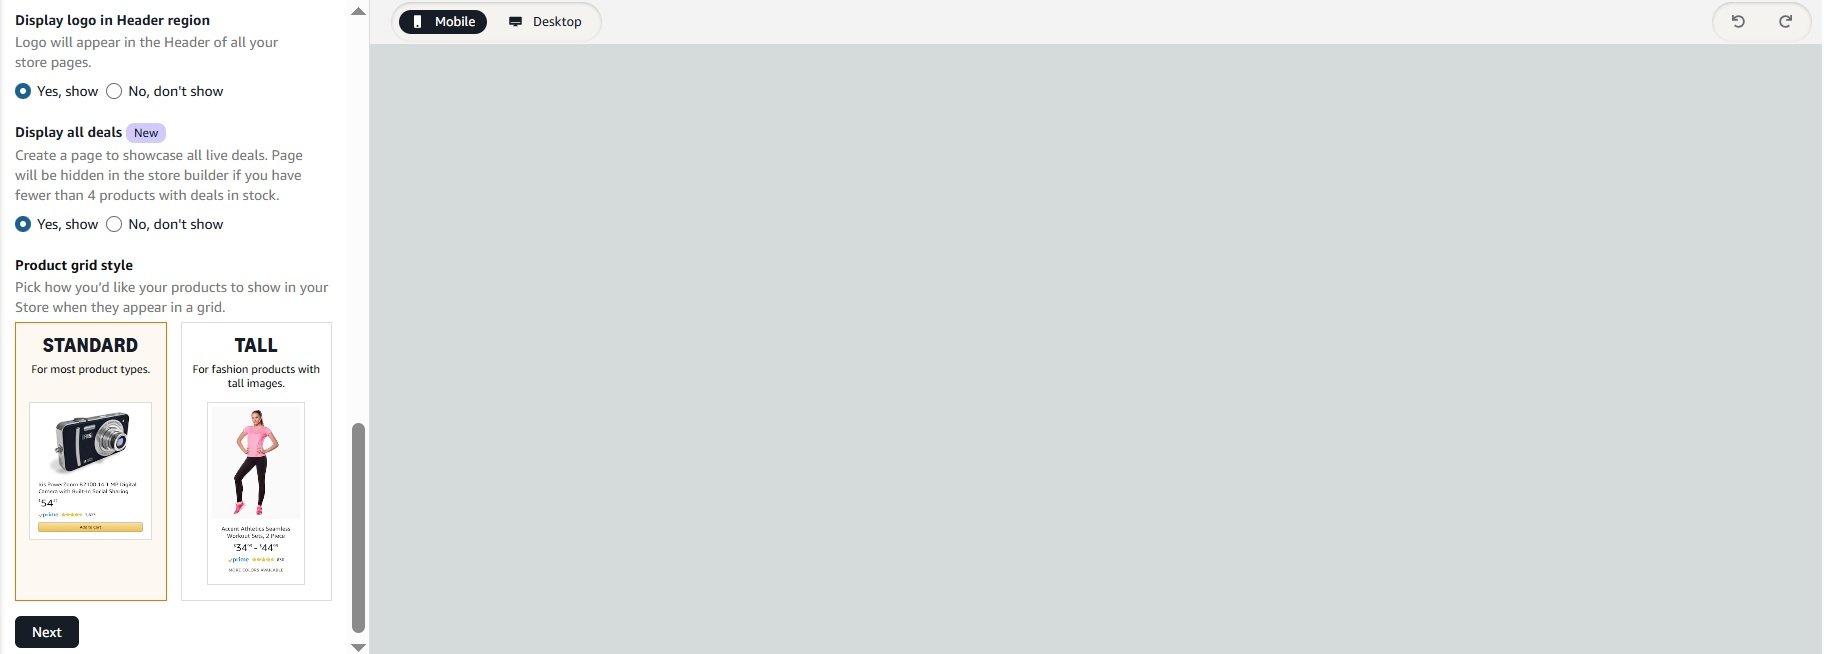
3: Brand Details and Store Grid Style
Then choose whether to display deals on your storefront; select “Yes, show” to highlight ongoing promotions or “No, don’t show” to skip them.
Next, pick your product grid style between Standard or Tall, depending on how you want products to appear. Once done, click Next to move to the Store Builder dashboard.
4. Choose a Store Template
Amazon provides several layout templates for the home page (and each subpage). As of today, the main options are:

- Product Collection: A grid of products. Best if you want to display many items at once, like a catalog overview or “shop all products” section.
- Marquee: A large banner image area (often used for hero images or key messages) with a smaller product grid below. Good for featuring a hero product or seasonal theme.
- Product Highlight: Focuses on a few key products with extra text space. Use this to spotlight best-sellers or a new launch with more details.
- Blank page: All tiles are empty; you have full freedom to add sections from scratch.
Pick the template that fits your home page goal. For example, if you have a flagship product or promotion, Marquee lets you create a strong visual impact at the top. If you want a clean overview of your line, a Product Collection (grid) might work better. You can experiment: changing templates later is easy. After selecting a template, the Store Builder will populate your page with default “tiles” (image
placeholders, etc.) in that layout.
5. Add Pages With Page Manager
A major advantage of an Amazon Store is having multiple pages. You can create up to three levels of pages beneath the home page . For example, under your main menu you might have pages for different categories (e.g. “Kitchen” and “Outdoor”) or brand story pages (“Our Story”, “Featured Partners”).

To add a page, look in the left sidebar of the Store Builder and click Add a Page.
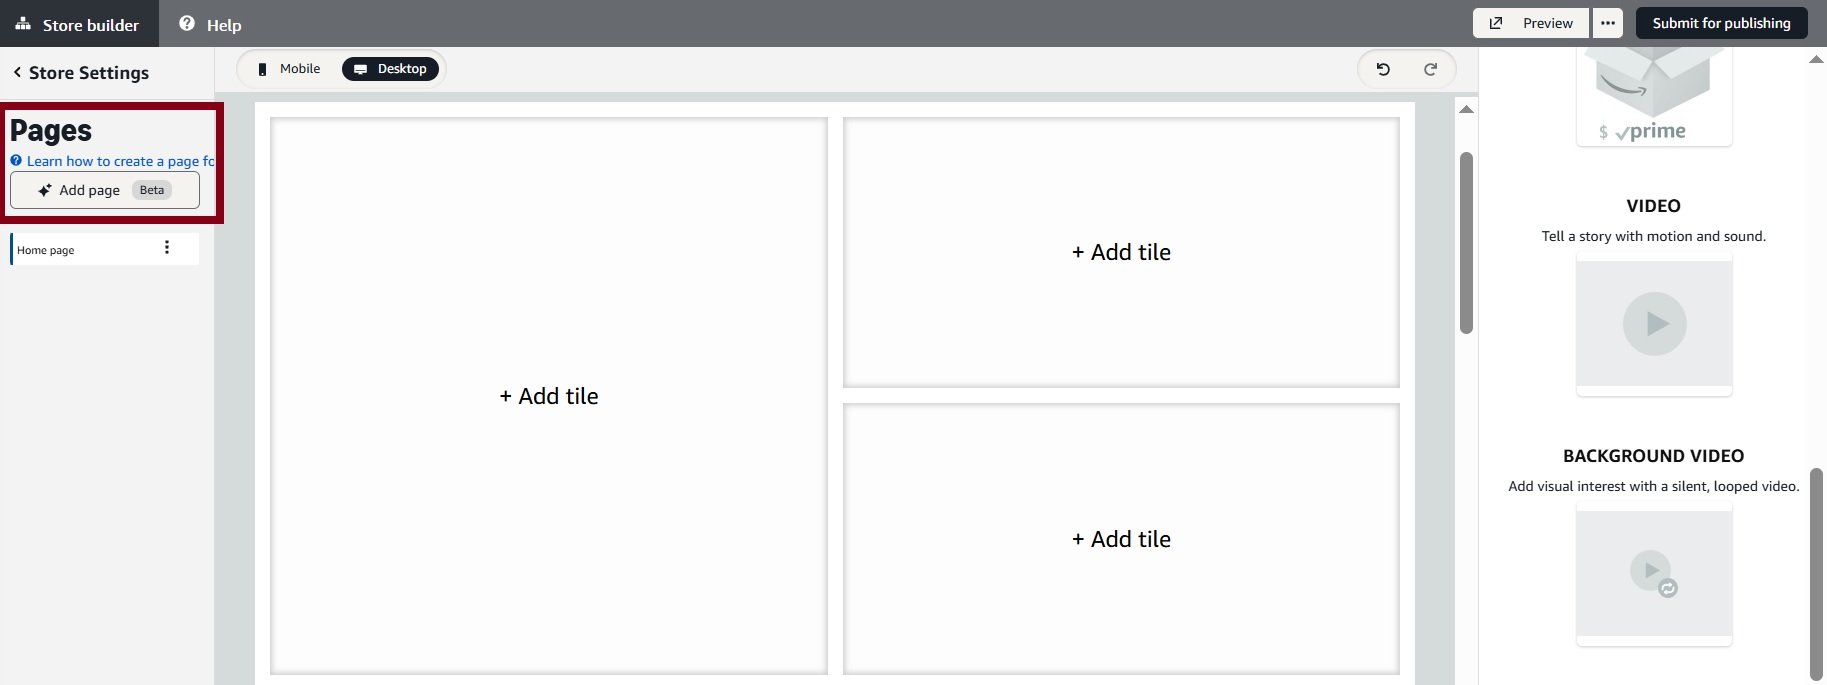
You’ll be prompted to enter:
- Page Name: The title that will appear in the Store’s navigation.
- Page Description: (Optional) A short meta description for search engines.
- Template: Choose a layout for the new page (same types as home page).

After creating it, you’ll see that page as a tab (or dropdown item) on your home page editor. You can drag tabs to reorder them. To nest pages (dropdowns), first click the parent page tab, then add a new page and it will become a sub-item under that parent. For example, you might click “Kitchen” then add “Coffee Mugs” and “Blenders” as subpages in a dropdown.
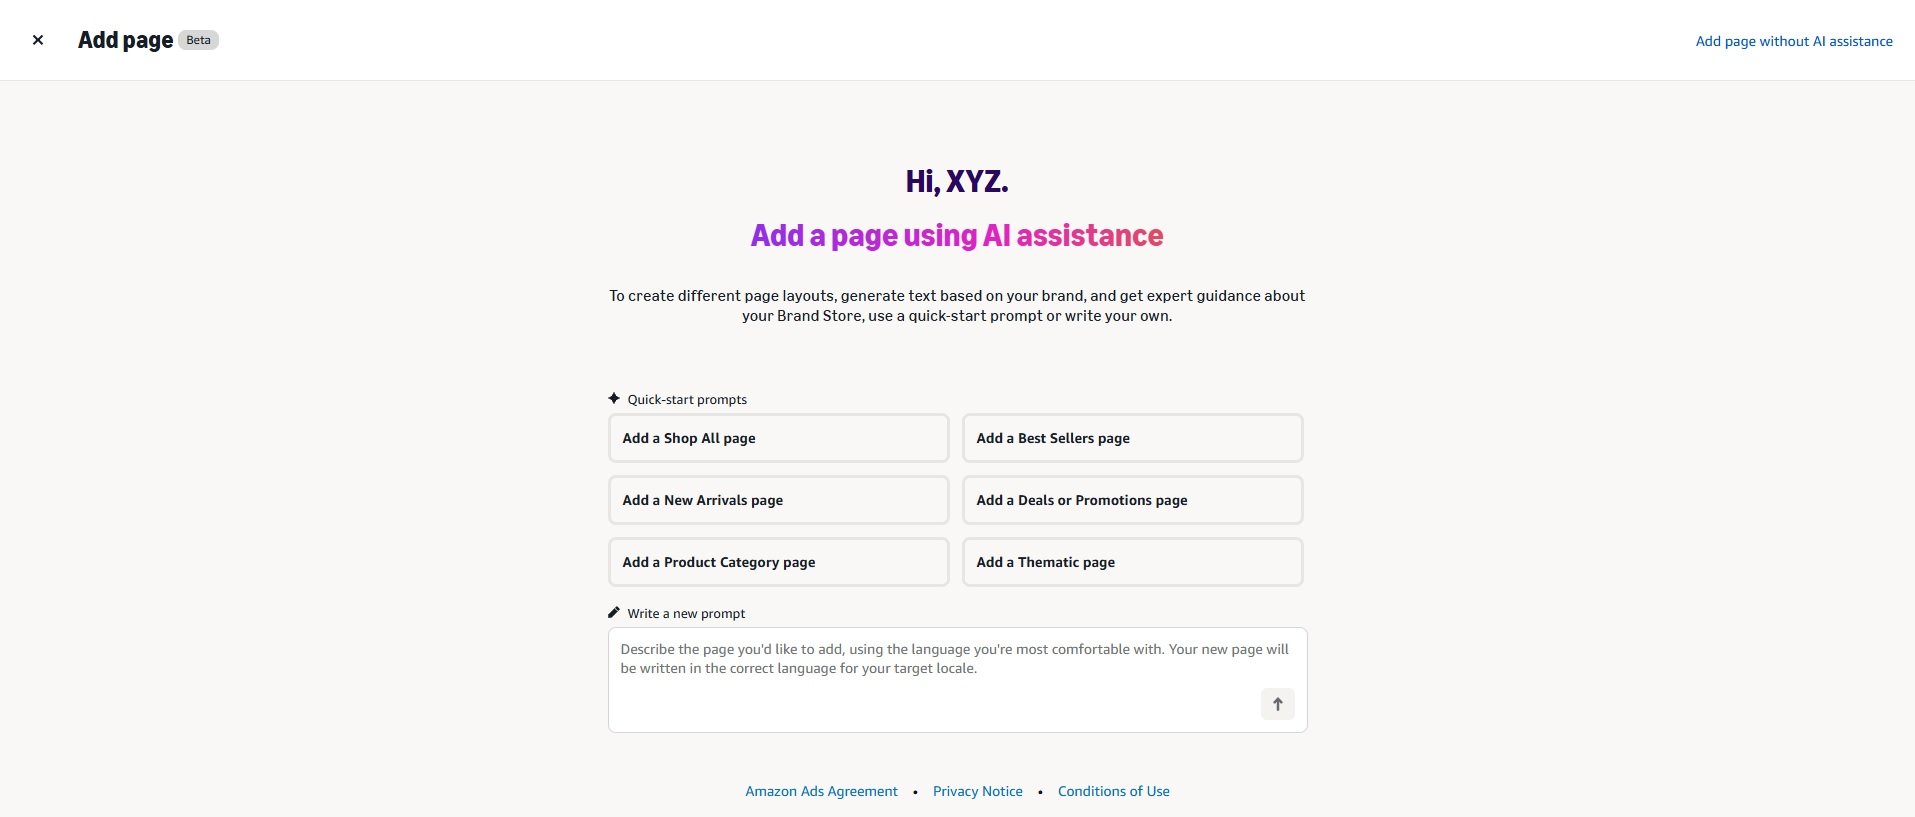
Now you can use create pages automatically with AI page builder in seconds. When you click “Add a page”, the next screen will show you pre-defined AI prompts. You can use these prompts to create or use one of your own. For example select “Create Best seller page” and Amazon will create page with all of your best selling products.
6. Populate Content and Media With Tile Manager
Now comes the creative part: filling each page with images, videos, text, and products. Use the Tile Manager and sections on each page to add content blocks. Amazon provides several tile types; common ones include:
Image tiles: Add lifestyle or product images. You can link an image tile directly to a product listing (so clicking the image brings up that item). Use eye-catching visuals here.

Text tiles: Add custom headlines or descriptions to tell your brand story or highlight a feature. Keep text concise and scannable.

Product grid tiles: Display a row or grid of product thumbnails (linked to listings). You pick the ASINs to include. Use these for “Shop All Products” or specific collections.

Video tiles: Embed product videos. Videos should be HD and Amazon-compliant; they autoplay only when clicked. Video is powerful for demonstrations or brand messages.

Best Seller or Custom widgets: Some templates include dynamic widgets like “Best Sellers” or “Product Collections” to auto-populate by sales or theme.

Shoppable image tile: Use this to add clickable points on products and link the relevant ASINs so customers can select a variation and view its listing.
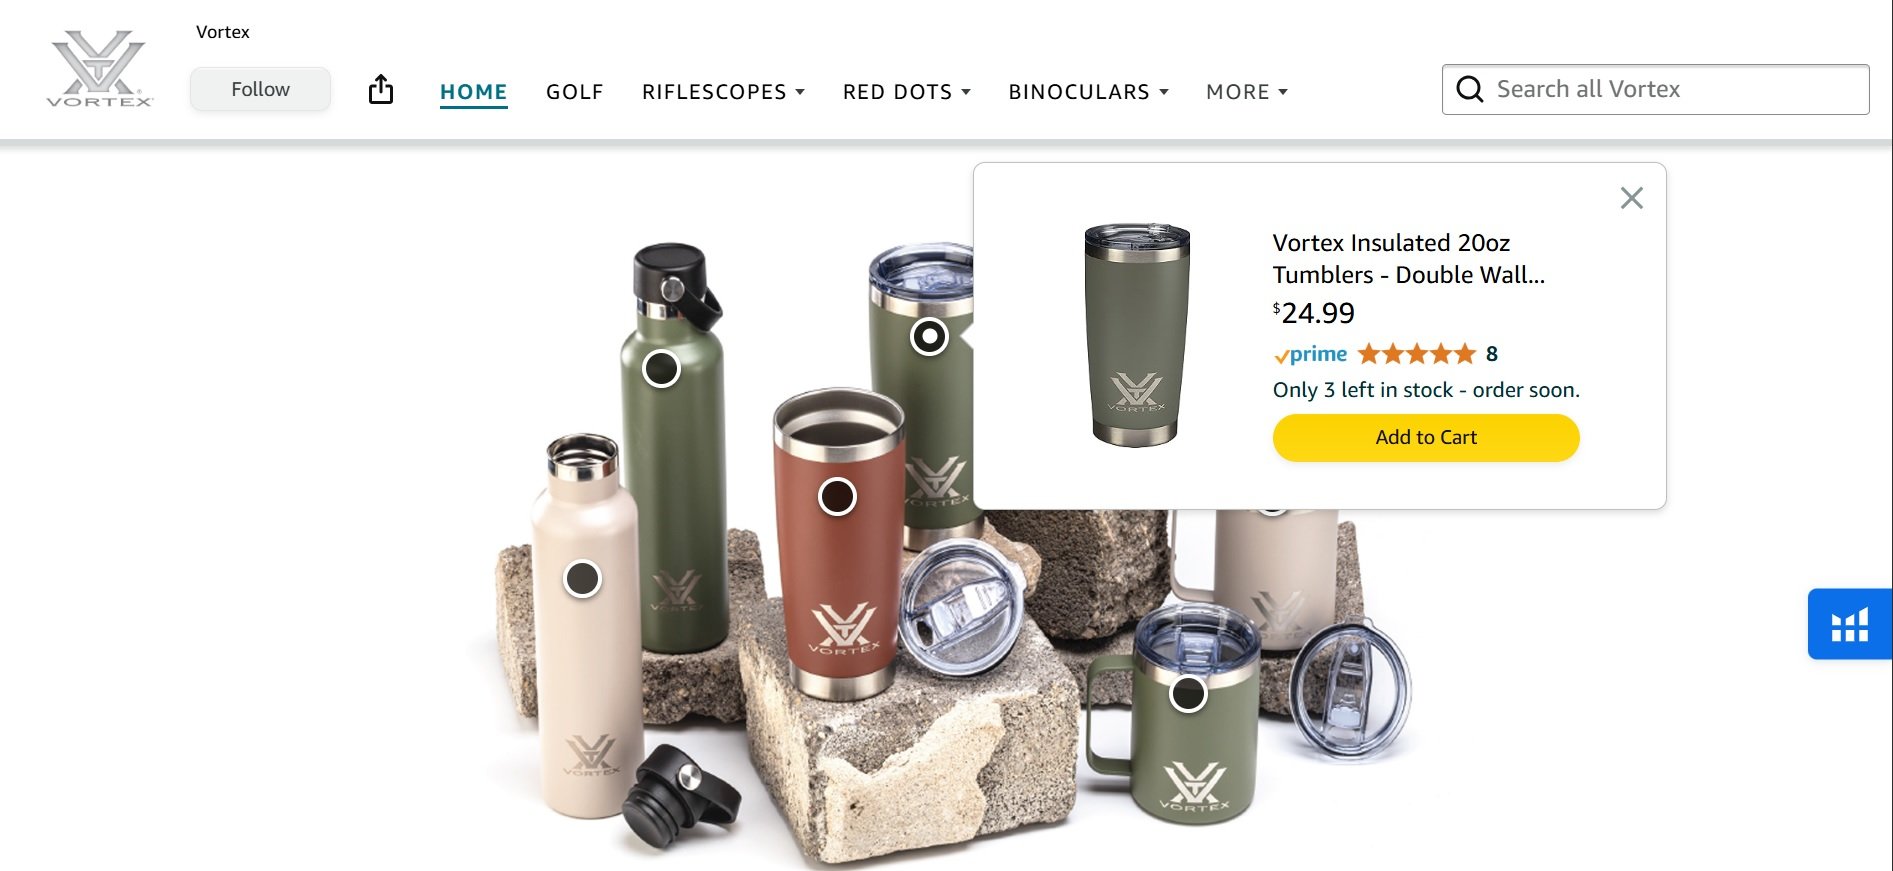
There are so many other tiles that you can add depending on your goal. Here is how to add tiles.
On any page in store, click on “Add new section” on left side as illustrated below.

Choose title type depending on what you are adding like image title, video tile etc.

Depending on the tile type enter details. If you are adding image tile then upload image along with other details and click on done.

Amazon’s guidelines restrict certain content in images (no editorial-like captions on product images, no contact info, no promotional badges), so keep images clean. If you need text, use the store’s text tiles instead of overlaying an image.
As you add content, preview frequently. Amazon shows a desktop and mobile view toggle. Check that all images and grids look good on phones.
7. Submit Your Store for Review
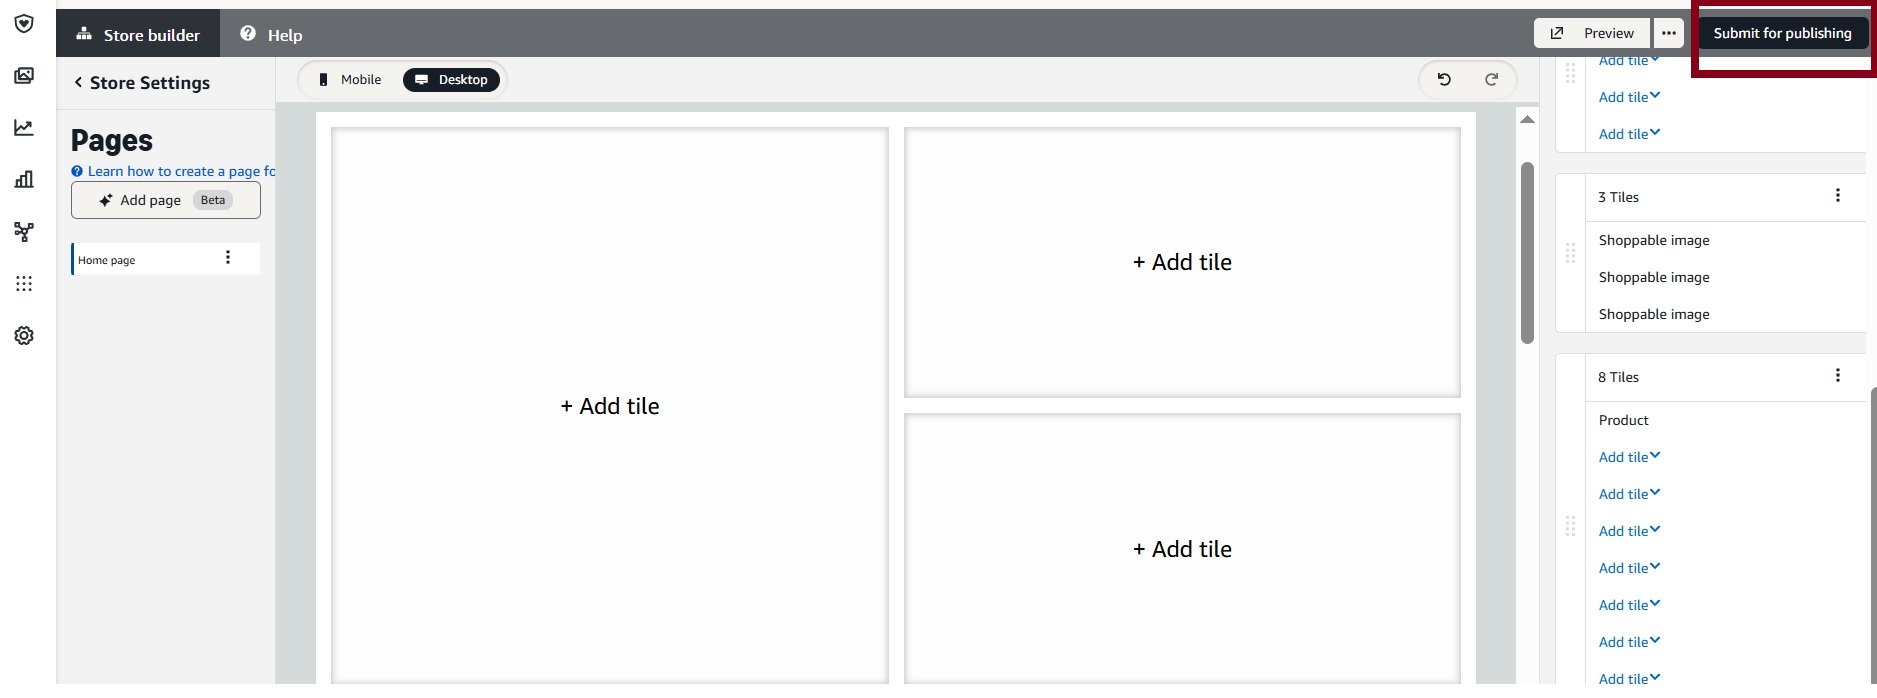
Once you’ve finished building and reviewing your store, click the ‘Submit for Publishing’ button in the top-right corner. Your store will then go through Amazon’s review process and is typically approved within 24 to 72 hours.
How to Drive Traffic to Amazon Store

A beautiful store with zero visitors won’t help your sales, so your focus has to shift from creation to promotion and analysis. This is how you turn that new store into a sales-driving asset.
Getting shoppers to your storefront requires a two-front approach. You have to pull off-Amazon traffic while also capturing shoppers already on the platform.
Building the Store is just the start. To get results, actively drive shoppers to it and make use of Amazon’s marketing tools:
1. Run Amazon Ads to Your Store
Use Sponsored Brands ads to point directly to your Store’s landing page. In the ad setup, instead of choosing a product detail page, select “Store” and pick your brand’s Store URL . This way, all traffic from that ad lands on your brand shop, not just one product.
It keeps visitors within your ecosystem and helps cross-sell. Many sellers find a store link ad yields higher total cart value, since shoppers see multiple items at once.
2. External Traffic & Attribution
Promote your Store outside Amazon. Put the Store link on social profiles, email newsletters, or offline ads. On TikTok or Instagram, post your brand’s Store URL (Amazon influencer program also allows linking).
Amazon Attribution is key here: whenever you share or sponsor external content leading to Amazon, use Amazon’s tracking (it supplies attribution tags) to see how those campaigns convert back in Amazon Ads console or Store Insights.
For instance, create a UTM-like tag ?channel=summer-email and append it to your Store URL in email campaigns. Amazon will log traffic by source, so you can compare which channels bring the most sales.
3. Social and Content Marketing
Share your Store on social media. Write blog posts or press releases featuring your brand’s Amazon Store link. If you have a mailing list, send out an announcement with highlights (“We just launched our new Amazon storefront; see our bestsellers here!”). Collaborate with influencers: give them your Store URL to post so their followers see your full line. Every time your brand is mentioned, guide people to the Store.
4. Offers and Deals
Highlight special promotions on your Store banners or tiles. You can feature current deals, coupons, or holiday sales right in the Store imagery or copy. For example, add a banner that says “20% off sitewide – limited time!” linking to a relevant category page. Shoppers love timely deals, and a big banner is the perfect place to shout them out. With new updates in Amazon store, when you run deals, a dedicated page will be created automatically with all of the products with deals.
In See “Section 3: Brand Details and Store Grid Style” where we discussed that you can choose whether to display deals on your storefront.
4. Storefront in Seller Profile
Remember that Amazon automatically links your Store in several places. When a customer clicks your brand name under any product, the “Visit the [Brand] Store” link appears. Also, as of now the Seller Profile page shows a link to your Store. Make sure your brand name is consistent across all listings so that link always reaches your Store.
Go to Amazon advertising console → Brand content → Brand profiles to complete your brand profile with logo and brand colors.
Monitoring and Optimizing Your Storefront
Once your Store is live and you’re driving traffic, use Amazon’s analytics and ongoing edits to improve performance over time:
Analyze Store Insights
In Seller Central under Stores, you’ll find an Insights Dashboard for each Store. Key metrics include page views, unique visitors, sales attributed to the Store, and traffic sources.
For example, you might see that your “Best Sellers” page has three times more views than “New Arrivals.” Use these numbers to make decisions: if a page is popular, consider adding more products or promotions there. If a page has low engagement, investigate why (maybe the images need a refresh or the products aren’t compelling) and update it.
Seasonal Refreshes
Plan content updates ahead. Amazon allows scheduling Store versions . Prepare a holiday-themed Store or a new product launch Store in advance and set the go-live date. After the season, you can revert or refresh. This keeps your Store timely and encourages repeat visits.
Iterative Improvements
Treat your Store like a website. Check it at least monthly. Are all product links still correct (sometimes ASINs can change if you relist)? Is any image outdated (e.g., new packaging now available)? If customer feedback comes in mentioning something confusing, update your store accordingly. For example, if buyers ask “What ingredients are in this product?” consider adding a text tile or an infographics tile that highlights that info.
Customer Feedback and A+ Content
Pay attention to reviews on your product pages. If customers compliment a product feature, highlight it in the Store. If they criticize something, you might omit or clarify it on the Store. Also, use A+ Content on product pages (as an additional step; not part of the Store Builder) to enhance listings. A+ and Store complement each other: the Store tells your brand story and bundles products, while A+ enriches each product page with charts and additional images.
FAQ About How to Create Amazon Storefront
How Much Does an Amazon Storefront Actually Cost?
The short answer? Building the Store itself is completely free. Amazon doesn’t charge you to use their Stores builder tool.
However, you can’t get started without a couple of things that do have costs.
- A Professional Seller Account: To access the Stores builder, you need to be on the Professional selling plan. This comes with a monthly subscription fee (currently $39.99 in the U.S.). The basic Individual seller plan won’t work.
- A Registered Trademark: This is the big one. Creating a Store is a benefit for brand-registered sellers, and you can’t get into Brand Registry without a trademark. The cost for this can vary widely, from a few hundred to a couple of thousand dollars. It depends on which trademark office you’re using (like the USPTO) and whether you use a program like Amazon’s IP Accelerator.
So, while the tool is free, think of these as the required tickets to get into the show.
How Long Is the Wait for Amazon to Approve My Store?
Once you’ve put the finishing touches on your Store and hit the submit button, the waiting begins. Typically, Amazon’s review team gets back to you within 24 to 72 hours.
Keep in mind, that timeline isn’t set in stone.
During busy times, like the Q4 holiday rush, everyone is trying to get their updates published, and review times can be longer. Amazon’s team manually checks everything to make sure it meets their creative guidelines. They’re looking for typos, blurry images, or anything that violates their policies.
Can I Get Around the Trademark Requirement?
Nope. This one is a firm requirement. A registered trademark is your golden ticket to unlocking Amazon Brand Registry, and Brand Registry is the only way to get access to the Stores builder.
There are no shortcuts here. If you aren’t brand registered, you can’t get an Amazon store. If a trademark isn’t on your radar yet, that needs to become your top priority.
Here’s the breakdown based on where you are in the process:
- If you have a pending trademark application: You’re in luck. Amazon’s IP Accelerator program can be a great help. By using one of their pre-approved law firms to file, Amazon often grants you access to Brand Registry and its tools (including Stores) while your trademark is still pending. This can save you months of waiting.
- If you haven’t started the trademark process: This is your first move. You simply can’t build a Store until you have, at minimum, a pending application filed with the appropriate trademark office.


