

Amazon’s Bulk Operations feature is a spreadsheet-based tool that lets you create, update and optimize multiple campaigns in batches, reducing time and manual effort. It is an imperative tool for any agency or team to deliver high quality Amazon PPC services for large catalogs.
Bulk Ops allows an experienced seller to make thousands of changes at once like adding or editing campaigns, ad groups, keywords, bids, budgets and more via a single upload.
This scales PPC management for hundreds or even thousands of SKUs, saving countless hours while giving precise control over bids, budgets and targeting across campaigns.
Sellers rely on Bulk Operations to implement data-driven adjustments en masse and to apply complex strategies (like moving keywords or copying campaigns between marketplaces) all in one structured workflow.
Below are some of the benefits of bulk operations over the manual work.
- Time Efficiency: You can reclaim hours of manual work. Tasks that would otherwise take up a whole day can often be finished in under an hour.
- Fewer Errors: Repetitive manual changes lead to mistakes. A spreadsheet keeps things consistent and accurate across all your campaigns.
- Granular Control: Bulk files offer a level of control that’s nearly impossible to achieve through the standard interface, allowing for more sophisticated strategies.
- True Scalability: It is fundamentally impossible to grow an ad account with hundreds of campaigns and thousands of keywords without a scalable system. Bulk operations provide that system.
To use bulk files effectively, you need a solid foundation in understanding the core of Amazon PPC, since that drives every action you’ll take.
The efficiency you gain is huge. With a single file upload, advertisers can edit over 10,000 campaigns, targets, or bids using smart filters, a task that would have been unimaginable just a few years ago.
When to Use Bulk Files Over Campaign Manager
For optimizing few campaigns upto 20 to 30 with one to two SKUs, the Campaign Manager is your best bet. It’s fast, visual, and perfect for isolated tasks.
But when you’re managing anything at scale, the game changes. Imagine you need to dial back bids on 500 keywords after a holiday sale. Or you discover a new negative keywords that needs to be added to every campaign.
Trying to tackle that in the Campaign Manager is tedious and a recipe for costly mistakes. This is the moment when bulk files become an absolute necessity.

Here are a few common scenarios where bulk files save the day.
1. Large-Scale Bid Adjustments
One of the most powerful uses for bulk operations is managing bids across your entire account with precision. Let’s say your target ACoS (Advertising Cost of Sale) is 30%. You can download a 30-day performance report, put it into a spreadsheet, and instantly filter for every keyword with an ACoS over 45%. From there, lowering all their bids by 15% is as simple as applying a formula to a single column.
On the flip side, you can just as easily spot the winners. Find all keywords converting under a 20% ACoS, bump up their bids to get more aggressive, and capture more traffic. Trying to do this in Campaign Manager would take days and be full of errors.
2. New Campaign Structures
Once you’ve found a campaign structure that works, you’ll want to replicate it for every new product. A solid Amazon PPC campaign structure is the foundation of organized growth, and bulk files make cloning it effortless.
You can create a template for your structure in a spreadsheet. For instance, a common setup might include:
- One auto campaign
- One manual broad match campaign
- One manual exact match campaign
Instead of manually building these three campaigns every time you launch a product, you just copy and paste your template rows, swap out the SKUs and keywords, and upload. A 30-minute chore becomes a 5-minute task.
3. Account Cleanup
Ad accounts get messy over time. You might have hundreds of old, paused campaigns from last year’s promotions. Trying to archive them one by one in the interface is a test of patience.
With a bulk file, you can filter for all campaigns that have zero impressions and spend over the last 90 days. Once you have your list, you just change their status to “archived” in one go and upload. This instantly declutters your account, making it easier to analyze the campaigns that are actually active.
Pro Tip: Don’t just archive old campaigns. Use your bulk file to find keywords draining your budget. A quick filter to find keywords with high clicks but zero sales over a 60-day period will reveal the money pits. Pause them all in bulk and watch your ad spend efficiency improve.
4. Task Comparison
To make it clearer, here’s a quick rundown of common tasks and which tool is generally the better fit.
| Advertising Task | Best Tool to Use | Reason |
|---|---|---|
| Pausing a single underperforming ad | Campaign Manager | It’s faster for a single, isolated change. Just click and pause. |
| Adjusting bids for an entire ad group | Bulk Operations | Ensures consistency and saves time over manual, keyword-by-keyword edits. |
| Launching one new campaign | Campaign Manager | The guided, visual setup is often simpler for a one-off launch. |
| Creating 20 new campaigns for a product line | Bulk Operations | Use a template to launch all campaigns in minutes, not hours. |
| Adding 5 new negative keywords to one campaign | Campaign Manager | Quick and straightforward for a small, targeted update. |
| Adding the same negative keyword to 50 campaigns | Bulk Operations | A simple copy-and-paste action prevents manual errors and saves time. |
| Archiving a handful of old campaigns | Campaign Manager | If it’s just a few, clicking through the interface is easy enough. |
| Archiving hundreds of inactive campaigns | Bulk Operations | Filter, change status, and upload. A massive cleanup task done in minutes. |
Both tools have their place. The Campaign Manager is for quick, tactical moves, while bulk operations are for strategic, large-scale management. Getting comfortable with both is key to managing your ads efficiently.
Operations You Can Do with Bulk File
You can use Bulk Ops to modify campaigns, ad groups, ads, and keywords in bulk. Start by downloading the current bulk file, then make changes offline in Excel or Google Sheets. Common bulk edits include:
- Adjust Bids: Change numbers in the Max Bid column for keywords or ad groups. Uploading the file applies the new bids automatically.
- Adjust Budgets: Edit the Campaign Daily Budget in campaign rows to update budgets.
- Change Status: Update the Status column (e.g., “paused” or “enabled”) for campaigns, ad groups, or keywords to pause or resume them.
- Rename Entities: Edit the campaign or ad group name in the sheet while keeping the Record ID intact. Uploading applies the new names.
- Copy and Move Keywords/Ad Groups: Duplicate rows and change the Campaign or Ad Group name to copy items between campaigns, useful for A/B testing or expansion.
- Placement Bid Adjustments: Use the placement bid modifier columns (e.g., “Top of Search” or “Product Pages”) to increase or decrease bids by placement.
- Add Negative Keywords: Insert new rows with Record Type “Keyword,” set Status to “enabled,” and choose Match Type “NegativeExact” or “NegativePhrase” to block unwanted terms.
Never change existing Record ID values. To pause a keyword, keep its ID and set Status to “paused.” To remove a keyword, set Status to “archived” or omit it from the new upload.
The Workflow for Bulk Sheets
Using bulk sheets for the first time can feel intimidating, but the core process is straightforward once you walk through it a few times. This is your guide to getting it right, from downloading the file to successfully uploading your changes.

We’ll break down each part of the workflow, showing you not just what to do, but why each step matters.
1. Generating and Downloading
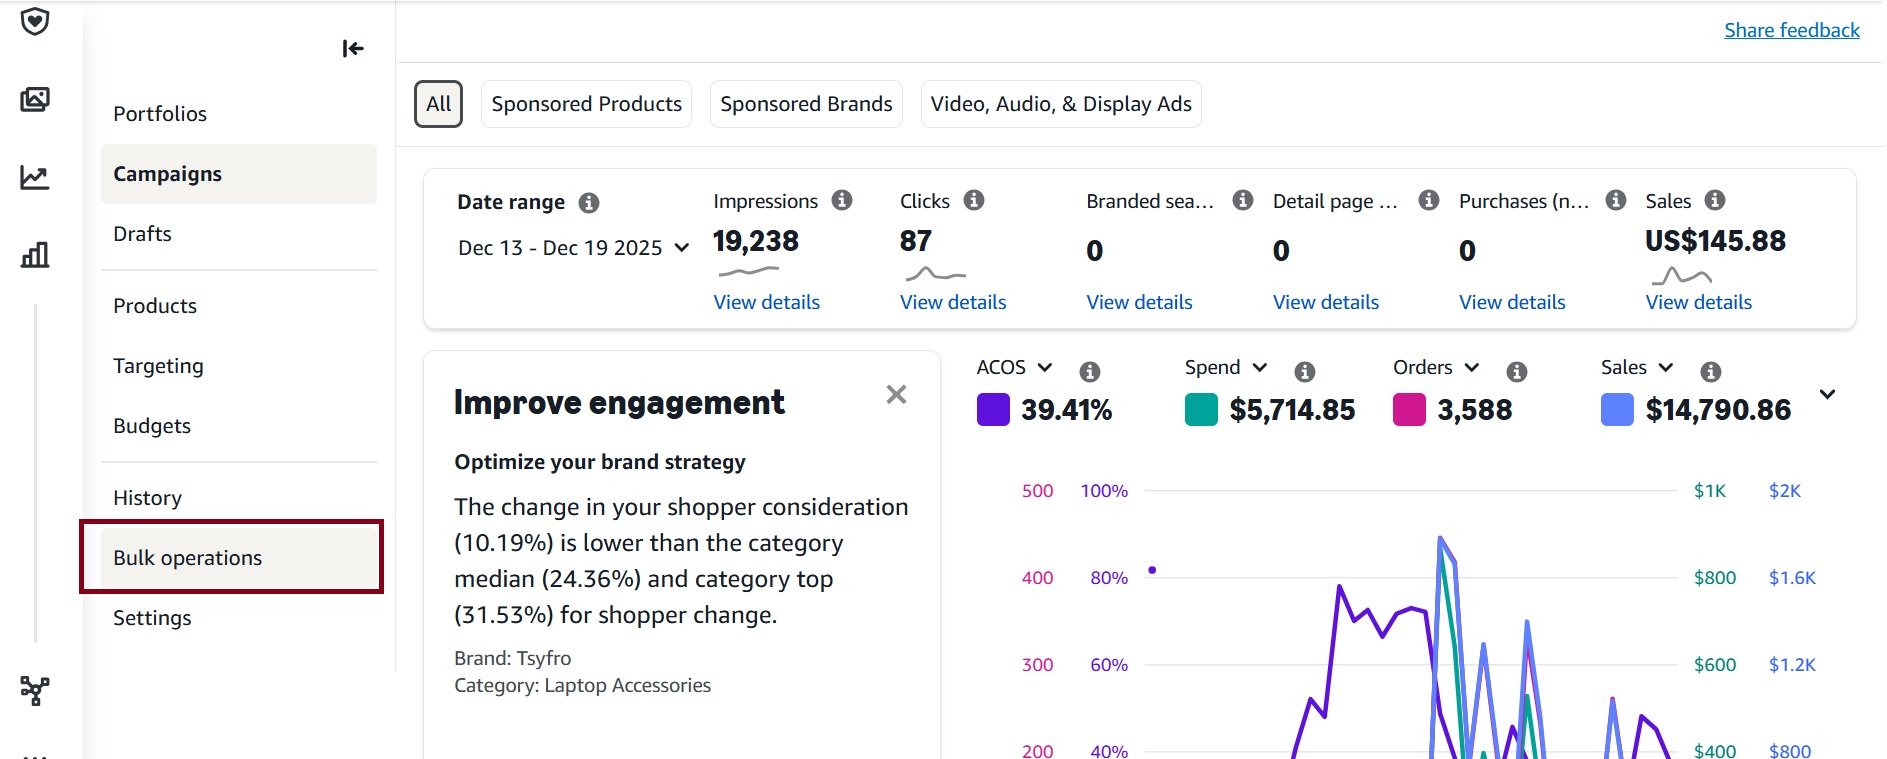
Amazon’s Bulk Operations tool is accessed from the Advertising Console in Seller Central (or Vendor Central). In Seller Central go to Advertising → Campaign Manager → Bulk Operations.
To get started, you’ll create a new spreadsheet for download. Your selections here are important.
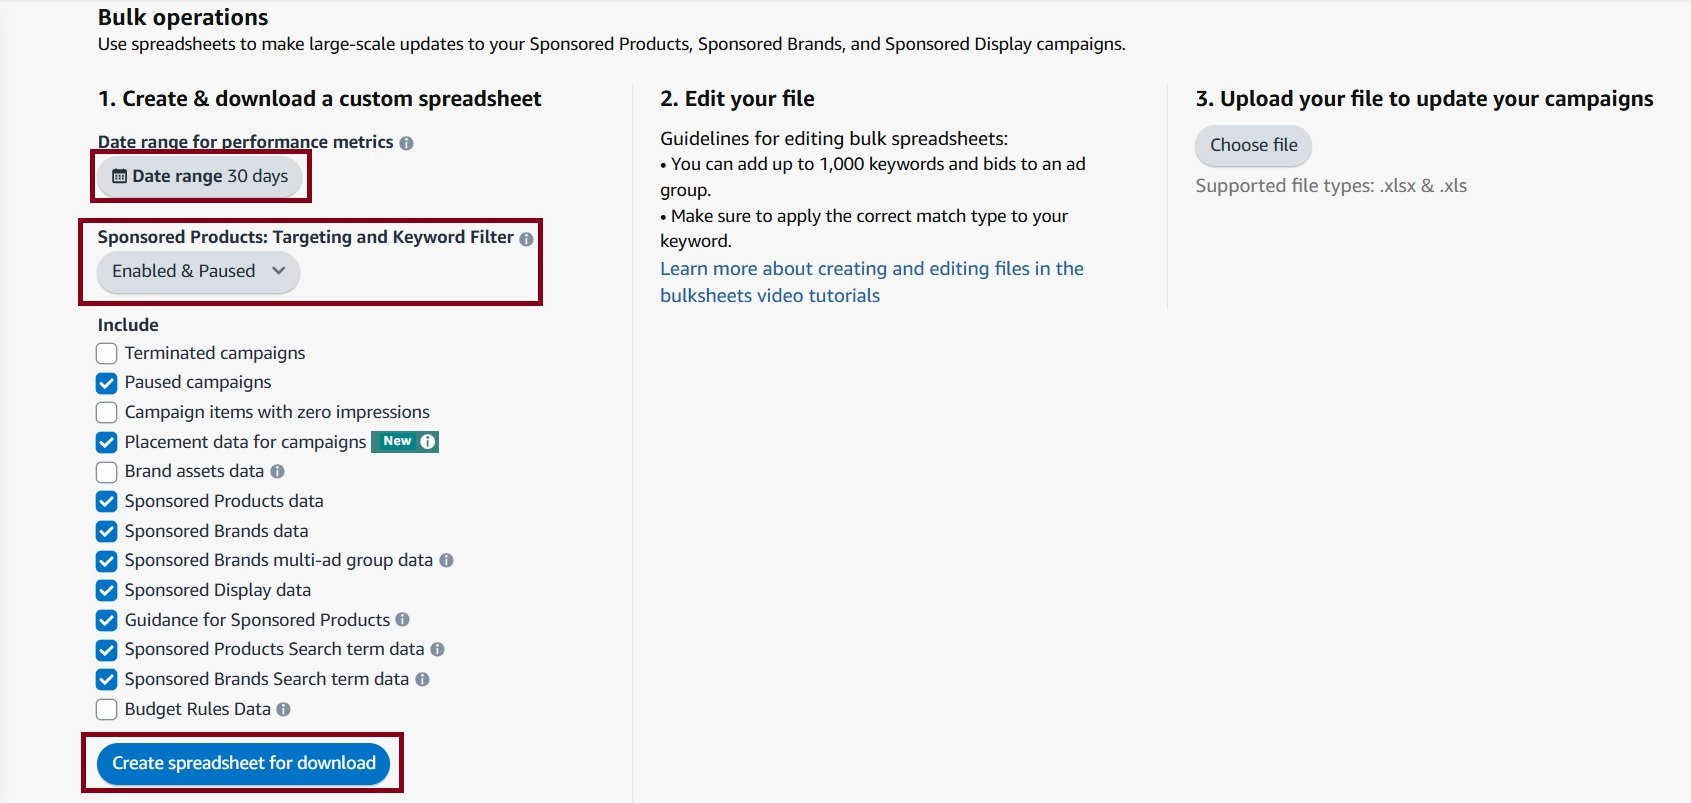
For most optimization tasks, these settings are a reliable starting point:
- Select 30 or 60 days. This gives you enough performance data to make informed decisions.
- Decide whether to exclude terminated (ended) campaigns to reduce clutter.
- Choose whether to exclude campaigns or ad groups with zero impressions. We ecommend including zero-impression items.
- Optionally, exclude placement data to simplify the spreadsheet.
- Click “Create spreadsheet for download.” Processing may take a few minutes to an hour depending on account size.
- Download the Excel file (.xlsx or .xls) and save it locally; the Bulk Operations interface shows supported file types.
After you click “Create spreadsheet for download,” you’ll need to wait. For large accounts, this can take a few minutes. Once it’s ready, download the file.
2. Understanding the Spreadsheet
The downloaded bulksheet is a multi-sheet Excel workbook. By default, it contains separate tabs for Sponsored Products, Sponsored Brands, and Sponsored Display, plus Portfolios and the Sponsored Products search term report.
Each row in the main campaign sheets includes a Record Type (sometimes called Entity) column indicating the level: Campaign, Ad Group, Keyword, Ad, or Product Targeting. Key columns include:
- Record Type: Specifies the object (Campaign, Ad Group, Keyword/Product Targeting, or Ad).
- Campaign Name / ID and Ad Group Name: Link each row to the corresponding campaign or ad group.
- Campaign Daily Budget, Start Date, End Date: Used on campaign rows to define budget and timing.
- Targeting Type: Manual or Automatic, specified in campaign rows.
- Portfolio ID (optional): Entered on the campaign row if portfolios are used.
- Bidding Strategy: Fixed bids, Dynamic – down only, or Dynamic – up and down, set at the campaign level.
- Max Bid: The default bid. In an Ad Group row, this is the default CPC for new keywords; in a Keyword row, it is that keyword’s bid.
- Match Type: For keywords (broad, phrase, exact) or negative keyword types.
- Keyword or Product Targeting: The exact keyword text or the ASIN (for product targeting).
- Status: Enabled or Paused for campaigns, ad groups, keywords, or ads.
- Performance Metrics: Columns for Impressions, Clicks, Cost, Sales, Orders, and related data to evaluate performance.
All required fields are documented in the sheet’s first row or in a definitions tab. It is critical not to alter the header row or delete columns, as Amazon requires exact formatting.
Existing Record IDs must never be changed, since they link each row to the correct campaign, ad, or keyword in Amazon’s system. The only fields that can be renamed without breaking links are elements such as campaign or ad group names, which will update directly in Amazon after upload.
3. Excel Formulas & Bulk Optimization Techniques
Bulk optimization only works when each optimization type is treated separately. Each section below assumes you are already inside the Amazon bulk sheet and working only on relevant rows, not the entire file. Formulas come after filtering, not before.
A. Target-ACoS Bidding
Target-ACoS bidding is used when a keyword or product target is converting but spending inefficiently. The objective is to recalculate the correct CPC, not guess reductions.
First, filter Entity to:
- Keyword
- Product Targeting
Then apply performance filters so only meaningful data remains:
- Clicks ≥ 15 (or your internal minimum)
- ACoS > Target ACoS
Now add a new column (for example: New Bid) and calculate the break-even bid using actual performance:
=(@Sales / @Clicks) * 0.30
This instantly generates the bid needed to hit the target ACoS given current performance. Here, ‘0.3’ represents a 30% target ACoS.
This formula answers one question only: what CPC would have produced the target ACoS given the current conversion rate. Key points to note here
- Apply the formula only to filtered rows
- Review extreme values manually
- Replace the existing Max Bid values with values in “New Bid” column.
This method corrects bids mathematically instead of applying blind percentage cuts.
B. Rule-Based Bid Adjustments
Rule-based bidding is used when you want directional control instead of full recalculation. It is best for stable, mature campaigns. First apply filter:
- Entity → Keyword / Product Targeting
- Clicks ≥ statistical minimum
- ACoS column visible and reliable
Then apply conditional logic that reacts to performance bands:
=IF(ACoS > 0.40, OldBid * 0.90, IF(ACoS < 0.30, OldBid * 1.05, OldBid))
What this does:
- Reduces bids when ACoS is too high
- Scales bids when performance is strong
- Leaves neutral keywords untouched
Keep in mind that do not use this on low-click keywords. When done, overwrite the original bid column with new bids. This keeps account volatility low while enforcing discipline.
C. Profit & Efficiency Metrics
ACoS alone does not describe profitability. This section is diagnostic, not automated. After filtering to keyword or product targeting rows, add calculated columns such as:
Profit per Click:
=(Sales – Spend) / Clicks
ROAS:
=Sales / Spend
Use these columns to:
- Sort keywords that meet ACoS targets but still lose money
- Identify high-ROAS terms that deserve more aggressive scaling
These metrics inform decisions; they are not meant to auto-push changes.
D. Flagging Low-Performing Keywords
Negation is not bidding. It requires clear isolation.
Filter:
- Entity → Keyword
- Orders = 0
- Clicks ≥ 15 (or your cutoff)
Then add a simple flag column:
=IF(AND([@Orders]=0,[@Clicks]>=15),”NEGATIVE”,””)
This creates a clean list of confirmed non-converters.
Usage:
- Filter by “NEGATIVE”
- Export or bulk-add as negative keywords
- Do not mix negation logic with bid formulas
E. Budget Scaling
Budgets are handled only at campaign level. You might decide to increase or decrease budgets by a flat percentage. First apply filter by “campaign”
- Entity → Campaign
Now apply budget logic:
- Flat scaling:
=[@[Campaign Daily Budget]] * 1.20
Rules:
- Never mix campaign rows with keyword rows
- Budgets control exposure, not efficiency
- If two products need different budgets, they must be in separate campaigns.
4. Uploading and Verifying
Once your edits are complete, save the file in the same format you downloaded it in (usually .xlsx).
Now, head back to the Bulk operations page in Seller Central. Look for the ‘Upload a file to update your campaigns’ section. Click “Choose file,” select your edited spreadsheet, and hit “Upload.”
The following screenshot from Amazon’s documentation shows where you’ll find the download and upload sections.
After the upload, Amazon will process your file. When it’s done, a processing report will be available for download. Always download and review this report. It will tell you if your changes were successful. If there were errors, the report specifies which rows failed and why, allowing you to fix just those issues and re-upload.
Combining bulk sheet edits with solid report analysis is what separates good ad managers from great ones. For a deeper dive into interpreting performance data, check out our guide on navigating Amazon advertising reports.
Advanced Bulk Operations Tactics
Bulk operations allow seasoned PPC managers to execute large-scale optimizations efficiently, moving beyond manual adjustments and guesswork. Here are some of the advanced tactics.
1. RPSB Method (Auto→Manual Transfer)
Export your Sponsored Products Search Term Report for the last 60 days. Filter for converting search terms from your Auto-targeting campaign.
Copy these terms into your bulk sheet as new keywords with Exact match type in a Manual campaign, and add them as Negative Exact in the Auto campaign.
This funnels proven search terms into tighter targeting, improving relevance and ACOS. Bulk operations let you perform all these steps in one go.
2. Negative Keyword Harvesting
Scan your search-term report for wasteful queries, such as those with high spend and no sales or many clicks without conversions. Add these as Negative Exact keywords in the bulk file.
This prevents budget drain by irrelevant queries and ensures campaigns focus on profitable search terms.
3. International Copy
After optimizing a US campaign, download its bulk sheet and upload it to another marketplace, such as the UK or Canada. Because the columns match, particularly for English keywords, you can replicate the entire campaign structure and bids abroad without redoing months of work. This method works best when targeting similar keywords across markets.
4. Version Control and Team Workflow
Treat each bulk file like code. Give it a meaningful name, such as BulkOps_2025-01-15_PreLaunch.xlsx. Keep backups of the original file before making changes. Use Excel’s “Track Changes” or comments to note why certain bids were adjusted or keywords added. Start with a small test, adjusting 10–20 keywords, upload, and verify results before scaling up.
Bulk operations are powerful but unforgiving. Even minor errors, such as extra spaces, wrong headers, or unintended percentages, can cause file errors. Always use Amazon’s exact header names and data formats, and review every column carefully before uploading.
Troubleshooting Common Errors
A failed upload can kill your momentum. You’ve spent time tweaking bids, only to get an error message. Don’t worry, these errors are almost always simple typos or formatting mistakes that are easy to fix.
1. Invalid SKU or ASIN
One of the most frequent hiccups is the ‘Invalid SKU’ or ‘Invalid ASIN’ message. This means Amazon couldn’t find the product you referenced in its catalog for that ad group.
This error is almost always caused by one of these:
- You used a Parent ASIN: The bulk file needs a specific child ASIN or your Merchant SKU (MSKU). Parent ASINs can’t be advertised directly.
- A simple typo: It’s easy to make a small mistake when copying SKUs. Cross-reference the SKU in your file with the one in your Seller Central inventory.
- The product isn’t in your catalog: The SKU might not exist in your inventory for that marketplace, especially if you mix up SKUs from different regions.
The fix is usually straightforward. Find the bad SKU in your processing report, grab the correct one from your inventory, and update that cell before re-uploading.
2. Bid Outside Allowed Range
Seeing a “Bid is outside the allowed range” error can be confusing. Amazon has minimum and maximum bid thresholds that vary by marketplace. For instance, in the US, the minimum bid is typically $0.02.
This error is a perfect example of why you should never delete your original downloaded file. If a bad formula accidentally changes all your bids to $0.01, you can revert to the original data instead of trying to undo a mistake.
Usually, this error is the result of a spreadsheet formula gone wrong. The processing report will point you to the exact row with the faulty bid. Correct the value so it falls within the acceptable range.
3. Duplicate Keyword or Target
This pops up when you try to add a keyword or product target to an ad group where it already exists with the same match type. You can’t have two identical “broad match: running shoes” keywords in the same ad group.
This typically happens when adding new keywords without checking if they’re already active. To fix this, find the duplicate entry in your file and delete that row. If you wanted to change the bid, edit the existing keyword row instead of adding a new one.
Using one of the best Amazon PPC tools can help automate this de-duplication process.
Fixing these small errors is important for performance. As of late 2024, the average Amazon conversion rate is around 9-11%, with optimized listings pushing 10-15%. An error that prevents a critical bid update can directly damage those rates. You can find more insights about Amazon’s growth and seller metrics on 247wallst.com.
Advanced Bulk Operations Strategies
Once you’ve mastered basic bid adjustments, bulk files open up a world of strategic growth. This is where you can implement sophisticated tactics that are difficult to manage through the standard Campaign Manager.

1. Tiered Bidding Structures
A simple but powerful strategy is to create tiered bids based on keyword match types. Not all match types are equal. An exact match keyword that consistently converts is more valuable than a broad match keyword used for discovery.
With a bulk file, you can roll out a tiered structure across your account in minutes.
- First, filter your bulk file to show only ‘Keyword’.
- Then, sort the sheet by the ‘Match Type’ column.
- Finally, apply bidding rules. For example, set exact match bids to 125% of your target CPC, keep phrase match at 100%, and pull broad match back to 75%.
This ensures your budget flows aggressively toward your highest-intent keywords while you use broad match more cautiously for research.
2. A/B Testing Ad Creative
Testing different product images or headlines for Sponsored Brands ads is essential for improving click-through rates (CTR). Setting up these tests manually for dozens of products is a time sink.
Bulk files make it easy to launch A/B tests at scale. In your spreadsheet, create two identical ad groups. The only thing you’ll change is the ‘SKU’ or ‘ASIN’ in the ‘Ad’ row, pointing to a duplicate SKU with a different main image. By launching them at the same time, you get a clean test.
When setting up A/B tests, use a clear naming convention for your ad groups, like “ProductA_Test_Image1” and “ProductA_Test_Image2.” This makes it much easier to compare performance data later.
Let the test run for a couple of weeks, then pull a new bulk file. You can quickly compare CTR and conversion rates to see which creative won.
3. Scheduled Bid Adjustments
Dayparting means adjusting your bids based on the time of day or day of the week to match when customers are most likely to buy. If you sell office supplies, your conversion rates probably spike during business hours. A snack brand might see more action on evenings and weekends.
While Amazon’s interface doesn’t have a built-in scheduling tool, you can manage this with bulk operations. Prepare different versions of your bulk file with pre-set bid adjustments, like a “Weekday Bids” file and a “Weekend Bids” file. At the start of each period, upload the appropriate sheet. It’s a manual process, but it can improve your ACoS by cutting wasted ad spend.
Sellers are digging into tools like the Amazon Marketing Cloud to analyze conversion data by the hour for the insights needed to make dayparting profitable.
4. Complex Placement Strategies
Effective advanced tactics involve implementing duplicated campaigns for placement optimization, and bulk operations make this manageable. The goal is to create separate campaigns to aggressively target specific placements like “Top of Search” or “Product Pages.”
A bulk file is perfect for this. You can take a high-performing campaign, duplicate all its rows in your spreadsheet, and assign it a new name like “CampaignName – Top of Search Only.” Then, use the placement modification columns to set a massive bid multiplier (like +500%) for the ‘Top of Search’ placement. This gives you direct control over where your ads show up.
Frequently Asked Questions
1. How often should I use bulk operations?
It depends on the size and complexity of your ad account.
For large accounts with a ton of daily ad spend, running bulk operations once or twice a week is a solid rhythm. It’s frequent enough to stay on top of performance but not so frequent that you’re just reacting to daily noise.
If you’re managing a smaller account, you might only need a bulk file every couple of weeks or once a month. Consistency is key. Find a schedule that lets you make decisions based on enough performance data.
Pro Tip: Resist the urge to make daily changes with bulk files. Most advertising data needs at least a few days to mature, especially with Amazon’s 72-hour attribution window. Making changes too often is a surefire way to make bad decisions based on incomplete data.
2. Can I use these for Sponsored Brands and Display?
Yes, you can. While bulk ops started as a Sponsored Products-only tool, it now supports Sponsored Brands, Sponsored Display, and Sponsored Products all in the same spreadsheet.
Each ad type has its own unique columns, so it’s important to always download the latest template from Amazon. For instance, a Sponsored Brands campaign will have columns for ad copy that don’t apply to Sponsored Products.
3. What’s the difference between “Paused” and “Archived”?
This is a common point of confusion.
- Paused: This is a temporary “off switch.” When you pause a campaign, ad group, or keyword, you can turn it back on anytime. Paused items still show up in your Campaign Manager and bulk files. It’s perfect for seasonal products or when you’re temporarily out of stock.
- Archived: This is the permanent option. Archiving is for decluttering your account by getting rid of old, irrelevant campaigns. Once something is archived, it cannot be reactivated. It’s effectively gone from your active view.
Use “pause” for temporary stops and “archive” for the final goodbye.
4. What if I mess up an upload?
First, don’t panic. If you upload a file with an error, one of two things usually happens:
- The entire file gets rejected. This is rare and usually means there’s a major structural problem.
- Only specific rows fail. This is far more common. The correct changes will go through, and Amazon will give you a processing report detailing which rows failed and why.
The best practice is to always save an unedited, original copy of the file you download before you start making changes. If you make a huge mistake, you can re-upload that original file to revert everything. For smaller issues, use the processing report to pinpoint the bad rows, fix them, and upload again.