
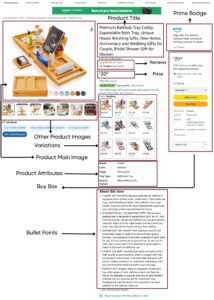
An Amazon product listing is the detail page a customer lands on when they click a product in search results. It holds the title, images, price, bullet points, description, and reviews for a single product, all tied to a unique ASIN (Amazon Standard Identification Number).
Your listing works for two audiences at the same time. Amazon’s search algorithm reads your listing data to decide where your product ranks. The customer reads it to decide whether to buy. Getting only one of those right is not enough. You need both.
Below is a quick overview showing the core components of every Amazon product listing.
| Component | What It Does | Seen by Customers? |
|---|---|---|
| Product Title | Identifies the product and drives search ranking | Yes |
| Bullet Points (Key Features) | Highlights benefits, specs, and selling points | Yes |
| Product Description | Provides detailed product information | Yes |
| Product Images (up to 9) | Shows what the buyer is getting | Yes |
| A+ Content | Rich media brand content replacing standard description | Yes (Brand Registered sellers) |
| Backend Search Terms | Hidden keywords Amazon indexes for search | No |
| Product Identifiers (UPC/EAN) | Verifies product identity in Amazon’s catalog | No |
| SKU | Your internal tracking number | No |
| Browse Node / Category | Places the product in the right department | Partially |
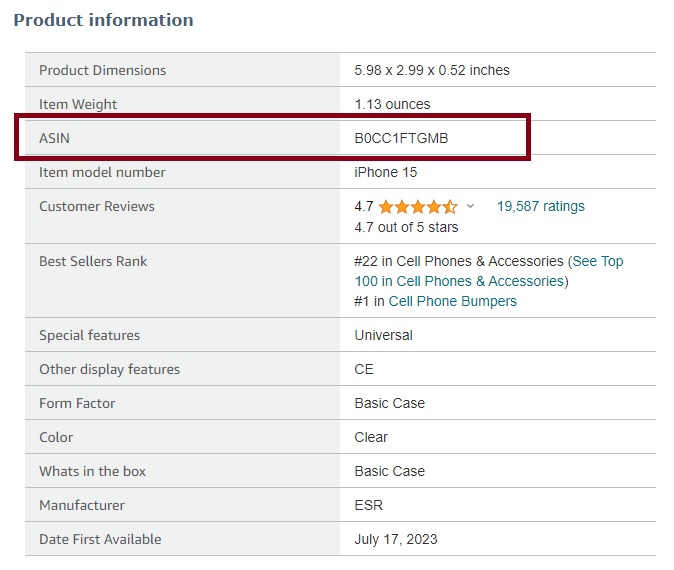
What is ASIN on Amazon?
The Amazon Standard Identification Number (ASIN) is a unique code assigned to each product on the marketplace. It serves as a key identifier for product identification and catalog management, utilized by both Amazon and its sellers.
Each product listed on Amazon is given a unique ASIN. This ensures that every item can be easily found and distinguished from others.
What You Need Before Creating a Listing
Jumping into the listing process without the right setup leads to errors, delays, and rejected submissions. Gather everything below before you open Seller Central.
Amazon Seller Account
You need an active seller account on one of Amazon’s two plans. Your plan type affects what you can do, including whether you can use bulk uploads or run ads.
Below is a side-by-side comparison of the two Amazon seller plans.
| Feature | Individual Plan | Professional Plan |
|---|---|---|
| Monthly subscription | None | $39.99 |
| Per-item selling fee | $0.99 per unit sold | None |
| Bulk listing upload | Not available | Available |
| Advertising access (PPC) | Not available | Available |
| Buy Box eligibility | Limited | Full |
| Category approval requests | Limited | Full |
| Best for | Fewer than 40 sales/month | More than 40 sales/month |
The math is simple. If you sell more than 40 units per month, the Professional plan saves you money compared to paying $0.99 per sale. It also unlocks bulk listing and advertising, which most serious sellers need from day one.
Product Identifiers (UPC, EAN, GTIN)
Amazon requires a product identifier for nearly every listing. For most new products in North America, that means a UPC barcode.
Here is what you need to know about product identifiers before listing.
- UPC (Universal Product Code): The standard identifier for products sold in the US and Canada. Purchase from GS1, the only source Amazon officially recognizes. A single UPC costs $30 from GS1 US. A pack of 10 costs $250.
- EAN (European Article Number): Used for products sold on Amazon’s European marketplaces.
- ISBN: Required for books only.
- GTIN Exemption: If you sell private label, handmade, or bundled products without existing barcodes, you can apply for a GTIN exemption directly in Seller Central. The application is free and usually approved within 24 hours.
Avoid purchasing UPC codes from third-party resellers on sites like eBay. Amazon has flagged and removed listings tied to recycled or unauthorized barcodes. GS1 is the only safe source.
Information You Should Have Ready
Gather this information before you start so you can complete the listing without interruptions.
- Product title (written to your category’s style guide)
- At least one high-quality product image (minimum 1000 x 1000 pixels, pure white background)
- Selling price
- Product condition (New, Used, Refurbished, Collectible)
- Available quantity
- Fulfillment method (FBA or FBM)
- Five bullet points highlighting key features
- Product description
- Brand name, manufacturer name, and part number (if applicable)
What is GTIN Exemption
Not every product has a UPC, EAN, or GTIN code. Private label products, handmade items, custom bundles, store-brand items, and products from smaller manufacturers often lack standard barcodes. Amazon allows sellers to apply for a GTIN exemption, which lets you create listings without providing a product identifier.
For sellers listing a small number of unique products, purchasing individual UPCs from GS1 is manageable. But for brands with large catalogs, the cost and logistics of obtaining unique GS1 barcodes for every single SKU can become a serious obstacle.
This is especially common in these situations.
- Clothing and apparel brands: A single t-shirt design in 5 sizes and 8 colors creates 40 individual SKUs. A full clothing line with 50 designs can easily reach 2,000+ SKUs, each technically requiring its own unique UPC from GS1.
- Handmade and custom products: One-of-a-kind or made-to-order items do not have manufacturer barcodes.
- Private label products: Your contract manufacturer may not assign GTINs to the products they produce for your brand.
- Bundled products: If you bundle multiple existing products into a new offering, the bundle itself typically does not have its own GTIN.
- Vintage, antique, or pre-owned items: These products predate modern barcode systems.
- Parts and industrial components: Many B2B or industrial products were never assigned consumer-facing barcodes.
Without a GTIN exemption, sellers in these situations would either need to purchase thousands of individual GS1 barcodes (at considerable cost) or simply could not list their products on Amazon at all.
How Much GS1 Barcodes Cost at Scale
To illustrate why GTIN exemptions are important for larger catalogs, here is what GS1 US charges for barcode capacity based on the number of unique products you need to identify.
| Number of Unique Products | GS1 US Initial Fee | GS1 US Annual Renewal Fee |
|---|---|---|
| 1 to 10 | $250 | $50 |
| 11 to 100 | $750 | $150 |
| 101 to 1,000 | $2,500 | $500 |
| 1,001 to 10,000 | $6,500 | $1,300 |
| 10,001 to 100,000 | $10,500 | $2,100 |
For a clothing brand with 3,000 SKUs across all size and color combinations, the GS1 initial fee alone is $6,500, with an ongoing $1,300 annual renewal. A GTIN exemption eliminates this cost entirely.
How to Apply for a GTIN Exemption in Seller Central
The application process is straightforward and free. Here is the step-by-step process.
- Log into Seller Central
- Go to Catalog > Add Products
- Click on “I’m adding a product not sold on Amazon”
- When prompted for a product ID, look for the option that says “Apply for GTIN exemption” or navigate directly to the GTIN exemption page via Seller Central Help (search “GTIN exemption”)
- Select the product category you want the exemption for (exemptions are granted per category, not account-wide)
- Enter your brand name exactly as it appears on your products and packaging
- Upload product images showing the product and its packaging. Amazon wants to see the product itself plus any branding, labels, or tags. For clothing, include images of hang tags or sewn-in labels showing the brand name.
- Submit the application
What Amazon Looks for in a GTIN Exemption Application
Amazon reviews your application against specific criteria. Understanding what they evaluate increases your approval chances significantly.
- Brand name consistency: The brand name you enter must match what is physically on the product or its packaging. Amazon may reject applications where the brand name does not appear visibly on the product.
- Product images: Images must clearly show the product and the brand name on the product or its packaging. Blurry images, mockups, or renderings are frequently rejected.
- Letter from the manufacturer (sometimes required): For certain categories, Amazon may ask for a letter on the manufacturer’s letterhead confirming that the products are not assigned GTINs. This letter should include the manufacturer’s name, address, contact information, and a statement that the products do not have UPC/EAN codes.
- Product authenticity: Amazon uses GTIN exemption applications partly as a quality gate. Products that appear to be counterfeit or misbranded will be rejected.
GTIN Exemption Approval Details
There are several important things to understand about how GTIN exemptions work once approved.
- Approval timeline: Most GTIN exemption applications are approved within 24 hours. Some take up to 48 hours if additional review is needed.
- Category-specific: An exemption for “Clothing & Accessories” does not cover “Sports & Outdoors.” If you sell across multiple categories, you need a separate exemption for each one.
- Brand-specific: The exemption is tied to the brand name you submitted. If you launch a second brand, you need a new exemption for that brand.
- No expiration: Once granted, a GTIN exemption does not expire. It remains active as long as your seller account is in good standing.
- Not all categories are eligible: Some categories always require a valid GTIN and do not allow exemptions. Media categories (books, music, DVDs) require ISBNs or equivalent identifiers regardless.
After Your Exemption Is Approved
Once approved, you can create new listings in that category without entering a UPC, EAN, or GTIN. During the listing creation process (both manual and bulk), leave the product identifier field blank or select the “I don’t have a product ID” option. Amazon associates the listing with your approved exemption automatically.
For bulk uploads via flat file, leave the external_product_id and external_product_id_type columns blank for products covered by your exemption.
How to List Products on Amazon Manually: Step-by-Step
The manual method is the standard way to create listings through Amazon Seller Central. You fill in each field directly in the browser, and most listings go live within minutes. This method works best when you are adding one product at a time or have fewer than 10 SKUs to list.
Both Individual and Professional plan sellers can use the manual method.
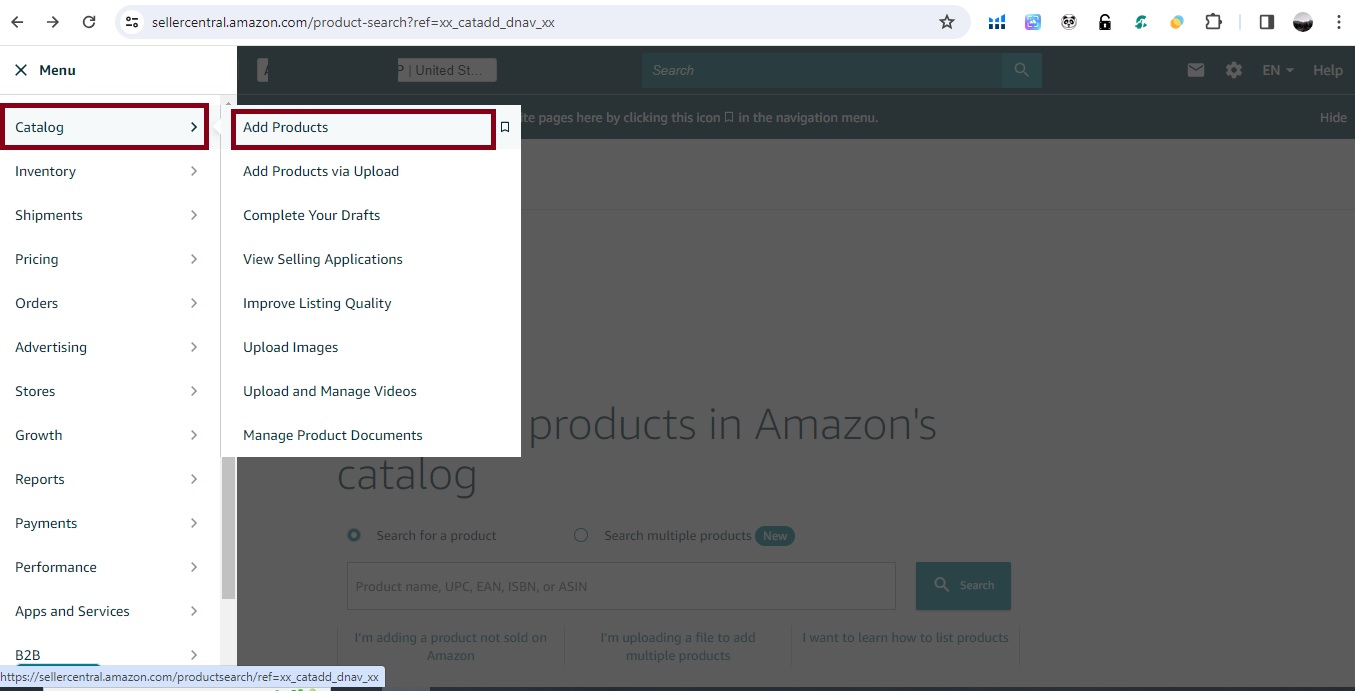
Step 1: Log Into Seller Central and Open the Listing Tool
Go to sellercentral.amazon.com and sign in. From the top navigation bar, hover over Catalog and click Add Products. This opens the listing creation workflow.
Step 2: Search Amazon’s Catalog or Create a New Product Page
Amazon operates a shared catalog. If the exact product you want to sell already exists in Amazon’s database (because another seller or Amazon itself already listed it), you do not create a new listing. You add your offer to the existing detail page. Creating a duplicate listing violates Amazon’s product detail page rules and will be merged or removed.
On the “Add Products” page, you have two paths.
- Match an existing listing: Type the product name, UPC, EAN, ASIN, or ISBN into the search bar. If Amazon finds a match, click “Sell this product” and enter your price, condition, quantity, and fulfillment method. You are done.
- Create a new listing: If the product does not exist in Amazon’s catalog, click “I’m adding a product not sold on Amazon.” This launches the full listing creation form.
Knowing which path to take depends on your business model.
- Wholesale and retail arbitrage sellers almost always match existing listings since they sell products other brands manufacture
- Private label sellers almost always create new listings since they sell their own branded products not yet in Amazon’s catalog
If you accidentally create a new listing for a product that already exists, Amazon’s catalog team will eventually merge it with the existing page, and you may lose control of your listing content in the process.
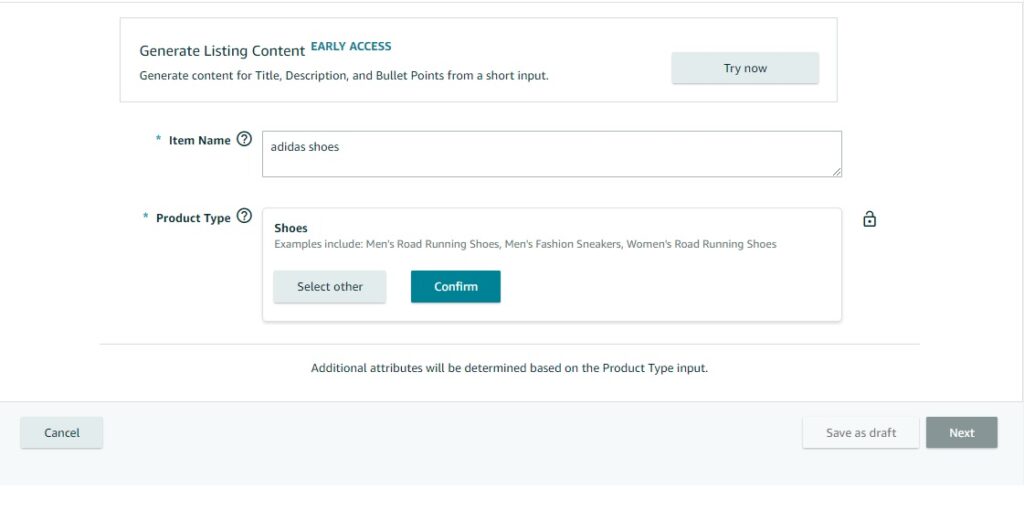
Step 3: Select Your Product Category
Amazon requires you to classify your product by choosing a category and subcategory. This classification determines which form fields appear, which listing rules apply, and where your product shows up in Amazon’s browse structure.
Type a keyword describing your product into the category search bar. Amazon suggests matching categories and product types. Always choose the most specific option available. Listing in a broad or incorrect category reduces your search visibility and may trigger a manual review.
Keep these points in mind when choosing your category.
- Some categories are gated (restricted). You must receive approval before listing. This topic is covered in a dedicated section later in this guide.
- Amazon uses internal “Product Type” classifications underneath each category. Selecting the correct product type ensures you see the right attribute fields (for example, choosing “Coffee Mug” instead of just “Kitchen” gives you relevant fields like capacity, material, and dishwasher safety).
- If you are unsure which category fits best, search for the top-selling competitor product similar to yours, open its listing, and scroll down to the “Product Information” section. The category path is listed there. Use that same path.
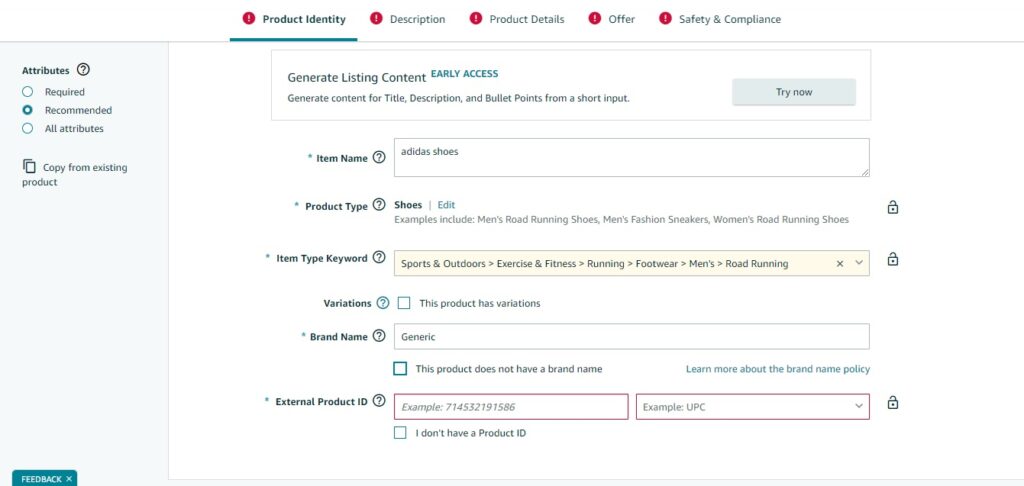
Step 4: Fill In the Product Identity Section
This section captures the core identifying data for your product. All of these fields are visible to Amazon’s catalog system and influence how your product is classified.
- Product Name (Title): Enter a clear, keyword-rich title. The maximum is 200 characters, but many categories enforce stricter limits between 80 and 150 characters. Detailed title rules are covered in the optimization section below.
- Brand Name: Enter the exact brand name. If you are enrolled in Brand Registry, the field may auto-populate or restrict entries to your registered brand.
- Manufacturer: The company that manufactures the product. For private label, this is often the same as the brand name.
- Manufacturer Part Number: The MPN, if one exists. Not required for all categories.
- Product ID: Enter your UPC, EAN, or GTIN. If you have a GTIN exemption, you can skip this field entirely.
Step 5: Fill In the Description Section
This section creates the customer-facing content that appears on your product detail page. These are the words that sell your product.
Key Product Features (Bullet Points)
Amazon gives you up to 5 bullet points. Each bullet can hold up to 500 characters, though some categories allow up to 1,000 characters per bullet.
Effective bullet points follow this structure.
- Start with a short, capitalized benefit phrase (2 to 4 words) like “LEAK PROOF DESIGN” or “PREMIUM STAINLESS STEEL”
- Follow with a descriptive sentence providing specific details, measurements, or use cases
- Address one key benefit or feature per bullet
- Include secondary keywords naturally within the text
- Never include pricing, shipping details, promotional language, or competitor references
Product Description
You have up to 2,000 characters. Use this space to expand on the information in your bullets and tell a fuller story about the product. Basic HTML is allowed: <b> for bold, <br> for line breaks, <p> for paragraphs. Do not use JavaScript, iframes, or external links.
If you have A+ Content through Brand Registry, the enhanced content replaces this description field on the detail page. You should still fill in the description field because Amazon uses it for search indexing and it appears as a fallback in contexts where A+ Content is not rendered (such as some mobile views and third-party apps).
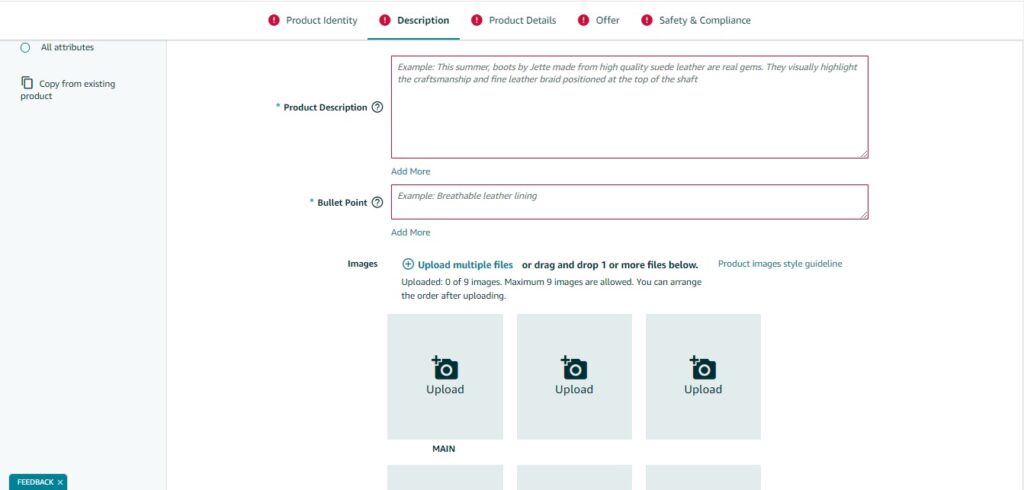
Step 6: Upload Product Images
Images are the single biggest factor in conversion rate after price. Weak images lose sales before a buyer reads a single word of your listing.
Below is a summary of Amazon’s product image requirements for 2026.
| Requirement | Specification |
|---|---|
| Main image background | Pure white (RGB 255, 255, 255) |
| Minimum image size | 1000 x 1000 pixels (enables zoom function) |
| Recommended image size | 2000 x 2000 pixels |
| Accepted file formats | JPEG (.jpg), TIFF (.tif), PNG (.png), GIF (.gif) |
| Maximum file size | 10 MB per image |
| Main image content rules | Product only. No text, logos, watermarks, borders, badges, or props |
| Product fill in frame | Must occupy at least 85% of the image area |
| Total images allowed | 9 (1 main + 8 additional) |
| Additional image rules | Lifestyle photos, infographics, size charts, dimensions, and usage scenarios allowed |
Your main image is the thumbnail buyers see in search results. It directly controls your click-through rate. If it fails Amazon’s automated image review, your listing gets suppressed, often within hours.
Here is a proven image strategy that maximizes both trust and conversions.
- Image 1 (Main): Product on white background, filling 85%+ of the frame, highest resolution available
- Image 2: Product from a different angle or showing key features close up
- Image 3: Infographic highlighting top 3 to 5 features with callout text
- Image 4: Lifestyle image showing the product in use in a real-world setting
- Image 5: Size/scale reference showing the product next to a common object or with dimensions overlaid
- Image 6: What’s in the box (all included items laid out together)
- Image 7: Comparison or chart showing how this product differs from alternatives
- Image 8: Additional lifestyle or close-up detail shot
- Image 9: Brand story or trust-building image (certifications, manufacturing process, warranty info)
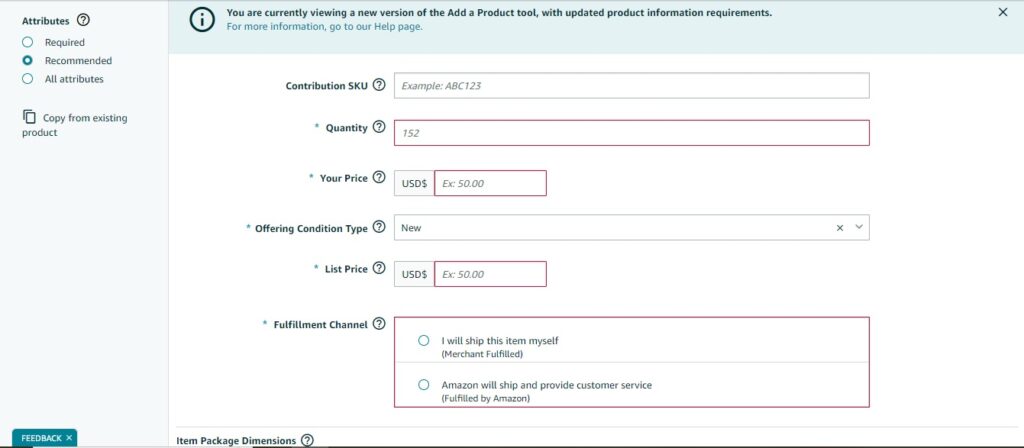
Step 7: Set Your Offer Details
The Offer tab covers the commercial side of your listing.
- Price: Set your selling price. Factor in Amazon’s referral fee (typically 15%), fulfillment costs (FBA or your own shipping), and your target profit margin before choosing this number.
- Condition: Select the product condition. Options include New, Used – Like New, Used – Very Good, Used – Good, Used – Acceptable, Refurbished, and Collectible.
- Fulfillment Channel: Choose FBA (Fulfilled by Amazon) or FBM (Fulfilled by Merchant). Choosing FBA means you will need to create an inbound shipment plan and send inventory to Amazon’s warehouse after listing.
- Quantity: Enter the number of units available for sale. FBA sellers can set this to 0 initially and update it once inventory arrives at Amazon’s fulfillment center.
- SKU: Your internal tracking code. If you leave it blank, Amazon generates one automatically. Using a consistent naming system (like BRAND-CATEGORY-001) makes inventory management and accounting significantly easier as your catalog grows.
Step 8: Enter Backend Search Terms
The Keywords tab contains your backend search terms. Buyers never see these, but Amazon’s algorithm indexes them and uses them when deciding which search queries your product appears for.
You get one text field with a 500-byte limit. This is roughly 500 English characters, though accented characters and non-Latin characters consume more than one byte each.
Follow these rules to extract maximum value from this limited space.
- Include synonyms, alternate spellings, and abbreviations that are not already in your title or bullet points
- Use only singular word forms (Amazon automatically matches plurals, so “bottle” covers “bottles”)
- Separate all words with single spaces (commas, semicolons, and pipes waste bytes and serve no purpose)
- Skip filler words like “a,” “an,” “the,” “for,” “with,” “and”
- Add Spanish translations of your highest-volume keywords if selling on Amazon US (Amazon indexes them for bilingual searches, which is a significant untapped traffic source)
- Never include competitor brand names, ASINs, or the phrase “best seller”
- Do not repeat words that already appear in your title or bullet points (Amazon indexes those fields separately and repetition wastes your byte limit)
Step 9: Add Product Compliance Information (If Required)
Depending on your product category, Amazon may require compliance documentation before your listing goes live. This step has expanded significantly in recent years.
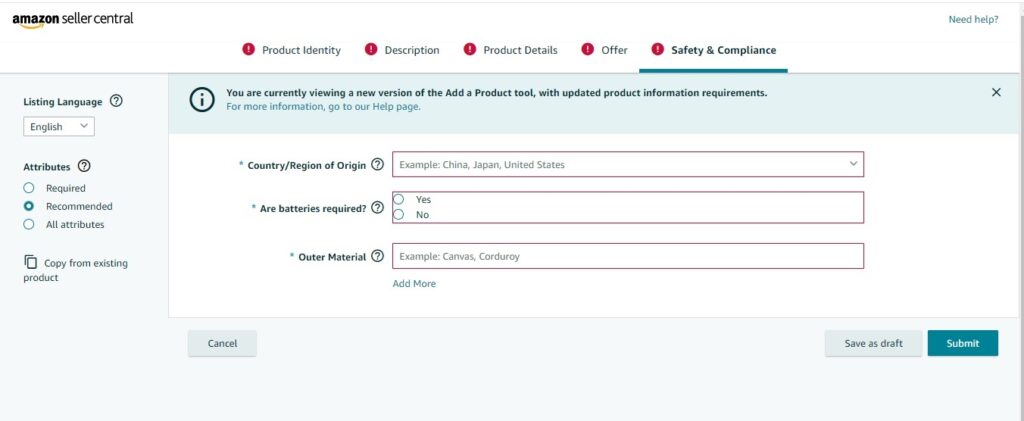
Products that commonly require additional compliance information include the following.
- Products containing lithium batteries (must include battery type, number of cells, and watt-hour rating)
- Items subject to California Proposition 65 (must include warning text)
- Children’s products (must comply with CPSIA and may need a Children’s Product Certificate)
- Dietary supplements (must include a Supplement Facts panel and comply with FDA labeling requirements)
- Pesticides and chemical products (must include EPA registration number)
- Topical products (skincare, cosmetics) may require Safety Data Sheets
- Electronics requiring FCC certification
Amazon may request these documents during listing creation or flag your listing for compliance review after it goes live. Having documentation ready prevents delays.
Step 10: Submit and Review
Click “Save and finish” to submit your listing. Amazon typically publishes new listings within 15 minutes to 24 hours. Listings requiring manual review or those in gated categories may take up to 48 hours.
After submission, verify your listing status under Inventory > Manage All Inventory. The Status column shows whether your listing is Active, Inactive, or Suppressed. Click on any quality alerts or warnings to see exactly what needs to be fixed.
How to List Products on Amazon in Bulk Using Flat File Templates
When you have more than a handful of products to list, entering each one manually through Seller Central is painfully slow. Amazon’s bulk listing tool lets you upload dozens, hundreds, or thousands of products at once using a spreadsheet template called a flat file.
When Bulk Listing Makes Sense
The flat file method is worth the setup time in these scenarios.
- You are launching a private label brand with multiple SKUs (especially common in apparel, where size/color combinations multiply fast)
- You are onboarding a wholesale supplier’s full catalog
- You need to update prices, quantities, or listing details across many products simultaneously
- You are creating large variation families (a parent product with dozens of child SKUs)
- You manage listings across multiple Amazon marketplaces and want a repeatable upload process
Step 1: Download Your Category-Specific Template
Amazon provides separate flat file templates for each product category. Each template contains the exact required and optional columns for that category’s products, including category-specific attributes you would not find in a generic template.
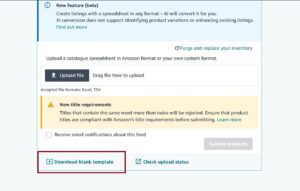
Follow these steps to download the correct template.
- Log into Seller Central
- Navigate to Catalog > Add Products via Upload
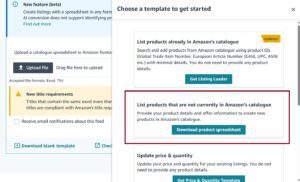
- Click Download Blank Template
- Now select Download Product Spreadsheet
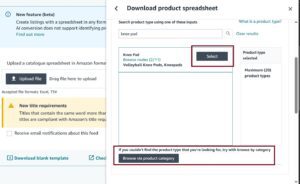
- Select your marketplace (e.g., Amazon.com)
- Now search product type with keyword or title
- Choose your product category (or search by product type keyword)
- Click Generate Spreadsheet
- Amazon downloads an Excel file (.xlsm) tailored to your selected category
If your catalog spans multiple categories, you need a separate template for each one. For example, if you sell both kitchen products and pet supplies, you would download the “Kitchen” template and the “Pet Supplies” template, fill out each separately, and upload them individually.
Step 2: Understand the Template Structure
Every flat file template contains multiple tabs. Understanding what each tab does before you start entering data prevents the majority of upload errors.
Below is a breakdown of the tabs in a standard Amazon flat file template.
| Tab Name | What It Contains | What You Do With It |
|---|---|---|
| Instructions | Explains how to use the template and how to upload | Read this first |
| Data Definitions | Describes every column, its accepted values, and whether it is required or optional | Reference this constantly while filling in the Template tab |
| Template | The main data entry tab where you input your product information | This is the only tab you fill in and the only tab Amazon reads |
| Example | Sample rows showing correctly formatted entries | Compare your entries against these to check your formatting |
| Valid Values | Drop-down lists for fields like condition type, fulfillment channel, color mapping, size mapping | Copy values exactly from here (spelling and capitalization must match) |
The Template tab is where all your work happens. Each row represents one product (or one variation of a product). Each column represents one product attribute.
Step 3: Fill In Required and Recommended Fields
The required fields vary by category, but certain columns appear in every flat file template. If any required field is missing or contains an invalid value, that row will fail during processing.
Here are the fields required across all Amazon flat file templates.
- feed_product_type: The product type classification. Copy the exact value from the Valid Values tab. Even a minor spelling difference causes a rejection.
- item_sku: Your internal SKU for the product. Must be unique across your entire catalog.
- brand_name: The product’s brand name, exactly as registered or as it appears on the product.
- item_name: The product title. Follow your category’s character limit and style guide.
- external_product_id: Your UPC, EAN, or GTIN. Leave blank if you have a GTIN exemption.
- external_product_id_type: The type of identifier (enter “UPC,” “EAN,” or “GTIN”). Leave blank if exempt.
- main_image_url: A publicly accessible URL pointing to your main product image. Amazon’s servers must be able to reach this URL directly, with no login walls, CDN restrictions, or redirects.
- standard_price: Your selling price.
- quantity: Units available if using FBM. For FBA, leave this blank or at 0 until you create an inbound shipment.
- fulfillment_channel_code: Enter “DEFAULT” for Merchant Fulfilled or “AMAZON_NA” for FBA in North America.
- condition_type: Typically “New” for new products. Copy the value from the Valid Values tab.
Highly recommended optional fields that dramatically improve listing quality include the following.
- bullet_point1 through bullet_point5: Your five key feature bullet points
- product_description: Your full product description
- generic_keywords: Backend search terms (250-byte limit)
- other_image_url1 through other_image_url8: URLs for your additional product images
- item_weight and item_dimensions: Product weight and size (required for FBA)
- material_type, color_name, size_name: Category-specific attributes that help Amazon categorize and filter your product correctly
Step 4: Prepare Your Image URLs
For bulk uploads, Amazon requires that all images be hosted at publicly accessible URLs. Amazon’s servers download the images from these URLs during processing. The URLs must remain live and accessible for at least 72 hours after upload.
Common approaches for hosting listing images include the following.
- Your own website or server: Upload images to your website and use those URLs
- Amazon’s image hosting: If you already have a manual listing with uploaded images, you can use those Amazon-hosted image URLs
- Cloud storage services: Use Google Cloud Storage, AWS S3, or similar services with public access enabled
- Third-party listing tools: Many Amazon listing tools (Helium 10, Jungle Scout, SellerApp) provide image hosting for flat file uploads
Make sure every URL you enter returns the image directly (ends in .jpg, .png, etc.) and does not redirect to a webpage or require authentication.
Step 5: Upload the Completed File
Once your spreadsheet is filled out and saved (keep it in .xlsm or .xlsx format), upload it through Seller Central.
- Go to Catalog > Add Products via Upload
- Click Upload your Inventory File
- Select the file type (typically “Inventory Files for non-Media Categories”)
- Choose your completed file
- Click Upload
Amazon begins processing immediately. Processing times depend on file size.
Step 6: Download and Review the Processing Report
After processing is complete, a report appears on the upload page. Download it immediately. This report tells you exactly which rows succeeded, which rows failed, and why.
You will see one of these outcomes in the processing report.
- Complete: Every row processed successfully. All listings are live or pending.
- Complete with errors: Some rows went through, others failed. Each failed row includes a specific error code and explanation.
- Fatal errors: The entire file was rejected. This typically means a formatting problem, a wrong template version, or a corrupted file.
Most Common Flat File Upload Errors and How to Fix Them
Upload errors repeat themselves constantly. Knowing the most frequent ones saves hours of frustration.
Below is a reference of common flat file errors sellers encounter and the specific fix for each.
| Error Code | What It Means | How to Fix It |
|---|---|---|
| 8572 | A required field is missing | Open the Data Definitions tab, find the missing required field, and fill it in for the affected row |
| 8541 | Invalid value for product type | Copy the exact value from the Valid Values tab (capitalization and spacing must match perfectly) |
| 5665 | Your UPC/EAN is already assigned to a different ASIN | Verify your UPC is correct. If it is your legitimate code, open a case with Seller Support to resolve the conflict |
| 8560 | Image URL is inaccessible | Ensure the URL is publicly accessible, not behind a login, and returns the image file directly |
| 90117 | Title exceeds the character limit for this category | Shorten your title to meet the category-specific maximum |
| 6024 | This category requires approval | Apply for and receive category ungating through Seller Central before re-uploading |
| 8058 | SKU already exists in your inventory | You are trying to create a new listing with a SKU you already used. Change the SKU or update the existing listing instead |
| 8566 | Brand name not authorized | Your brand name must match Brand Registry enrollment or you need brand approval. Contact Brand Registry support. |
If you encounter an error code not listed here, paste the full error code number into the Seller Central Help search bar. Amazon documents every error code with resolution instructions.
Tips for Successful Bulk Uploads
These practices prevent the most common issues sellers face with flat file submissions.
- Always download a fresh template before starting. Amazon periodically updates template formats, and using an outdated version causes file-level rejections.
- Fill in your first 5 to 10 rows, upload them as a test file, check the processing report, and fix any issues before uploading your full catalog. This approach catches systemic errors early.
- Use the Valid Values tab religiously. Manually typing values like “fulfillment_channel_code” or “condition_type” instead of copying from the Valid Values tab is the number one source of preventable errors.
- Keep a master copy of your completed flat file. You will need it for future updates, price changes, and inventory adjustments.
- When updating existing listings, you only need to include the SKU column and the columns you want to change. You do not need to re-enter every field.
Manual vs. Bulk Listing: Choosing the Right Method
Both listing methods accomplish the same goal, but they are designed for different situations. Choosing the wrong one wastes your time.
Below is a comparison to help you decide which listing method fits your situation.
| Factor | Manual Listing | Bulk Listing (Flat File) |
|---|---|---|
| Best for | 1 to 10 products | 10+ products |
| Seller account required | Individual or Professional | Professional only |
| Learning curve | Low | Moderate (template structure) |
| Speed per listing | 10-20 minutes each | 2-5 minutes each (after setup) |
| Error visibility | Immediate (on-screen validation) | Post-upload (processing report) |
| Bulk price/quantity updates | Not practical | Fast and efficient |
| Variation creation | Doable but clunky | Structured and scalable |
| Best use case | First listing, testing a product | Catalog onboarding, wholesale, multi-SKU brands |
Setting Up Product Variations (Parent-Child Listings)
Product variations are one of the most confusing parts of Amazon listing for new sellers, but the concept is simpler than Amazon’s documentation makes it seem. This section breaks it down in plain language with examples.
A variation is Amazon’s way of grouping related versions of the same product onto a single detail page. Instead of creating a separate listing for every size, color, or style of your product, you create one listing that lets the buyer choose their preferred option.
Think of it this way: when you shop for a t-shirt on Amazon and you see a dropdown for “Size” and clickable swatches for “Color,” you are looking at a product with variations. Every size/color combination is a separate product (with its own ASIN, inventory, and price), but they all live together on one page.
Three Parts of a Variation
Every variation family consists of three components. Understanding each one is essential before you try to create them.
1. Parent Listing (The Container)
The parent listing is an invisible wrapper. Customers never see it, and they cannot buy it. It exists only to connect all the child listings together. Think of it as the folder that holds all the individual files.
The parent listing has:
- A title (usually the generic product name without a specific size or color)
- A SKU
- A product type and category
- No price, no inventory, no images of its own
2. Child Listings (The Buyable Products)
Each child listing is a real, purchasable product with its own unique details. Every child has:
- Its own ASIN (Amazon assigns this automatically)
- Its own SKU
- Its own price (different sizes can have different prices)
- Its own inventory count
- Its own images (each color should show its own photos)
- Its own product identifier (UPC/EAN) unless you have a GTIN exemption
3. Variation Theme (What Makes Them Different)
The variation theme defines the attribute that differentiates the children from each other. Amazon provides predefined variation themes based on your product category.
Below are the most common variation themes sellers encounter.
| Variation Theme | What It Controls | Common Category |
|---|---|---|
| Color | Different colors of the same product | Clothing, Home, Electronics accessories |
| Size | Different sizes of the same product | Clothing, Shoes, Pet supplies |
| SizeName-ColorName | Both size and color differ | Clothing, Shoes, Bedding |
| Flavor | Different flavors | Food, Supplements, Beverages |
| Scent | Different fragrances | Candles, Personal care, Cleaning |
| Pattern | Different patterns or prints | Clothing, Home textiles |
| StyleName | Different styles | Furniture, Accessories |
| PackageQuantity | Different pack sizes (1-pack, 3-pack, 6-pack) | Consumables, Office supplies |
Not every category supports every theme. When you create a listing and select your product type, Amazon shows you which variation themes are available. If the theme you need is not listed, your category does not support that type of variation.
How to Create Variations Using the Manual Method
This is the most intuitive way to create variations if you have a small number of options (for example, a product in 3 colors or 5 sizes).
Step-by-step process:
- Start creating a new listing in Seller Central (Catalog > Add Products > I’m adding a product not sold on Amazon)
- Select your product category and product type
- Click the “Variations” tab in the listing creation form
- Select your variation theme from the dropdown (e.g., “ColorName” or “SizeName”)
- Click “Add variations”
- Enter each variation value (e.g., “Black,” “White,” “Navy Blue”) and click Add for each one
- A table appears with one row per variation. Fill in the SKU, price, quantity, condition, UPC, and images for each child
- Complete the rest of the listing form (title, bullets, description, search terms). This content applies to the parent and is shared across all children.
- Click “Save and finish”
Amazon creates the parent listing automatically and generates individual ASINs for each child. The entire variation family appears as a single product page with selectable options.
How to Create Variations Using the Flat File (Bulk) Method
For larger variation families, such as a clothing item in 5 sizes and 8 colors (40 child SKUs), the flat file method is far more practical than entering each one manually.
Here is exactly how the flat file columns work for variations.
Key columns for variation listings:
| Column Name | Parent Row Value | Child Row Value |
|---|---|---|
| parent_child | Parent | Child |
| parent_sku | (Leave blank) | The exact SKU of the parent row |
| relationship_type | (Leave blank) | Variation |
| variation_theme | SizeName-ColorName (or your theme) | SizeName-ColorName (must match parent) |
| item_sku | YOUR-PARENT-SKU | CHILD-SKU-001, CHILD-SKU-002, etc. |
| item_name | Generic product title | Can be left blank (inherits from parent) or customized per child |
| standard_price | (Leave blank, parent is not purchasable) | Individual price for this child |
| quantity | (Leave blank) | Available inventory for this child |
| color_name | (Leave blank) | Black, White, Navy Blue, etc. |
| size_name | (Leave blank) | Small, Medium, Large, XL, etc. |
| main_image_url | (Leave blank) | Unique image URL for this child variation |
A real example with 3 rows for a t-shirt variation:
Here is how three rows would look in your flat file for a simple t-shirt in two colors and two sizes.
| item_sku | parent_child | parent_sku | relationship_type | variation_theme | color_name | size_name | standard_price |
|---|---|---|---|---|---|---|---|
| TSHIRT-PARENT | Parent | SizeName-ColorName | |||||
| TSHIRT-BLK-M | Child | TSHIRT-PARENT | Variation | SizeName-ColorName | Black | Medium | 24.99 |
| TSHIRT-BLK-L | Child | TSHIRT-PARENT | Variation | SizeName-ColorName | Black | Large | 24.99 |
You would add additional rows for every size/color combination. A product in 5 sizes and 4 colors would have 1 parent row plus 20 child rows, for 21 rows total in your flat file.
Adding a New Child to an Existing Parent Listing
You do not need to rebuild the entire variation family to add a new option. Whether you are introducing a new color or a new size, you can add individual children to an existing parent.
Manual method: Go to the existing listing in Manage All Inventory, click Edit, navigate to the Variations tab, and add the new variation value with its details.
Flat file method: Create a new file with only the new child row. Reference the existing parent’s SKU in the parent_sku column. Set parent_child to “Child” and relationship_type to “Variation.” Upload the file, and Amazon adds the new child to the existing family.
The new child immediately inherits the parent listing’s combined review count and rating, which is one of the strongest advantages of the variation structure.
Amazon Listing Changes and Updates for 2026
Amazon updates its listing tools, policies, and enforcement systems constantly. These are the most significant changes sellers need to be aware of heading into 2026.
AI-Powered Listing Generation
Amazon launched generative AI listing tools in late 2023 and has expanded them steadily since. Sellers can now generate complete product titles, bullet points, and descriptions by entering a brief product summary or uploading a product URL. The tool creates content aligned with Amazon’s style guidelines.
These tools save time, but they produce generic output. Sellers who review and customize the AI-generated content consistently outperform those who publish it without editing. Think of the AI as a first draft, not the final product.
Enhanced Listing Quality Dashboard
The Listing Quality Dashboard now offers more granular recommendations. It flags missing attributes, scores your image quality, and rates overall content completeness. Amazon has stated in seller communications that addressing these recommendations improves search visibility.
Stricter Title Policy Enforcement
Amazon’s automated systems now actively suppress titles that break the style guide. Excessive capitalization, promotional language, keyword stuffing, and decorative special characters all trigger suppression. This enforcement has been especially aggressive in the Health & Personal Care, Beauty, and Grocery categories.
Expanded Compliance Documentation Requirements
Several categories now require additional compliance paperwork before a listing goes live. Products containing batteries, chemicals, or items subject to California’s Proposition 65 must include safety data sheets, compliance certificates, or exemption documentation at the time of listing.
Faster AI Image Review
Amazon has deployed upgraded AI-based image review systems that evaluate and flag non-compliant images more quickly than before. Main images with colored backgrounds, text overlays, or lifestyle content used in the main slot are being caught and suppressed within hours rather than days.
Frequently Asked Questions
How long does it take for a new Amazon listing to go live?
Most listings become active within 15 minutes to 24 hours after submission. Listings in restricted categories or those flagged for manual review can take up to 48 hours. Bulk uploads depend on file size. Files with fewer than 100 products process in 15 to 30 minutes, while larger files may take several hours.
Can I list products on Amazon without a UPC code?
Yes, in certain cases. You can apply for a GTIN exemption through Seller Central if you sell handmade items, private label products, or items in categories that do not require a UPC. Amazon also accepts EAN, ISBN, and GTIN identifiers. GTIN exemption applications are free and typically approved within 24 hours.
What is the difference between creating a new listing and selling on an existing one?
If the product you want to sell already has a detail page on Amazon (created by another seller or Amazon itself), you must add your offer to that existing listing. Creating a duplicate page violates Amazon’s catalog policy and will be removed. New listings should only be created for products that do not yet exist in Amazon’s catalog.
How many images can I upload to an Amazon product listing?
Amazon allows up to 9 images per listing, which includes 1 main image and up to 8 additional images. All images should be at least 1000 x 1000 pixels to activate the zoom feature. Brand Registered sellers can also upload product videos.
What happens when an Amazon listing gets suppressed?
Suppressed listings are removed from search results but remain in your seller inventory. Go to Manage All Inventory and filter by “Suppressed” to see affected listings and the reasons for suppression. Fix the flagged issue, and Amazon typically restores the listing within a few hours.
Can Individual plan sellers use the bulk upload tool?
No. Bulk listing uploads using flat file templates are only available to Professional seller account holders ($39.99/month). Individual plan sellers must create listings one at a time through the manual “Add a Product” workflow.
How do I add a video to my Amazon product listing?
Product videos are available to sellers enrolled in Amazon Brand Registry. Go to Catalog > Upload Videos in Seller Central, upload your video file, and assign it to the relevant ASINs. The video appears in the image carousel and in the dedicated video section on the product detail page.
How can I tell if my backend search terms are actually indexed?
Use the reverse ASIN lookup feature in tools like Helium 10 or Jungle Scout to see which keywords Amazon has indexed for your listing. You can also manually check by searching your ASIN combined with a specific keyword on Amazon (for example, “B08XYZ123 stainless steel bottle”). If your listing appears in the results, it is indexed for that term.