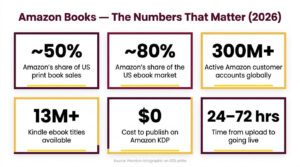
Amazon is the largest book retailer on the planet, accounting for more than half of all print book sales and the vast majority of ebook sales in the United States. Publishing your book on Amazon puts your work in front of over 300 million active customer accounts across 13 international marketplaces. And in 2026, the entire process is free.
This guide walks you through every stage of publishing a book on Amazon using Kindle Direct Publishing (KDP). You will get specific formatting requirements, real royalty calculations, pricing strategies, and marketing tactics that go far beyond surface-level advice.
The self-publishing industry has experienced significant growth, and Amazon KDP sits at the center of it. Understanding the scale of this opportunity helps you set realistic expectations and make informed decisions about your publishing strategy.
Table below reflect the current state of book publishing on Amazon, drawn from industry reports and platform data.
| Metric | Data Point | Source/Year |
| Amazon’s share of US print book sales | ~50% | Codex Group, 2024 |
| Amazon’s share of US ebook market | ~80% | Various industry estimates, 2024 |
| Self-published ebook unit share on Amazon | 30% to 34% of all ebook units sold | Author Earnings Report |
| Active Amazon customer accounts globally | 300+ million | Amazon annual report, 2024 |
| Kindle ebook titles available | 13+ million | Amazon, 2024 |
| Kindle Unlimited subscriber base | Millions (exact figure undisclosed) | Amazon |
| Cost to publish on Amazon KDP | $0 (free) | Amazon KDP |
| Time from upload to live listing | 24 to 72 hours | Amazon KDP |
| KDP ebook royalty rate options | 35% or 70% | Amazon KDP |
| Number of Amazon book marketplaces | 13 countries | Amazon KDP |
What Is Amazon KDP (Kindle Direct Publishing)?
Kindle Direct Publishing is Amazon’s free self-publishing platform. It lets anyone publish ebooks, paperbacks, and hardcovers without a literary agent, a publishing contract, or any upfront investment. Amazon handles printing, fulfillment, and payment processing for you.
KDP absorbed the former CreateSpace print-on-demand service in 2018 and has continued to expand its features. In 2026, KDP remains the most widely used self-publishing platform in the world.
You can publish three formats through KDP.
- Kindle Ebooks delivered digitally to Kindle devices and apps
- Paperback Books printed on demand when a customer orders
- Hardcover Books available with case laminate covers in select marketplaces
The print-on-demand model means Amazon only prints a physical copy when someone buys one. You never purchase inventory, rent warehouse space, or handle shipping. Every sale is fulfilled automatically by Amazon.
Self-Publishing vs. Traditional Publishing: Which Path Makes Sense?
First-time authors often debate whether to pursue a traditional publishing deal or self-publish through Amazon. Both routes have legitimate advantages, but the differences in timeline, earnings, and creative control are substantial.
The following comparison breaks down the key differences between these two paths.
| Factor | Amazon Self-Publishing (KDP) | Traditional Publishing |
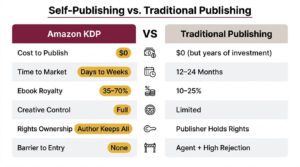
| Upfront cost to the author | $0 (free to publish) | $0 (publisher covers production) |
| Time to publication | Days to weeks | 12 to 24 months typical |
| Ebook royalty rate | 35% to 70% of list price | 10% to 25% of net price |
| Print royalty rate | 60% minus printing cost | 6% to 10% of list price |
| Creative control | Full (cover, price, content, marketing) | Limited; publisher makes key decisions |
| Rights ownership | Author retains all rights | Publisher holds rights (often 5 to 15 years) |
| Marketing support | Author-driven (or paid ads) | Varies widely; rarely substantial for new authors |
| Barrier to entry | None | Need an agent; high rejection rates |
| Ability to update content | Update anytime, free | Extremely difficult after printing |
| Income timeline | Monthly royalties (60-day lag) | Advance + semi-annual royalty statements |
What You Need Before Publishing on Amazon
Preparing your materials before you log into KDP saves time and prevents publishing delays. Incomplete or low-quality uploads are the top reason books get stuck in Amazon’s review process.
Your pre-publishing checklist should include the following items.
- A completed, professionally edited manuscript
- A professional book cover (front only for ebook; full wrap for print)
- A compelling book description (up to 4,000 characters)
- Seven targeted keyword phrases for Amazon search
- Three browse categories selected
- A bank account for royalty deposits
- Tax information (SSN or EIN for US authors; W-8BEN for international authors)
- An ISBN (optional for ebooks; free from Amazon for print books, or purchase your own)
How Much Does It Cost to Publish a Book on Amazon?
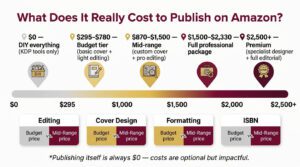
Publishing on KDP itself is completely free. However, most successful authors invest in professional services to ensure their book competes with traditionally published titles. The costs below represent typical ranges in the US market.
| Service | Budget Range | Mid-Range |
| Professional editing (developmental + copy) | $200 to $500 | $500 to $1,500 |
| Book cover design | $50 to $150 (pre-made) | $150 to $500 (custom) |
| Interior formatting | $0 (free tools) | $50 to $200 |
| ISBN | $0 (Amazon-provided) | $125 (single from Bowker) |
| Copyright registration (US) | $45 to $65 | $45 to $65 |
| Amazon KDP publishing fee | $0 | $0 |
| Estimated total | $295 to $780 | $870 to $2,330 |
You can technically publish for $0 by doing everything yourself. However, investing in professional editing and a quality cover dramatically improves your book’s performance. Readers make purchase decisions in seconds, and a polished product builds trust immediately.
How to Publish a Book on Amazon: Step-by-Step Process
The sections below walk you through every stage of the KDP publishing process. Follow these steps in order, and your book can be live on Amazon within days.
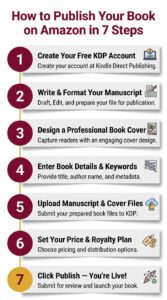
Step 1: Create Your Free Amazon KDP Account
Navigate to kdp.amazon.com and sign in with your existing Amazon account. If you already buy products on Amazon, you can use that same login. Amazon will prompt you to complete your author and payment profile before you can publish.
Complete these setup tasks during your first login.
- Enter your legal name or the pen name you want to publish under
- Add your mailing address
- Provide bank account details for royalty deposits (checking or savings)
- Complete the tax interview (W-9 for US residents; W-8BEN for international authors)
- Verify your identity if Amazon requests additional documentation
Amazon typically processes your tax and payment information within 24 to 48 hours. Once your account is verified and active, you can start creating your first book listing right away.
Step 2: Write and Format Your Manuscript
Your manuscript must meet Amazon’s formatting specifications for your chosen format. Ebooks and print books have different requirements, and using the correct file type from the start prevents formatting headaches later.
Ebook Manuscript Requirements
Amazon accepts multiple file types for Kindle ebooks. The platform converts your uploaded file into the Kindle format automatically. However, some formats produce cleaner results than others.
Amazon supports the following ebook file types.
- EPUB (recommended for most authors; cleanest conversion)
- DOCX (Microsoft Word; widely used and reliable)
- KPF (Kindle Package Format; created by Kindle Create)
- PDF (supported but limited; not ideal for reflowable text)
- HTML and RTF (supported but less commonly used)
Print Book Manuscript Requirements
Paperback and hardcover books require a print-ready PDF. Your file must include proper margins, embedded fonts, and correct trim size dimensions.
Key specs for print manuscripts include the following.
- File format: PDF (print-ready, flattened)
- Resolution: 300 DPI minimum for all images
- Fonts: Must be fully embedded in the PDF
- Margins: Minimum 0.25 inches on outside edges; inside (gutter) margin increases with page count
- Bleed: 0.125 inches on all sides if any content touches the page edge
- Page count: 24 to 828 pages for paperback; 75 to 550 pages for hardcover
Step 3: Design a Professional Book Cover
Your cover is the single most important factor in a reader’s decision to click on your book. Research consistently shows that readers evaluate covers within fractions of a second. A poorly designed cover signals amateur quality no matter how good your writing is.
Ebook Cover Specifications
Amazon recommends the following dimensions for Kindle ebook covers.
- Ideal size: 2,560 x 1,600 pixels (height x width)
- Minimum size: 1,000 x 625 pixels
- Aspect ratio: 1.6:1
- File format: JPEG or TIFF
- Maximum file size: 50 MB
- Color space: RGB (not CMYK)
Print Book Cover Specifications
Paperback and hardcover covers require a full-wrap file that includes the front cover, spine, and back cover in a single image. Exact dimensions vary based on your trim size, page count, and paper type.
Use Amazon’s free Cover Calculator tool (available in your KDP dashboard) to download a template with precise measurements for your specific book. The template shows exactly where the spine, front, back, barcode, and bleed areas fall.
Cover Design Options and Costs
The table below compares common approaches for getting a professional book cover.
| Option | Typical Cost | Quality Range | Turnaround Time |
| KDP Cover Creator (Amazon’s free tool) | Free | Basic | Instant |
| Pre-made covers (SelfPubBookCovers, GoOnWrite) | $50 to $200 | Good | Instant to 24 hours |
| Fiverr designers | $20 to $300 | Highly variable | 3 to 14 days |
| 99designs contest | $299 to $599 | Good to excellent | 7 to 14 days |
| Professional genre-specialist designer | $300 to $1,500+ | Excellent | 7 to 30 days |
For the best results, invest $150 to $500 in a custom cover from a designer who specializes in your specific genre. Study the current bestsellers in your Amazon category to learn what cover styles, color palettes, and typography readers expect.
Step 4: Enter Your Book Details on KDP
Log into your KDP dashboard and click “Create New Title.” Select your format (Kindle ebook, paperback, or hardcover). You will then fill out three sections of information. The first section covers your book’s metadata.
Fill in each field thoughtfully. Amazon uses this data to index your book, display it in search results, and recommend it to readers.
- Language: Select the primary language of your book
- Book title: Your exact title (capitalize major words consistently)
- Subtitle (optional): Use for clarity and additional keyword relevance
- Series information (optional): Series name and volume number if applicable
- Author name: Your real name or pen name
- Contributors (optional): Editors, illustrators, foreword authors
- Description: Up to 4,000 characters with basic HTML formatting allowed
- Publishing rights: Select “I own the copyright” for original work
- Keywords: Up to 7 keyword phrases (50 characters each)
- Categories: Up to 3 browse categories
Writing a Book Description That Sells
Your description is your sales page. Amazon allows basic HTML tags, which help you create visual hierarchy and make your description scannable.
You can use these HTML tags in your KDP book description.
- <b>text</b> for bold text
- <i>text</i> for italic text
- <br> for line breaks
- <h4>text</h4> for subheadings within the description
A high-converting description typically follows this structure: a 1 to 2 sentence hook that creates curiosity, 3 to 5 sentences about the book’s content or story, social proof or author credentials if relevant, and a brief call to action.
Choosing Your 7 Amazon Keywords
Amazon gives you seven keyword slots, each allowing up to 50 characters. These keywords help Amazon’s algorithm understand your book’s content and determine when to show it in search results.
Follow these best practices for maximum visibility.
- Use all 7 keyword slots without exception
- Enter keyword phrases rather than single words (e.g., “cozy mystery small town female detective”)
- Do not repeat words already in your title or subtitle (Amazon indexes those automatically)
- Include synonyms, alternate phrasings, and related terms readers search for
- Avoid subjective claims like “best,” “number one,” or “award-winning”
- Use tools like Publisher Rocket, or Helium10 to find high-volume, low-competition phrases
Selecting Your 3 Browse Categories
Amazon allows up to 3 browse categories during the publishing setup. Your category selections determine where your book appears in Amazon’s bestseller lists and category rankings.
Smart category selection can be the difference between obscurity and bestseller status.
- Research categories by examining where top-selling competitors in your genre are listed
- Choose specific subcategories over broad ones (e.g., “Science Fiction > Space Opera” rather than just “Science Fiction”)
- Look for subcategories with lower competition where even modest sales can earn a bestseller badge
- After publishing, request additional categories through Amazon Author Central (you can have up to 10 total)
Step 5: Upload Your Manuscript and Cover Files
The second section of the KDP setup is where you upload your files and configure format-specific settings. For ebooks, you will upload your manuscript and cover image. For print books, you will also select trim size, paper type, and bleed settings.
For Kindle Ebooks
Upload your manuscript file (EPUB or DOCX recommended) and your cover image (JPEG or TIFF). After uploading, use Amazon’s Online Previewer to check how your book renders across Kindle devices.
Review these elements in the previewer before proceeding.
- Table of contents links navigate correctly
- Chapter headings and page breaks display properly
- Images appear clearly at different screen sizes
- Bold, italic, and header formatting looks correct
- No unexpected blank pages or broken layouts
You will also choose whether to enable Digital Rights Management (DRM) for your ebook. DRM restricts unauthorized copying but cannot be changed after publishing. Most indie authors leave DRM off, but the decision depends on your preferences.
For Paperbacks and Hardcovers
Select your print options first, then upload files. Key settings include trim size, paper color (white or cream for black-and-white interiors), ink type (black and white, standard color, or premium color), and bleed settings.
The most popular trim sizes by book type are shown in the table below.
| Book Type | Recommended Trim Size | Notes |
| Fiction (novels) | 5″ x 8″ or 5.5″ x 8.5″ | Standard mass-market feel |
| Non-fiction (business, self-help) | 6″ x 9″ | Professional, easy to read |
| Children’s picture books | 8.5″ x 8.5″ or 8″ x 10″ | Room for full-page illustrations |
| Poetry collections | 5.5″ x 8.5″ | Traditional poetry format |
| Workbooks and journals | 8.5″ x 11″ | Full letter size for writing space |
| Memoirs and biographies | 5.5″ x 8.5″ or 6″ x 9″ | Standard non-fiction sizing |
After uploading your print files, always order a printed proof copy before approving your book for sale. A physical proof lets you check print quality, cover alignment, color accuracy, and overall feel. Digital previews are helpful but do not replace holding the actual book in your hands.
Step 6: Set Your Price and Choose Your Royalty Plan
The third section of the KDP publishing process is where you set your list price and select your royalty structure. Your pricing directly impacts earnings per sale, sales volume, and category ranking potential.
Kindle Ebook Royalty Plans
Amazon offers two royalty options for Kindle ebooks. Each plan has specific price range requirements and cost structures.
The table below compares the two plans side by side.
| Feature | 35% Royalty Plan | 70% Royalty Plan |
| Eligible price range | $0.99 to $200.00 | $2.99 to $9.99 |
| Delivery cost deduction | None | Yes (based on file size) |
| Available territories | All Amazon marketplaces | Select territories only |
| Pricing requirement | Must be at least 20% below physical list price | Must be at least 20% below physical list price |
The 70% plan is the clear choice for most authors. It requires pricing between $2.99 and $9.99 but delivers roughly double the per-sale royalty even after delivery costs are deducted.
Ebook Royalty Calculation Examples
Understanding exactly how much you earn per sale helps you set the right price. Amazon calculates 70% plan royalties using this formula: (List Price minus Delivery Cost) x 70%. The 35% plan uses a simpler formula: List Price x 35%.
Delivery costs under the 70% plan are based on your file size and vary by marketplace. For a typical text-based novel, the delivery cost usually falls between $0.01 and $0.20. Image-heavy books incur higher delivery costs.
The following table shows estimated royalties at common price points, assuming a typical text-based book with approximately $0.10 in delivery costs.
| List Price | Royalty Plan | Est. Delivery Fee | Your Royalty Per Sale |
| $0.99 | 35% | $0.00 | $0.35 |
| $1.99 | 35% | $0.00 | $0.70 |
| $2.99 | 70% | $0.10 | $2.02 |
| $3.99 | 70% | $0.10 | $2.72 |
| $4.99 | 70% | $0.10 | $3.42 |
| $6.99 | 70% | $0.10 | $4.82 |
| $9.99 | 70% | $0.10 | $6.92 |
| $12.99 | 35% | $0.00 | $4.55 |
| $14.99 | 35% | $0.00 | $5.25 |
Notice the sharp drop in royalties when pricing above $9.99. At $12.99, you earn only $4.55 per sale on the 35% plan, compared to $6.92 at $9.99 on the 70% plan. This pricing cliff is one of the most important dynamics to understand in KDP publishing.
Paperback Royalty Calculations
Paperback royalties follow a different formula: (List Price minus Printing Cost) x 60%. Amazon calculates printing cost using a fixed charge plus a per-page charge. Expanded distribution (sales through third-party bookstores and online retailers) pays 40% instead of 60%.
The printing cost formula for US marketplace black-and-white interiors is approximately $0.85 fixed charge + ($0.012 x page count).
The table below shows paperback royalty examples for a 6″ x 9″ black-and-white interior book at various page counts and prices.
| Page Count | Est. Printing Cost | List Price | Royalty (60%) | Expanded Dist. (40%) |
| 150 pages | $2.65 | $9.99 | $4.40 | $2.94 |
| 200 pages | $3.25 | $12.99 | $5.84 | $3.90 |
| 250 pages | $3.85 | $14.99 | $6.68 | $4.46 |
| 300 pages | $4.45 | $15.99 | $6.92 | $4.62 |
| 400 pages | $5.65 | $18.99 | $8.00 | $5.34 |
These printing costs are approximate. Amazon adjusts rates periodically, and costs differ by marketplace, ink type, and paper color. Always use Amazon’s KDP Printing Cost Calculator for exact figures before setting your price.
Hardcover Royalty Considerations
Hardcover printing costs are substantially higher than paperback costs. A typical 250-page hardcover with case laminate cover costs approximately $8 to $11 to print, depending on ink type and trim size. This means hardcover list prices usually need to start at $20 or higher to generate meaningful royalties.
Check Amazon’s current hardcover printing costs directly in your KDP dashboard, as these rates have been updated multiple times since the format launched.
Step 7: Click Publish and Go Live
After completing all three sections, review your book details one final time. Click “Publish Your Kindle eBook” (or the equivalent button for your format). Amazon will review your submission, and your book typically goes live within 24 to 72 hours.
Here is what to expect immediately after publishing.
- You will receive an email confirmation from KDP when your book is live
- Your book may not appear in all search results immediately (Amazon’s indexing can take a few days)
- Your Amazon product page will populate with your cover, description, and pricing
- Initial sales rank will be very high (meaning low visibility) until you start getting sales
- You can update your book files, description, or price at any time after publishing
KDP Select vs. Wide Distribution: Making the Right Choice
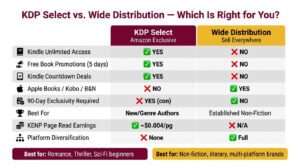
One of the biggest strategic decisions you will face is whether to enroll your ebook in KDP Select. This program offers significant benefits but requires 90-day exclusivity, meaning your ebook can only be sold on Amazon during the enrollment period.
The comparison below covers the main tradeoffs between KDP Select and wide distribution.
| Factor | KDP Select (Amazon Exclusive) | Wide Distribution (Multiple Platforms) |
| Exclusivity required | Yes (90-day auto-renewing terms) | No |
| Kindle Unlimited (KU) access | Yes (readers borrow your book; you earn per page read) | No |
| KENP payout rate | ~$0.004 to $0.005 per page read | N/A |
| Kindle Countdown Deals | Available | Not available |
| Free Book Promotions | Up to 5 days per 90-day period | Not available |
| Distribution reach | Amazon only | Amazon + Apple Books + Kobo + B&N + Google Play + more |
| Revenue potential | Higher on Amazon; zero elsewhere | Moderate across multiple platforms |
| Best for | Authors whose readers are primarily on Amazon | Authors with established presence on other platforms |
When KDP Select Makes Sense
KDP Select tends to work best for new authors, genre fiction writers (especially romance, thriller, and science fiction), and anyone whose target readers heavily use Kindle Unlimited. The KENP (Kindle Edition Normalized Pages) payout has historically averaged between $0.004 and $0.005 per page read. For a 300 KENPC book read cover to cover, that translates to roughly $1.20 to $1.50 per full read-through.
When Going Wide Makes Sense
Wide distribution is often the better long-term play for non-fiction authors, literary fiction writers, and anyone building a brand beyond Amazon. Platforms like Apple Books and Kobo have loyal reader bases and less competition than Amazon. However, building sales momentum on multiple platforms simultaneously requires more marketing effort.
Amazon Book Pricing Strategy
Pricing your book correctly can mean the difference between strong sales and crickets. Price too high and readers skip past you. Price too low and you leave significant money on the table.
The following genre-specific pricing benchmarks reflect what top-selling self-published authors typically charge in 2026.
| Genre | Ebook Price Range | Paperback Price Range | Notes |
| Romance | $2.99 to $4.99 | $12.99 to $15.99 | $0.99 effective for first-in-series |
| Thriller/Mystery | $2.99 to $5.99 | $13.99 to $16.99 | Higher prices accepted for established authors |
| Science Fiction/Fantasy | $3.99 to $6.99 | $14.99 to $18.99 | Longer books justify higher prices |
| Non-fiction (business, self-help) | $4.99 to $9.99 | $14.99 to $19.99 | Higher perceived value supports premium pricing |
| Memoir/Biography | $3.99 to $7.99 | $14.99 to $17.99 | Price similar to non-fiction |
| Children’s books | $2.99 to $4.99 | $9.99 to $14.99 | Print versions often outsell ebook |
| Poetry | $2.99 to $5.99 | $9.99 to $14.99 | Smaller audience; lower page count |
Three specific pricing tactics work particularly well on Amazon.
- $0.99 first-in-series: Price book one at $0.99 (accepting the 35% royalty) to pull readers into a series. Profit comes from full-price sequels.
- $4.99 sweet spot for fiction ebooks: This price balances conversion rate and royalty amount. You earn approximately $3.42 per sale.
- $9.99 ceiling for non-fiction ebooks: Maximizes the 70% royalty tier. Going above $9.99 often earns you less per sale due to the 35% rate.
How to Market Your Book on Amazon
Publishing is only half the equation. Without marketing, even a brilliant book will struggle to gain traction in a marketplace with over 13 million Kindle titles. Amazon offers built-in tools and advertising options that can drive discovery and sales.
Most new authors either skip Amazon Ads entirely or throw money at a single auto campaign without a plan. A structured campaign approach gives you cleaner data, better control over spend, and faster optimization. The framework below is what experienced indie authors use to launch and scale book advertising on Amazon in 2026.
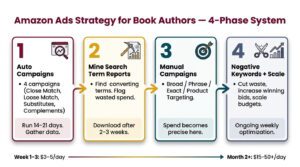
Phase 1: Start With Four Auto Campaigns
Auto campaigns let Amazon’s algorithm match your book to relevant searches and product pages. Instead of running one catch-all auto campaign, split your auto targeting into four separate campaigns, one for each match type Amazon offers within auto targeting.
Each campaign isolates a different targeting behavior, which makes your search term data far easier to analyze and optimize.
| Campaign | Auto Match Type | Purpose | Suggested Starting Bid |
|---|---|---|---|
| Auto – Close Match | Close match | Targets searches closely related to your book’s metadata | $0.25 to $0.35 |
| Auto – Loose Match | Loose match | Casts a wider net on loosely related searches | $0.15 to $0.25 |
| Auto – Substitutes | Substitutes | Shows your ad on product pages of similar books | $0.20 to $0.30 |
| Auto – Complements | Complements | Shows your ad on product pages of complementary books | $0.15 to $0.25 |
Keep bids intentionally low on loose match and complements because these match types tend to generate less relevant clicks. Close match and substitutes usually produce higher conversion rates and deserve slightly higher bids.
Set each campaign’s daily budget between $3 and $5 to start. Let all four campaigns run for 14 to 21 days before making significant changes. You need enough data (aim for at least 1,000 impressions per campaign) to draw meaningful conclusions.
Phase 2: Mine Your Search Term Reports
After two to three weeks of auto campaign data, download your Search Term Report from the Amazon Ads console. This report reveals the exact search queries and ASINs (competitor book pages) that triggered your ads and which ones actually converted into sales.
Follow this process when reviewing your search term data.
- Identify converting search terms with at least 1 to 2 sales and a reasonable ACoS (under 70% for most fiction authors)
- Flag high-spend, zero-sale terms that are burning budget without results
- Note converting ASINs (competitor product pages where your ad appeared and generated a sale)
- Look for patterns in search terms that reveal how readers actually describe books like yours
Phase 3: Build Manual Campaigns From Winning Data
Once you have identified your best-performing search terms, create manual keyword campaigns organized by match type. This is where your ad spend becomes precise and profitable.
The recommended manual campaign structure is outlined below.
| Campaign | Match Type | Keywords to Include | Bid Strategy |
|---|---|---|---|
| Manual – Broad | Broad match | 15 to 30 mid-performing search terms from your auto data | $0.20 to $0.35 (discovery-level bids) |
| Manual – Phrase | Phrase match | 15 to 30 mid-performing search terms from your auto data | $0.25 to $0.40 (moderate bids) |
| Manual – Exact | Exact match | Top 3 to 5 highest-converting keywords only | $0.35 to $0.75 (aggressive bids for proven winners) |
| Manual – Product Targeting | ASIN targeting | 10 to 20 competitor ASINs that converted in auto campaigns | $0.20 to $0.40 |
The logic behind this structure is straightforward. Broad and phrase campaigns continue finding new keyword opportunities at lower cost. Your exact match campaign concentrates budget on the keywords you already know convert. Product targeting puts your book directly on competitor pages that have proven to send you sales.
Phase 4: Negative Keywords and Ongoing Optimization
As data accumulates, add negative keywords aggressively. Any search term that has received 15 or more clicks without a sale should be added as a negative exact match in the campaign where it appeared. This stops budget leakage on irrelevant or non-converting terms.
Your weekly optimization routine should include these actions.
- Download the search term report every 7 to 10 days
- Move new converting search terms from auto/broad/phrase campaigns into your exact match campaign
- Add non-converting high-spend terms as negative keywords
- Increase bids by $0.05 to $0.10 on keywords with strong ACoS and sales volume
- Decrease bids or pause keywords with ACoS consistently above your break-even threshold
- Monitor total daily spend and adjust budgets based on performance
Understanding Your Break-Even ACoS
Your break-even ACoS is the maximum percentage of revenue you can spend on ads without losing money. Knowing this number prevents you from optimizing blindly.
The calculation is simple: Break-even ACoS = Royalty per sale / List price x 100.
The table below shows break-even ACoS at common ebook price points.
| List Price | Royalty (70% plan) | Break-Even ACoS |
|---|---|---|
| $2.99 | ~$2.02 | 67.6% |
| $3.99 | ~$2.72 | 68.2% |
| $4.99 | ~$3.42 | 68.5% |
| $6.99 | ~$4.82 | 68.9% |
| $9.99 | ~$6.92 | 69.3% |
If your ACoS is below your break-even number, you are profitable on that keyword. If you are writing a series, you can tolerate a higher ACoS (even above break-even) on book one because read-through revenue from subsequent books makes up the difference.
Budget Scaling Guidelines
Do not scale budget before you have profitable data. Once you have campaigns with consistent sales and ACoS below break-even, increase budgets gradually.
- Week 1 to 3: $3 to $5 per campaign per day (data gathering phase)
- Week 4 to 6: Increase budget on profitable campaigns to $5 to $15 per day
- Month 2 onward: Scale winning campaigns to $15 to $50+ per day while pausing or reducing spend on underperformers
- Series authors: Consider allocating 50% to 100% of book one royalties back into ads, knowing series read-through generates the real profit
This structured approach turns Amazon Ads from a money pit into a predictable, scalable sales engine. The key is patience during the data gathering phase and discipline during optimization.
Additional Marketing Strategies
Effective book marketing extends beyond Amazon’s own tools. Successful indie authors typically combine several approaches.
- Build an email list before and during launch (this is the single highest-ROI marketing asset for authors)
- Run price promotions using services like BookBub, Freebooksy, or BargainBooksy
- Optimize your book’s A+ Content (enhanced product page with images and formatted text, available through Author Central)
- Encourage reviews by including a polite request at the end of your book and using your email list
- Leverage social media strategically (focus on 1 to 2 platforms where your readers congregate)
- Pursue cross-promotion with other authors in your genre through newsletter swaps and anthology projects
Amazon’s AI-Generated Content Policy
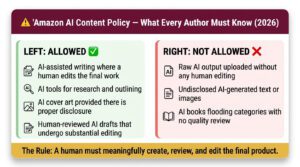
Amazon updated its content guidelines in September 2023 to address AI-generated material. As of 2026, these policies remain in effect and are actively enforced. Understanding the rules protects your account and your books.
Key points of Amazon’s AI content policy include the following.
- You must disclose whether your content (text or images) is AI-generated during the KDP publishing process
- AI-assisted content (where AI tools help but a human creates and substantially edits the work) is permitted
- Fully AI-generated content without meaningful human review or editing may be removed
- AI-generated cover images must be disclosed
- Amazon can remove listings and suspend accounts for policy violations
- You are ultimately responsible for the quality and originality of your content regardless of how it was produced
The practical takeaway is straightforward: you can use AI tools in your writing and design process, but a human must meaningfully create, review, and edit the final product. Simply prompting an AI to generate an entire book and uploading the raw output without substantial human involvement violates Amazon’s guidelines.
Realistic Income Expectations for Amazon Authors
Income from self-publishing varies enormously. Setting realistic expectations helps you make smart decisions about your publishing investment and timeline.
The table below provides income benchmarks based on multiple industry surveys and author earnings reports.
| Author Profile | Estimated Annual Income | Key Factors |
| First book, no marketing, no email list | $0 to $500 | Limited visibility; need marketing |
| 1 to 3 books, basic Amazon Ads | $500 to $5,000 | Ads and keywords drive initial traction |
| 3 to 5 books in a series, active marketing | $5,000 to $25,000 | Series read-through multiplies revenue |
| 5 to 10+ books, established audience, email list | $25,000 to $100,000 | Backlist and repeat readers drive consistency |
| Prolific author (10+ books), strong brand | $100,000+ | Multiple income streams; loyal audience |
According to the Alliance of Independent Authors, the median income for self-published authors who treat publishing as a business (rather than a hobby) and have 5 or more titles is significantly higher than often-cited averages. The key factors that separate profitable authors from struggling ones are consistent publishing cadence, series writing, email list building, and reinvesting in advertising.
Publishing Beyond KDP: Audiobooks and Other Formats
Once your ebook and print editions are live on Amazon, consider expanding into audiobooks. The audiobook market has grown consistently, and Amazon’s ACX (Audiobook Creation Exchange) platform connects you with narrators and producers.
Options for audiobook publishing include the following.
- ACX (Audible/Amazon/iTunes): The dominant audiobook platform; offers royalty share or pay-per-finished-hour narrator arrangements
- Findaway Voices (now part of Spotify): Wide audiobook distribution to multiple platforms
- AI narration through KDP: Amazon now offers AI-generated audiobook narration for select titles at no upfront cost (Virtual Voice beta program)
Audiobooks typically earn $3 to $10 per sale through ACX, depending on your distribution choice and whether you pay a narrator upfront or share royalties.
Frequently Asked Questions
Is it free to publish a book on Amazon?
Yes. Amazon KDP charges no upfront fees to publish an ebook, paperback, or hardcover. Amazon earns its revenue by taking a percentage of each sale through the royalty structure. The only costs you may incur are optional investments in editing, cover design, and marketing.
How much money can you make publishing a book on Amazon?
Earnings vary widely. A single book with no marketing may earn $0 to $500 per year. Authors with multiple books, an email list, and active advertising commonly earn $5,000 to $50,000+ annually. Top indie authors with large catalogs earn six and seven figures per year.
Do I need an ISBN to publish on Amazon?
No, for Kindle ebooks, Amazon assigns a free ASIN (Amazon Standard Identification Number) automatically. For paperbacks and hardcovers, Amazon provides a free ISBN, or you can supply your own. If you use Amazon’s free ISBN, the publisher of record will be listed as “Independently Published.”
How long does it take for a book to go live on Amazon?
Most books go live within 24 to 72 hours after you click publish. Some books may take longer if Amazon’s review team flags content for additional checks. Print books occasionally take up to 5 business days.
Does Amazon own my book rights if I publish through KDP?
No. You retain full rights to your work. Amazon holds a non-exclusive license to distribute your book while it is listed on their platform. You can unpublish your book at any time and publish it elsewhere. KDP Select does require 90-day ebook exclusivity on Amazon, but your rights remain yours.
How does Amazon pay authors?
Amazon pays KDP royalties approximately 60 days after the end of the month in which the sale occurs. For example, royalties earned in January are paid around the end of March. Payment methods include direct deposit (EFT), wire transfer, or check, depending on your marketplace and settings. The minimum payout threshold is $10 for EFT in the US.
Can I sell my book on other platforms if I publish on Amazon?
Yes, unless you enroll in KDP Select. Without KDP Select, you are free to sell your ebook on Apple Books, Kobo, Barnes & Noble, Google Play, and any other platform simultaneously. KDP Select requires 90-day exclusivity for your ebook (print editions are not affected and can be sold anywhere).
Do I need to copyright my book before publishing on Amazon?
Your work is automatically protected by copyright the moment you create it. However, registering your copyright with the U.S. Copyright Office (or your country’s equivalent) provides additional legal protections and costs $45 to $65 in the US. Registration is optional but recommended.
Can I publish a book on Amazon from outside the United States?
Yes. Amazon KDP is available to authors in most countries worldwide. International authors complete a W-8BEN tax form during account setup and can receive royalty payments via electronic fund transfer to a local bank account in many countries.